
|
INFO: 72 - 79 Gauge Clusters and Wiring |
Post Reply 
|
Page <12345 9> |
| Author | ||
Robbdtme 
Senior Member 

Joined: 06-June-2012 Location: Central WI Status: Offline Points: 765 |
 Post Options Post Options
") Thanks(0) Thanks(0)
 Quote Reply Quote Reply
 Posted: 12-July-2012 at 11:15AM Posted: 12-July-2012 at 11:15AM |
|
|
Just need to do a little rewiring as 75 to77 has a few differences. The wiring connector pinouts are posted here look at the 75-76 for wires and the 77-79 for dash connections. Can then cut and splice a few wires to get it correctly working. I did that in the past for a 75 dash in a 72.
|
||
 |
||
|
Robbdtme
Senior Member
Joined: 06-June-2012 Location: Central WI Status: Offline Points: 765 |
Post Options
Thanks(0)
Quote Reply
Posted: 12-July-2012 at 11:17AM |
|
|
I can also help you make a ammeter setup for it. Pretty easy to get it working correctly with a few wires.
|
||
|
||
|
Srandaz2
Member 

Joined: 11-July-2011 Location: Michigan Status: Offline Points: 139 |
Post Options
Thanks(0)
Quote Reply
Posted: 12-July-2012 at 11:24AM |
|
|
Guess that's where I am a little concerned - forgive my ignorance but my 75 is unmolested and although I don't mind doing this I don't want to hack it all too he** and back. So my question is - do I cut my 75 harness and match the wire colors to the 77? Is there anything I have to do on the engine side? Or is this all at the clip and the circut board. Also if you can help Witt the ammeter that would be great I always have an issue doing those
|
||
|
Steve
|
||
|
||
|
Srandaz2
Member
Joined: 11-July-2011 Location: Michigan Status: Offline Points: 139 |
Post Options
Thanks(0)
Quote Reply
Posted: 12-July-2012 at 12:34PM |
|
|
Ok I am really confused now I took my dash cluster out and followed the wire comparison on the 75 / 77 illustrations all of my wires on my harness match those of 77-79 except for pin #12 I only have a gray wire with yellow stripe. The other weird thing is I tested the cluster all the lights work - turn signals work - high beam work -hell if the key buzzer works now...lol. The only problem I am having is the temp and fuel.......any suggestions?
|
||
|
Steve
|
||
|
||
|
Robbdtme
Senior Member
Joined: 06-June-2012 Location: Central WI Status: Offline Points: 765 |
Post Options
Thanks(0)
Quote Reply
Posted: 12-July-2012 at 12:40PM |
|
|
You only need to cut a few wires so it really is not a butcher job once finished. Also I think a member here had a 76 dash for 65 bucks posted awhile back.
I never tried it but let me look at the wiring closer another possibility may be to take the dash apart and move a few gauges around to correct it. I will look into that. If you look at the pics of these you will notice the gauge positions are different from 76 and earlier and 77 later. Did you start the motor? Otherwise the one that went to max reading would be your oil pressure. It went to max because the oil light would have been lit. The oil sender will need to be changed once the wiring i done or good pressure reads 0 and bad no pressure will read 90. Temp sender is the same and will be fine. |
||
|
||
|
Srandaz2
Member
Joined: 11-July-2011 Location: Michigan Status: Offline Points: 139 |
Post Options
Thanks(0)
Quote Reply
Posted: 12-July-2012 at 12:52PM |
|
|
Yep started the engine all seem to be working fine except fuel and temp - i just tested the tach 3 wire + - and negative coil...works great I am thinking maybe gas and temp need swapped if I can figure out the wires I would just swap them it's easier
|
||
|
Steve
|
||
|
||
|
Zebra 3
Senior Member

Joined: 11-February-2012 Location: Topeka, Ks. Status: Offline Points: 392 |
Post Options
Thanks(0)
Quote Reply
Posted: 12-July-2012 at 1:04PM |
|
|
DO NOT GO CUTTING WIRES.....THERE IS A BETTER WAY!!!
I am getting ready to post a "how to" reference retro fitting the printed circuit board. The how to will cover the stock to sports cluster conversion for the '74-'75 and some '76 instrument clusters AND a how to make your own circuit board if your original is junk... Before you do ANYTHING else CAFE FULLY remove the Printed Circuit Board OR position it so that you can trace the circuits....the PCB is like a road map...if you know what number on the wiring terminal block goes to what(turn signals,dash lights, ground, gauges etc., etc.) then that number should go to what ever light or gauge in the cluster....such as the problem with the fuel and temp having wrong readings ( assuming the PCB is in tact and proper connects for the temp. and fuel gauges) If you need to move/switch a wire...with out cutting...here is how it is done.
Here are some pictures from the up coming "how to" that should be of some help.
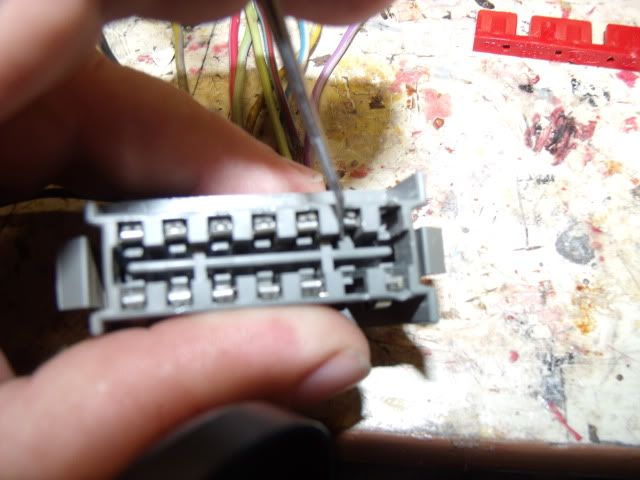
This is the wiring terminal block that plugs into the printed circuit board (PCB) ...note the Red piece in the center portion of the terminal block. Using a small tool, such a small knife blade or pick (pictured) gently pry the Red piece from the terminal block. Once the piece is removed use the same tool to push down on the small plastic piece that holds the metal pin in the terminal block...pull gently on the wire until the wire and pin are free of the wire terminal block. Once the wires have been switched, gently push the wire back into the terminal block until it catches/stops. Gently push the Red piece back into position.
Edited by Zebra 3 - 09-October-2013 at 2:08PM |
||
|
"I deeply admire the men who founded this country, and I think we ought to know more about them and how they lived and the force and courage they had.
Henry Ford. 1926 Brian Conn '76 Torino |
||
|
||
|
Srandaz2
Member
Joined: 11-July-2011 Location: Michigan Status: Offline Points: 139 |
Post Options
Thanks(0)
Quote Reply
Posted: 12-July-2012 at 1:18PM |
|
|
Excellent idea - actually my 75 cluster is in mint condition so I can put the two side to side and see which way the road is going it appears on 75 pin #2 is for the temp gauge the other goes the ground on the circut board the fuel looks like is goes to pin #9 with the other going to ground
|
||
|
Steve
|
||
|
||
|
Zebra 3
Senior Member
Joined: 11-February-2012 Location: Topeka, Ks. Status: Offline Points: 392 |
Post Options
Thanks(0)
Quote Reply
Posted: 12-July-2012 at 2:06PM |
|
|
....Keep in mind that the fuel, oil, and temp. gauges share a common positive(+)
circuit going to the output side (positive) of the instrument cluster voltage
regulator....the little box piece with the PCB folded over the top of it and
snapped in place. The three individual circuits(- ground) coming from the three
gauges go to three different positions on the terminal block respectfully.
|
||
|
"I deeply admire the men who founded this country, and I think we ought to know more about them and how they lived and the force and courage they had.
Henry Ford. 1926 Brian Conn '76 Torino |
||
|
||
|
Srandaz2
Member
Joined: 11-July-2011 Location: Michigan Status: Offline Points: 139 |
Post Options
Thanks(0)
Quote Reply
Posted: 12-July-2012 at 2:10PM |
|
|
Ok I will have to wait for your retro fit - so far I pulled pin#12 and that seems to be the temp gauge wire on the diagram posted it shows 12 is a ground mine seems to be hot....in any case I will sleep on this and hope to see something posted in the am
|
||
|
Steve
|
||
|
||
|
Zebra 3
Senior Member
Joined: 11-February-2012 Location: Topeka, Ks. Status: Offline Points: 392 |
Post Options
Thanks(0)
Quote Reply
Posted: 12-July-2012 at 2:16PM |
|
|
.....I will start posting the "How To" this up coming weekend (7-14, 7-15).....finishing up the "trial & error" testing as we speak...so far so good
|
||
|
"I deeply admire the men who founded this country, and I think we ought to know more about them and how they lived and the force and courage they had.
Henry Ford. 1926 Brian Conn '76 Torino |
||
|
||
|
Zebra 3
Senior Member
Joined: 11-February-2012 Location: Topeka, Ks. Status: Offline Points: 392 |
Post Options
Thanks(0)
Quote Reply
Posted: 12-July-2012 at 2:34PM |
|
sounds like your 75 cluster is the Sport cluster....dont get it confused with the standard cluster...they have different curcuitry. Just F.Y.I: #2 pin goes to the ground (-) side of the temp. gauge #9 pin goes to the ground (-) side of the fuel gauge
#12 pin goes to the positive (+) side of the parking brake light socket (sport cluster only...standard cluster and/or base Torino has no parking brake light switch/curcuitry)
Edited by Zebra 3 - 12-July-2012 at 2:39PM |
||
|
"I deeply admire the men who founded this country, and I think we ought to know more about them and how they lived and the force and courage they had.
Henry Ford. 1926 Brian Conn '76 Torino |
||
|
||
|
Srandaz2
Member
Joined: 11-July-2011 Location: Michigan Status: Offline Points: 139 |
Post Options
Thanks(0)
Quote Reply
Posted: 12-July-2012 at 2:44PM |
|
|
That's what I posted earlier if I went off the diagram for the 77 wiring harnes as is posted the one in my car is exactly the same except for one pin - when I plug this 77 sport dsh in everything works except for gas and temp.....I know this is a is,ple fix.... Xjust have to find the two wires too swap
|
||
|
Steve
|
||
|
||
|
Zebra 3
Senior Member
Joined: 11-February-2012 Location: Topeka, Ks. Status: Offline Points: 392 |
Post Options
Thanks(0)
Quote Reply
Posted: 12-July-2012 at 4:20PM |
|
|
O.K I am with you now
On the '76 terminal block the fallowing wires/pins will need to be moved/switched to work w/ your '77 cluster:
#1 on the terminal block moves to #14 (should be the positive side (+) of the brake [pressure] light socket) #2 moves to #13 (should be the positive side (+) of the fasten belt light socket) #'s 3 thru 9 stay in their positions
#10 on the terminal block moves to #11 (should be for the alternator.....pins 10 & 11 on the '76 are #11 move to #12 part of the curcuit "loop".... on your '77 it's pins 11& 12)
#12 move to # 2 (should be ground (-) side for the temp. gauge) #13 move to #10 (should be ground (-) side for the oil pressure gauge) #14 move to#1 (should be ground (-) side for brake [pressure],parking brake and fasten belt light socket)
|
||
|
"I deeply admire the men who founded this country, and I think we ought to know more about them and how they lived and the force and courage they had.
Henry Ford. 1926 Brian Conn '76 Torino |
||
|
||
|
Srandaz2
Member
Joined: 11-July-2011 Location: Michigan Status: Offline Points: 139 |
Post Options
Thanks(0)
Quote Reply
Posted: 12-July-2012 at 4:29PM |
|
|
Thats what i was looking for - Only thing is I Currently have a 1975 G-Torino Cluster and trying to put in a 1977 - Based on what you are showing me below - I am assuming it doesnt matter (75 or 76) I just need to match the wires as indicated in Pauls Post.
|
||
|
Steve
|
||
|
||
|
Zebra 3
Senior Member
Joined: 11-February-2012 Location: Topeka, Ks. Status: Offline Points: 392 |
Post Options
Thanks(0)
Quote Reply
Posted: 13-July-2012 at 1:00AM |
|
If you have a Sport cluster, disregard the alternator reference since you have an Ampmeter....the alternator reference is for the standard cluster. Also the #13 move to #10 is NOT oil pressure. The information should read as follows: #10 on the terminal block moves to # 11 (should be the ground (-) for the oil pressure gauge) #11 moves to #12 ( you will have to tell us what that is on the '77...on the '76 it goes no where) #13 move to #10 (should be positive side (+) seat belt light socket
Edited by Zebra 3 - 13-July-2012 at 1:05AM |
||
|
"I deeply admire the men who founded this country, and I think we ought to know more about them and how they lived and the force and courage they had.
Henry Ford. 1926 Brian Conn '76 Torino |
||
|
||
|
Srandaz2
Member
Joined: 11-July-2011 Location: Michigan Status: Offline Points: 139 |
Post Options
Thanks(0)
Quote Reply
Posted: 13-July-2012 at 4:00AM |
|
|
So So close - ok so far I rewired my terminal block to match the 77 cluster - everything is working lights, signal lists high beam temp gauge, however as soon as I plug the fuel wire into the pin the temp gauge goes past normal and the gas gauge goes beyond full. now if I unplug the temp gauge the fuel gauge works fine, and vice versa, when I try these together it goes too sh%%%% - what am I missing.........
|
||
|
Steve
|
||
|
||
|
Zebra 3
Senior Member
Joined: 11-February-2012 Location: Topeka, Ks. Status: Offline Points: 392 |
Post Options
Thanks(0)
Quote Reply
Posted: 13-July-2012 at 1:29PM |
|
|
I humbly apologize for any and all confusion.....the inability to self edit
and delete post after a few minutes has me pissed off Part of the confusion on my part is that I don't have a '77-'79 PCB...I am
relying on the information that Paul (Psquare75) has posted, plus what
information is provided in the post. I admit, I made a mistake with some of my
notes that I had taken and tried to transcribe to the forum...I am dealing with
a standard to Sport cluster conversion and retrofit here with my own Torino and
my note taking abilities leaves some to be desired.
I have proofread the following information to the point that I can almost recite it verbatim. To the best of my knowledge it is correct according to what information has been provided in these forums and what I have been able to find elsewhere.(manuals,other sites, etc.etc.) This is a '76 plug in terminal block to '77 Printed Circuit Board conversion. The numbers on the far Left correspond with the numbers on the '76 plug in terminal block. To the Right of the numbers is the wire colors. To the Right of the wire colors is to what light(s) or gauge the circuit goes to (according to the '74-'75 and some '76 PCB that I have). To the Right of that is the conversion information.
#1 Red w/ Yellow hash positive (+) Brake [pressure] light socket move '76 #1 to '77 #14 #2 Light Green ground (-) Temperature gauge move '76 #2 to '77 #13 #3 Light Blue w/ Red Stripe (+) positive dash light sockets don't move #4 Black ground (-) dash ,turn signal, fasten belt and high beam light sockets don't move #5 White w/Light Blue strips (+) positive Right turn signal light socket don't move #6 Light Green w/ White stripe (+) positive Left turn signal light socket don't move #7 Light Green w/ Black Stripe (+) positive high beam light socket don't move #8 Black w/ light Green hash (+) positive input instrument cluster voltage regulator don't move #9 Yellow w/ White stripe ground (-) fuel gauge don't move #10 Light Green w/ Red stripe (-) ground oil pressure move '76 #10 to '77 #11 #11 Gray w/ Yellow stripe No circuit on the '76 PCB unknown information ref: '77-'79 PCB move '76 #11 to '77 #12 #12 Red w/ White stripe circuit w/ break on the '76 PCB unknown information ref: '77-'79 PCB move '76#12 to '77 #2 #13 White w/ Red stripe (+) positive fasten belt light socket move '76 # 13 to '77 #10 #14 Purple w/ White stripe ground (-) brake (pressure),parking brake and fasten belt light sockets move '76 # 14 to "77 #1
|
||
|
"I deeply admire the men who founded this country, and I think we ought to know more about them and how they lived and the force and courage they had.
Henry Ford. 1926 Brian Conn '76 Torino |
||
|
||
|
Srandaz2
Member
Joined: 11-July-2011 Location: Michigan Status: Offline Points: 139 |
Post Options
Thanks(0)
Quote Reply
Posted: 13-July-2012 at 1:47PM |
|
|
I appreciate everything posted - But i took defeat this morning and put my standard cluster back in - I also noticed that the the PCB has some cuts / breaks in the roadways - (Guess I should have examined it alot better before buying it) So i dont know if this is fixable or i should just sell it as a donor - Beleive Me I am 100% sure all the gauges work - so i am almost sure someone could use it. Unless it can be fixed but who knows
|
||
|
Steve
|
||
|
||
|
Zebra 3
Senior Member
Joined: 11-February-2012 Location: Topeka, Ks. Status: Offline Points: 392 |
Post Options
Thanks(0)
Quote Reply
Posted: 13-July-2012 at 2:21PM |
|
|
YES!!! it is fixable to better than original standards!!! The "how to" that I am putting together will show how hard wire your own board....In my honest opinion a much better way than the flimsy,weak PCB that Ford-Lincoln-Mercury used for almost 20 years!
|
||
|
"I deeply admire the men who founded this country, and I think we ought to know more about them and how they lived and the force and courage they had.
Henry Ford. 1926 Brian Conn '76 Torino |
||
|
||
|
Srandaz2
Member
Joined: 11-July-2011 Location: Michigan Status: Offline Points: 139 |
Post Options
Thanks(0)
Quote Reply
Posted: 13-July-2012 at 2:33PM |
|
|
Then I will patiently wait for the post - thanks again - Do you have a S&H Torino? Just curious? |
||
|
Steve
|
||
|
||
|
Rockatansky
Senior Member
Joined: 30-July-2010 Location: On The Road Status: Offline Points: 6072 |
Post Options
Thanks(0)
Quote Reply
Posted: 14-July-2012 at 10:59AM |
|
|
i think i'll end up doing a 'point to point wiring job on whatever i decide to use for a dash display, mine came with the base cluster, i have maybe a couple GT clusters but will probably do something custom. here's an example of 'point to point' in a guitar amp, no PCB's here but they did get through warranty & then some
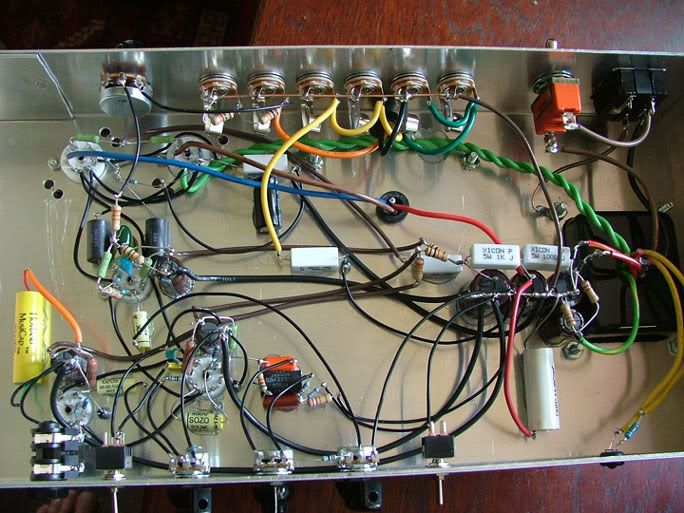 Edited by Rockatansky - 14-July-2012 at 11:00AM |
||
|
72 GT Ute
|
||
|
||
|
philou
New Member 

Joined: 14-November-2012 Location: france Status: Offline Points: 7 |
Post Options
Thanks(0)
Quote Reply
Posted: 14-November-2012 at 10:50AM |
|
|
hi all
i'm french and own a 78 ford ranchero.the instrument cluster is the same than torino.my pcb is burned,and i have to put another fuel level gauge(autometer 73 ohms to 10 ohms)i'ld like to know which wires to remove from the pcb 14 pins connector for the new fuel level gauge.thanks in advance
|
||
|
tomorrow is another day
|
||
|
||
|
philou
New Member
Joined: 14-November-2012 Location: france Status: Offline Points: 7 |
Post Options
Thanks(0)
Quote Reply
Posted: 14-November-2012 at 8:30PM |
|
|
nobody can help me?i think to make a custom instrument cluster without pcb,only wires with autometer gauges.i have to learn which wires fit on which gauge.for the turn signals,it is not a problem,i have a controler,but for the other i'm lost.last question,with autometer gauges,do i need the voltage regulator?thanks
|
||
|
tomorrow is another day
|
||
|
||
|
Rockatansky
Senior Member
Joined: 30-July-2010 Location: On The Road Status: Offline Points: 6072 |
Post Options
Thanks(0)
Quote Reply
Posted: 15-November-2012 at 10:11AM |
|
|
if you are going to use Autometer mechanical gauges then you would not need the factory Instrument Cluster Voltage Regulator (ICVR)
what about the fuel level gauge ? Edited by Rockatansky - 15-November-2012 at 10:12AM |
||
|
72 GT Ute
|
||
|
||
|
philou
New Member
Joined: 14-November-2012 Location: france Status: Offline Points: 7 |
Post Options
Thanks(0)
Quote Reply
Posted: 15-November-2012 at 11:17AM |
|
|
||
|
tomorrow is another day
|
||
|
||
|
philou
New Member
Joined: 14-November-2012 Location: france Status: Offline Points: 7 |
Post Options
Thanks(0)
Quote Reply
Posted: 16-November-2012 at 12:19AM |
|
|
good news,i have an old instrument cluster removed from a 75 ranchero,i've changed my voltage regulator with the one on the old cluster,and now my fuel level gauge works great.i'm glad,i was right,my volt regul was destroyed and there were too much voltage on my fuel gauge.thanks again for your great help |
||
|
tomorrow is another day
|
||
|
||
|
JoeKarasinski
Member
Joined: 18-March-2013 Location: Redford, MI. US Status: Offline Points: 120 |
Post Options
Thanks(0)
Quote Reply
Posted: 31-March-2013 at 2:54AM |
|
junction block, Do you mean some thing like this?  And from this picture you show a yellow "original wiring" coming from the junction block. I'm really not getting this.
|
||
|
||
|
Psquare75
Admin Group 
Member of the Stroker Club Joined: 26-November-2005 Location: United States Status: Offline Points: 4591 |
Post Options
Thanks(0)
Quote Reply
Posted: 31-March-2013 at 5:56PM |
|
|
Yes, something like that.
And you should have a yellow wire somewhere.. I think it powers the entire car. |
||
|
Paul
77 XR7 460/C6/3.00:1 *SOLD* 78 XR7 523/C6/3.5:1 79 F100 460/TKO500/3.25:1 'I also have some left over potatoes-I understand you can generate electricity from them'- Foote500 |
||
|
||
|
JoeKarasinski
Member
Joined: 18-March-2013 Location: Redford, MI. US Status: Offline Points: 120 |
Post Options
Thanks(0)
Quote Reply
Posted: 01-April-2013 at 1:41AM |
|
|
OK, so this yellow wire would be connected to the battery side of the selinoid now and I need to move it to the junction block to make this all work?
Thank you!
|
||
|
||
|
Post Reply
|
Page <12345 9> |
| Tweet |
| Forum Jump | Forum Permissions You cannot post new topics in this forum You cannot reply to topics in this forum You cannot delete your posts in this forum You cannot edit your posts in this forum You cannot create polls in this forum You cannot vote in polls in this forum |


 Topic Options
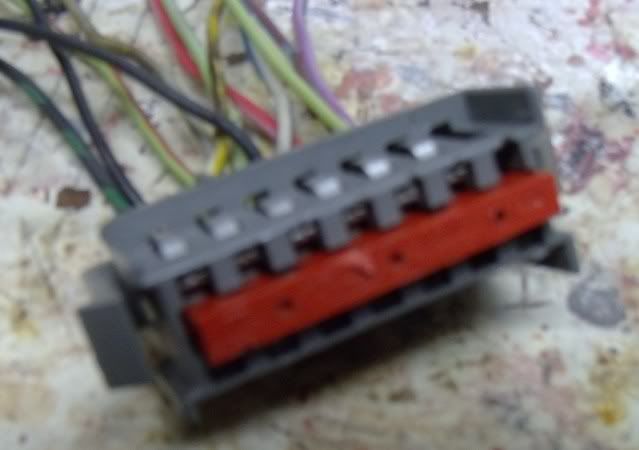
 Srandaz2 wrote: