
|
1976 S&H LE Gran Torino |
Post Reply 
|
Page 12> |
| Author | |
Paul W 
New Member 

Joined: 26-October-2011 Location: Massachusetts Status: Offline Points: 37 |
 Post Options Post Options
") Thanks(0) Thanks(0)
 Quote Reply Quote Reply
 Topic: 1976 S&H LE Gran Torino Topic: 1976 S&H LE Gran TorinoPosted: 14-November-2011 at 7:48AM |
|
So...this thursday we are finally going to start the project of restoring it. The first thing we are going to accomplish is cleaning it out. While we are cleaning i am going to be looking for the original build sheet. I am hoping to find out that it is a true Startsky and Hutch edition. After that, we are going to figure out if the motor works. It only has 42k miles on it, but has been sitting not running for 20+ years. We are going to start with the mystery oil down the spark plug holes, and replacing the plugs and wires. Any suggestions besides that?
Edited by 72 GTS 429 - 18-November-2011 at 9:07AM |
|
 |
|
|
Psquare75
Admin Group 
Member of the Stroker Club Joined: 26-November-2005 Location: United States Status: Offline Points: 4591 |
Post Options
Thanks(0)
Quote Reply
Posted: 14-November-2011 at 8:05AM |
|
change the oil and filter.
Pull the distributor and prime the oil pump. (making sure to keep in mind the location of the rotor and distributor). I wouldn't even bother with the fuel tank.. run a hose to a 5 gallon catch can from the inlet on the fuel pump, and run it that way.
Edited by Psquare75 - 14-November-2011 at 8:05AM |
|
|
Paul
77 XR7 460/C6/3.00:1 *SOLD* 78 XR7 523/C6/3.5:1 79 F100 460/TKO500/3.25:1 'I also have some left over potatoes-I understand you can generate electricity from them'- Foote500 |
|
|
|
|
Guests
Guest 
|
Post Options
Thanks(0)
Quote Reply
Posted: 14-November-2011 at 10:12AM |
|
look under the back seat for the build sheet
as Paul said ,disconnect the fuel hose from the fuel pump leading to the fuel tank,then get yourself about 18 inches of fuel hose and attach the one end onto the fuel pump and then take a small 1.5 -2 gal gas can with fuel and shove the end of the fuel hose in the gas can and try starting it off that as it will make sure that you are getting good clean fresh gas with no rust particles to clog the fuel filter on the carb. I would replace the fuel filter on the carb with a new one before starting as who knows if the old one is clogged.Valve seals may be toast from sitting that long but won't effect it from starting but they may need repalacing later after you find out if the engine still runs or not |
|
|
|
|
Ranchero Fan
Senior Member 

Joined: 03-March-2011 Location: Chicago area Status: Offline Points: 1022 |
Post Options
Thanks(0)
Quote Reply
Posted: 14-November-2011 at 1:47PM |
|
|
|
Brian 1973 Ford Ranchero Big Block. ''THE OTHER WOMAN''
|
|
|
|
|
Paul W
New Member
Joined: 26-October-2011 Location: Massachusetts Status: Offline Points: 37 |
Post Options
Thanks(0)
Quote Reply
Posted: 17-November-2011 at 11:57AM |
|
I will be putting the marvel in the plug holes when i get to that point. today i found the build sheet, whats left of it. and i changed out the rims and tires to something that hold air.
|
|
|
|
|
Paul W
New Member
Joined: 26-October-2011 Location: Massachusetts Status: Offline Points: 37 |
Post Options
Thanks(0)
Quote Reply
Posted: 17-November-2011 at 11:58AM |
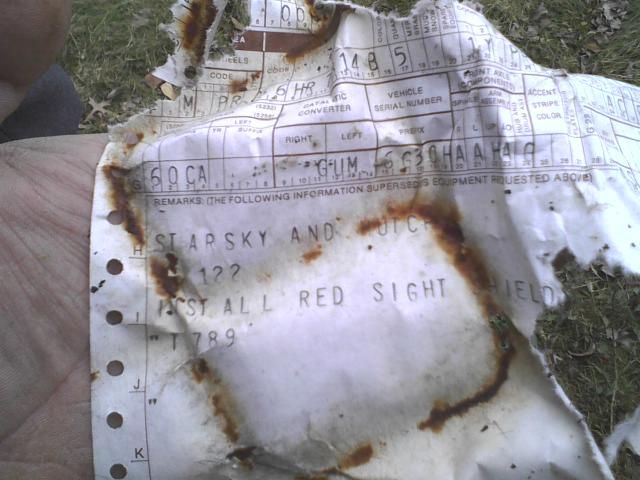 This is what i found today for whats left of the build sheet. This is what i found today for whats left of the build sheet.
|
|
|
|
|
picon3
Senior Member
Joined: 20-February-2007 Location: North Carolina Status: Offline Points: 2097 |
Post Options
Thanks(0)
Quote Reply
Posted: 17-November-2011 at 12:52PM |
|
Often there is/are more than one build sheet. Keep looking. BTW, that's great you at least found a partial one with all of the goodies listed on the bottom. Paul~
|
|
|
1972 GTS 351CJ-4V black/black
|
|
|
|
|
Paul W
New Member
Joined: 26-October-2011 Location: Massachusetts Status: Offline Points: 37 |
Post Options
Thanks(0)
Quote Reply
Posted: 17-November-2011 at 1:10PM |
|
do you know where the normal spots are i should look for another one?
|
|
|
|
|
interceptor460
Senior Member
Joined: 24-February-2009 Location: montreal Status: Offline Points: 409 |
Post Options
Thanks(0)
Quote Reply
Posted: 17-November-2011 at 9:55PM |
|
Two ohter places I found build sheets were in the trunk under the mat near the spare and under the front seat. It is not for certain in your car ,but its worth a look. Place what you got of the build sheet in sheet protector. If it been seating out doors the gas pump will have dried up and not work ,so to the carb. I hope it still turns freely.
|
|
|
|
|
Guests
Guest
|
Post Options
Thanks(0)
Quote Reply
Posted: 18-November-2011 at 9:06AM |
|
I have heard some say they found build sheet inside the front seat the upholstry like under the seat back are of the front seat.not that you want to start removing the seat cover just to find if one is there as if the seat is not ripped you don't want to take a chance just to see if one exists there
how about posting a few photos in this thread of the StarsKy & Hutch car as all the photos are in your welcome thread. I'm also gonna change the name of this thread now you now it is actually and S&H limited edition |
|
|
|
|
unlovedford
Senior Member

Joined: 17-December-2010 Location: Tennessee Status: Offline Points: 10142 |
Post Options
Thanks(0)
Quote Reply
Posted: 19-November-2011 at 11:12AM |
|
My '72 GTS had a build sheet in the front upper seatback under the springs. Would have never found it if we had not torn the cover when scrapping it.
|
|
|
Joe
1972 Mom's Squire Wagon 1972 Torino Wagon 1976 Torino 1968 Cougar XR7-First batch 1972 Torino 460 1989 BroncoII/Jeeps/Titanimous Popeye and Brutus (Rams) |
|
|
|
|
Paul W
New Member
Joined: 26-October-2011 Location: Massachusetts Status: Offline Points: 37 |
Post Options
Thanks(0)
Quote Reply
Posted: 07-December-2011 at 4:33PM |
|
Sorry i havent updated in a while. but here is what has happened. We aquired a matching set of rims that were on a 72 mach1 with tires for $100. Last weekend we installed them and this is what they look like. The same day i also tried to remove the spark plugs to see how bad they are. But they didn't move at all. A bunch of people told me different ideas on how to remove them, but we went with using PB Blaster on them to try and lossen them. This saturday, 12-10-11, i will be trying to remove them again. I will update again then.
The first picture is of the new rims. look how wide the back ones look!! The second one is what the from seat looked like the day we decided to move it. 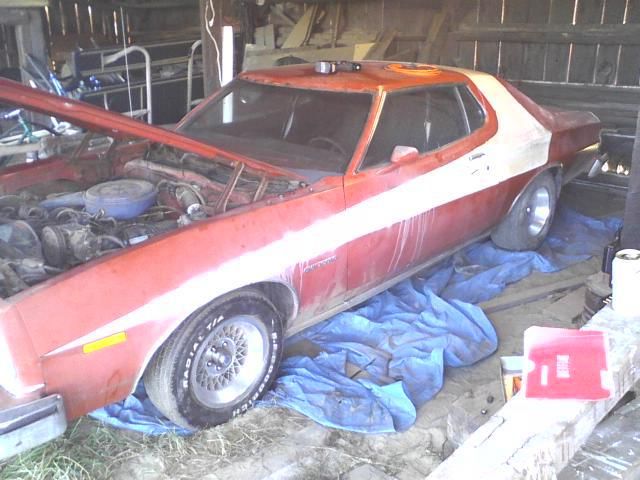  |
|
|
|
|
TV 2M8O
Senior Member
Joined: 20-September-2006 Location: Southern Ohio Status: Offline Points: 2052 |
Post Options
Thanks(0)
Quote Reply
Posted: 08-December-2011 at 9:57PM |
|
Paul, First, welcome to the forum and congrats on a great find! I had one of the factory S&H LE back in the day and had her for years until one day I had a brain fart and sold her... she hadn't moved three feet when I realized I had made a BIG mistake, so I'm currently building a new one!! Anyway, look forward to watching your progress.
I agree with John's (75GranMan) comment on you "Hurting 1976 Torino" topic that the engine has been replaced because none of the other AC parts are present in your engine bay... dehydrator, refrigerant lines nor the condensor box on the firewall. Does the heater control mention Air Conditioning? Both my cars have been AC cars so I'm not 100% sure what the heater control panel would say on a non-AC car. Losing the York compressor and associated bracketry will save you a BUNCH-O-WEIGHT!! Does the engine decal say 1976 model year?
Again GOOD LUCK on your build... I'll be watching!
|
|
 TV 2M8O OUT JOE 1976 Gran Torino S&H season 2-4 Clone Project Blog: http://tv2m8o.blogspot.com/ |
|
|
|
|
Paul W
New Member
Joined: 26-October-2011 Location: Massachusetts Status: Offline Points: 37 |
Post Options
Thanks(0)
Quote Reply
Posted: 09-December-2011 at 1:08AM |
|
Where is the decal i should look for? it this what i should get a better picture of?
 |
|
|
|
|
TV 2M8O
Senior Member
Joined: 20-September-2006 Location: Southern Ohio Status: Offline Points: 2052 |
Post Options
Thanks(0)
Quote Reply
Posted: 09-December-2011 at 1:59AM |
|
Paul, Yup, that's the decal. In the lower left corner it should specify the year of the engine. Was going to attach a reference pic but can't get it to upload....
Hope this helps!
|
|
|
TV 2M8O OUT JOE 1976 Gran Torino S&H season 2-4 Clone Project Blog: http://tv2m8o.blogspot.com/ |
|
|
|
|
Paul W
New Member
Joined: 26-October-2011 Location: Massachusetts Status: Offline Points: 37 |
Post Options
Thanks(0)
Quote Reply
Posted: 09-December-2011 at 7:03AM |
|
We framed the build sheet. Here is what it looks like.
 |
|
|
|
|
Psquare75
Admin Group
Member of the Stroker Club Joined: 26-November-2005 Location: United States Status: Offline Points: 4591 |
Post Options
Thanks(0)
Quote Reply
Posted: 09-December-2011 at 7:36AM |
 |
|
|
Paul
77 XR7 460/C6/3.00:1 *SOLD* 78 XR7 523/C6/3.5:1 79 F100 460/TKO500/3.25:1 'I also have some left over potatoes-I understand you can generate electricity from them'- Foote500 |
|
|
|
|
Paul W
New Member
Joined: 26-October-2011 Location: Massachusetts Status: Offline Points: 37 |
Post Options
Thanks(0)
Quote Reply
Posted: 09-December-2011 at 7:49AM |
|
I dont remember what is in there, but i will bring my camera with me tomorrow and take a bunch of new pictures. The really nice thing is, the headliner(to me) looks to be in really good condition. It just needs to have a couple spots fixed up on the seems.
|
|
|
|
|
TV 2M8O
Senior Member
Joined: 20-September-2006 Location: Southern Ohio Status: Offline Points: 2052 |
Post Options
Thanks(0)
Quote Reply
Posted: 09-December-2011 at 9:32AM |
|
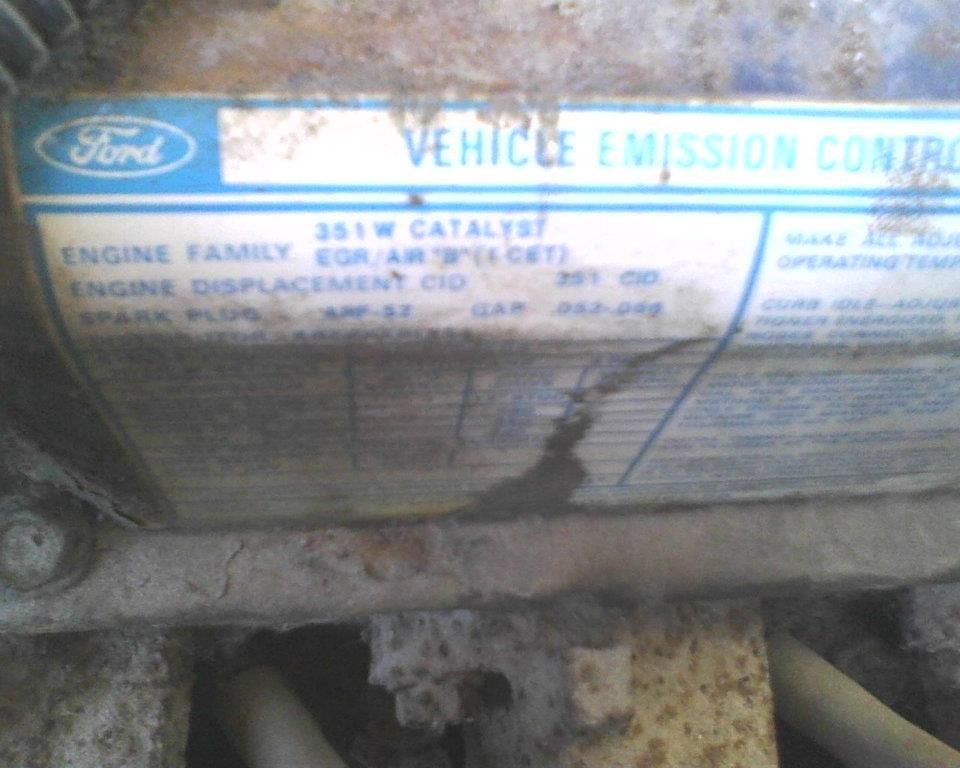
Here is a reference engine decal... lower left corner specifies year of certification. 1977 in this case
 Hope this does the trick.
|
|
|
TV 2M8O OUT JOE 1976 Gran Torino S&H season 2-4 Clone Project Blog: http://tv2m8o.blogspot.com/ |
|
|
|
|
Paul W
New Member
Joined: 26-October-2011 Location: Massachusetts Status: Offline Points: 37 |
Post Options
Thanks(0)
Quote Reply
Posted: 10-December-2011 at 9:21AM |
|
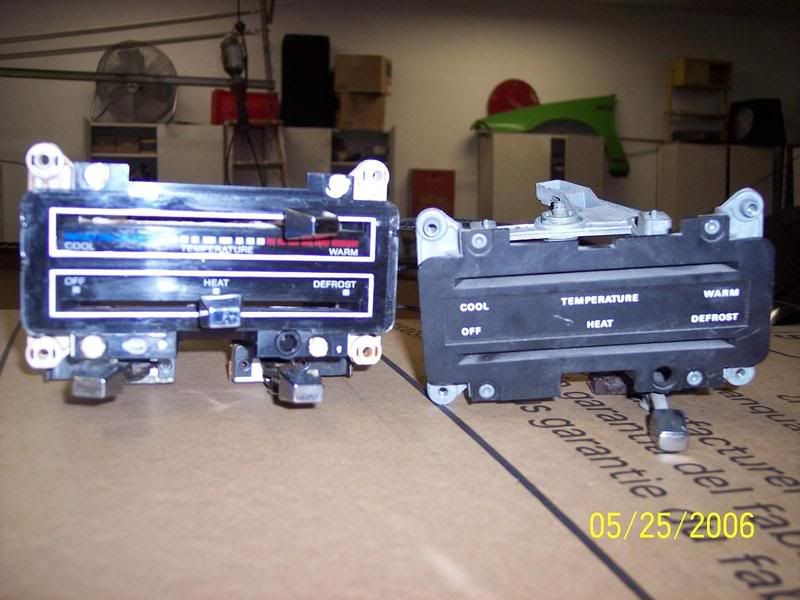
ok, so we were finally able to get a spark plug out. I am going to try to work hard to get the rest out before it gets to cold to do anything. i was able to get a couple pictures for you guys. My friend looked at the car and said that there is an a/c installed in the car with not really correct a/c tubes. The ac control on the inside is completely seperate from the other temperature controls. And the sticker on the valve cover says 1976 on it. i couldnt get a good picture of it really.
   |
|
|
|
|
Ranchero Fan
Senior Member
Joined: 03-March-2011 Location: Chicago area Status: Offline Points: 1022 |
Post Options
Thanks(0)
Quote Reply
Posted: 10-December-2011 at 9:58AM |
|
Your car wasn't a factory A/C car, as it would have, as metioned above, the black plastic box on the firewall containing the evaporator & such. And your heater control head would have the A/C designation. Your A/C that you have was most likely Dealer installed, a popular option, back in the day. My '74 Ranchero gt was such, & had the 2'' thumb type wheels (on-offf & speed, temp settings) by the center vent registers. Also, factory A/C vech. did not have manual cable controled fresh bair vents, where the non A/C vech. did.(a knob on the lower dash on each side by the kick panels)
|
|
|
Brian 1973 Ford Ranchero Big Block. ''THE OTHER WOMAN''
|
|
|
|
|
Paul W
New Member
Joined: 26-October-2011 Location: Massachusetts Status: Offline Points: 37 |
Post Options
Thanks(0)
Quote Reply
Posted: 10-December-2011 at 10:17AM |
|
yeah, the ac control is on the right side oposite of the other controls
|
|
|
|
|
occupant
Senior Member

Joined: 23-October-2006 Location: Lawton, OK Status: Offline Points: 1973 |
Post Options
Thanks(0)
Quote Reply
Posted: 11-December-2011 at 6:03AM |
|
See you've got the best of both worlds. Strong factory heater and vent and defrost. Manual fresh air vents which work GREAT when you're moving. And then the air conditioner you can flip on when it's just too darn hot or you're not rolling. Sweet.
|
|
|
08 Uplander LS, 262K, broken again
08 Explorer EB, 195K, for the wife still looking for another something |
|
|
|
|
Paul W
New Member
Joined: 26-October-2011 Location: Massachusetts Status: Offline Points: 37 |
Post Options
Thanks(0)
Quote Reply
Posted: 11-December-2011 at 11:16PM |
|
So my question for the day for everyone is....As i and removing things i am bagging and tagging everything. Should i be cleaning the original nuts and bolts? Or should i toss them and get new ones?
Also, the carburetor. Would something like http://www.jegs.com/i/Holley/510/0-4412CK/10002/-1?parentProductId= be an ok replacement? or should i be trying to rebuild this one?
|
|
|
|
|
TV 2M8O
Senior Member
Joined: 20-September-2006 Location: Southern Ohio Status: Offline Points: 2052 |
Post Options
Thanks(0)
Quote Reply
Posted: 12-December-2011 at 12:24AM |
|
Paul,
If you are trying to maintain originality, I would clean up the old hardware, unless it is really corroded and beyond reuse. At that point look for new pieces. Same goes for the carb.
Bagging and tagging is a good idea as well as taking pictures as you disassemble. Sometimes, the memory isn't always the best assembly manual!
If originality is not an issue, the skys the limit!
Just my 2 cents....
|
|
|
TV 2M8O OUT JOE 1976 Gran Torino S&H season 2-4 Clone Project Blog: http://tv2m8o.blogspot.com/ |
|
|
|
|
Paul W
New Member
Joined: 26-October-2011 Location: Massachusetts Status: Offline Points: 37 |
Post Options
Thanks(0)
Quote Reply
Posted: 12-December-2011 at 12:31AM |
|
The owner did say he want to do things original. If i endup cleaning things up, what should i use to do it?
|
|
|
|
|
Psquare75
Admin Group
Member of the Stroker Club Joined: 26-November-2005 Location: United States Status: Offline Points: 4591 |
Post Options
Thanks(0)
Quote Reply
Posted: 12-December-2011 at 2:40AM |
|
My method... I read this ideas somewhere and they seem to work.
(edit: I didn't think this would be so long!)
Bolts. Take a wooden wire brush, [img]http://www.chinatraderonline.com/Files/Household/Bathroom-Toilet-Accessories/Toilet-Brushes/European-Style-Wire-Brushes-20542228752.jpg[/img] and mount it in a bench vice, teeth up. Take a bolt, mount it it in a drill as if it were a drill bit, and run it against the wire brush. To clean up the threads, flip the bolt around in the drill by chucking the head and running the threads against the brush, *warning*.. makes a mess of the bench over time.. and your face. wear glasses. Nuts.. Take a matching bolt mounted in the drill, thread side out, and spin the nut on it about 1/3 of the way down (make sure the threads are engaged fully on the nut.) Run this against the wire brush *slowly*. Run it clockwise, so the nut will tighten, and not loosen, taking off like a rocketship if it spins off, lol. Paint prep. Take this cleaned hardware and a clear, empty, clean, 3l bottle of soda. (They still make 3 liters, look for store brand soda). Get something like this  You really can only do a few at a time, but when I did my bolts, I painted them 'baggie at a time' to keep them in order and they went from paint to installation.. But anyway. Put the bolts and nuts in the bottle.. fill the bottle a bit, up past the level of the hardware. cap it, and shake for 30 seconds or so. Get another empty 3l bottle of soda and a small funnel (NOT FROM THE KITCHEN!  ). Mount the funnel in the empty bottle, pour the 'hardware' into the funnel. You should end up with a funnel full of bolts and nuts, a bottle of dirty cleaner, and an empty bottle. ). Mount the funnel in the empty bottle, pour the 'hardware' into the funnel. You should end up with a funnel full of bolts and nuts, a bottle of dirty cleaner, and an empty bottle. Wipe off the hardware with a clean rag (old tshirts work fine in this case.), then on to paint.. if you wish. Repeat as needed with new hardware. The cleaner can be reused many times, Until it's no longer transparent. Notes #1. The whole funnel/bottle step is designed to keep the cleaner off your hands, and make it a little neater.. Also makes the cleaner reuseable. #2. This method will ruin the cad coating on bolts if you aren't careful.. Depending how bad it is, sometimes I just go right to the bottle and not the drill, if the color of the hardware is a concern. #3. If you ruin the cad coating, there is a paint process that simulates it fairly well, but that's another story. Edited by Psquare75 - 12-December-2011 at 2:40AM |
|
|
Paul
77 XR7 460/C6/3.00:1 *SOLD* 78 XR7 523/C6/3.5:1 79 F100 460/TKO500/3.25:1 'I also have some left over potatoes-I understand you can generate electricity from them'- Foote500 |
|
|
|
|
unlovedford
Senior Member
Joined: 17-December-2010 Location: Tennessee Status: Offline Points: 10142 |
Post Options
Thanks(0)
Quote Reply
Posted: 12-December-2011 at 3:04AM |
|
Great hints, Paul!
|
|
|
Joe
1972 Mom's Squire Wagon 1972 Torino Wagon 1976 Torino 1968 Cougar XR7-First batch 1972 Torino 460 1989 BroncoII/Jeeps/Titanimous Popeye and Brutus (Rams) |
|
|
|
|
Paul W
New Member
Joined: 26-October-2011 Location: Massachusetts Status: Offline Points: 37 |
Post Options
Thanks(0)
Quote Reply
Posted: 14-December-2011 at 8:02AM |
|
update: we have finally removed all the spark plugs and placed marvels mystery oil down their holes. our next step is to try to hand crank it. my question is do i need to remove the fan to get to the bolt? and also do you have any clue what the size socket i would need would be? cant wait to see all that oil come shooting out. after that are plans for and oil change with new filter and change the plugs and wires.
it also looks like i need to replace all the wires that go to the celanoid. would that be easy to purchase or should i make them? sorry for allthe question. the snow has been holding off. and the longer it does, the more i will work on it. |
|
|
|
|
Psquare75
Admin Group
Member of the Stroker Club Joined: 26-November-2005 Location: United States Status: Offline Points: 4591 |
Post Options
Thanks(0)
Quote Reply
Posted: 14-December-2011 at 8:13AM |
|
No, you should be able to do it with the fan in place. Not sure what the size of it is.
Which wires are you referring to, the starter solenoid? Pics would be helpful.
|
|
|
Paul
77 XR7 460/C6/3.00:1 *SOLD* 78 XR7 523/C6/3.5:1 79 F100 460/TKO500/3.25:1 'I also have some left over potatoes-I understand you can generate electricity from them'- Foote500 |
|
|
|
|
Post Reply
|
Page 12> |
| Tweet |
| Forum Jump | Forum Permissions You cannot post new topics in this forum You cannot reply to topics in this forum You cannot delete your posts in this forum You cannot edit your posts in this forum You cannot create polls in this forum You cannot vote in polls in this forum |


 Topic Options
 Psquare75 wrote: