
|
Project TV 2M8O |
Post Reply 
|
Page <1 2526272829 42> |
| Author | ||||||
californiajohnny 
Moderator Group 

Joined: 05-October-2013 Location: winlock, wa Status: Offline Points: 14609 |
 Post Options Post Options
") Thanks(0) Thanks(0)
 Quote Reply Quote Reply
 Posted: 17-June-2018 at 1:10PM Posted: 17-June-2018 at 1:10PM |
|||||
|
looks good joe!
my fender shields didn't have any metal clips like that???? 76 must be different? |
||||||
|
JOHN
74 GRAN TORINO S&H CLONE 74 VETTE CUSTOM 90 S10 BLAZER 4X4 LIFTED 77 CELICA CUSTOM 75 V8 MONZA SUPERCHARGED 79 COURIER VERT. SLAMMED 75 VEGA V6 5 SPD 70 CHEV C10 P/U 68 MUSTANG FB CONVERSION |
||||||
 |
||||||
|
TV 2M8O
Senior Member 
Joined: 20-September-2006 Location: Southern Ohio Status: Offline Points: 2053 |
Post Options
Thanks(0)
Quote Reply
Posted: 17-June-2018 at 1:15PM |
|||||
|
John,
My liners are actually from a '76 Cougar so the contour and evidently the inner fender brace slot were a bit different, so I had to improvise!
|
||||||
 TV 2M8O OUT JOE 1976 Gran Torino S&H season 2-4 Clone Project Blog: http://tv2m8o.blogspot.com/ |
||||||
|
||||||
|
Rockatansky
Senior Member
Joined: 30-July-2010 Location: On The Road Status: Offline Points: 6072 |
Post Options
Thanks(0)
Quote Reply
Posted: 17-June-2018 at 1:17PM |
|||||
|
Joe has clips we've never dreamed of Johnny  never underestimate the power of a blob of silicone  |
||||||
|
72 GT Ute
|
||||||
|
||||||
|
californiajohnny
Moderator Group
Joined: 05-October-2013 Location: winlock, wa Status: Offline Points: 14609 |
Post Options
Thanks(0)
Quote Reply
Posted: 17-June-2018 at 2:48PM |
|||||
|
hmmm... ok
|
||||||
|
JOHN
74 GRAN TORINO S&H CLONE 74 VETTE CUSTOM 90 S10 BLAZER 4X4 LIFTED 77 CELICA CUSTOM 75 V8 MONZA SUPERCHARGED 79 COURIER VERT. SLAMMED 75 VEGA V6 5 SPD 70 CHEV C10 P/U 68 MUSTANG FB CONVERSION |
||||||
|
||||||
|
californiajohnny
Moderator Group
Joined: 05-October-2013 Location: winlock, wa Status: Offline Points: 14609 |
Post Options
Thanks(0)
Quote Reply
Posted: 17-June-2018 at 2:51PM |
|||||
 (that he looked for and didn't have (that he looked for and didn't have  that i made) that i made) |
||||||
|
JOHN
74 GRAN TORINO S&H CLONE 74 VETTE CUSTOM 90 S10 BLAZER 4X4 LIFTED 77 CELICA CUSTOM 75 V8 MONZA SUPERCHARGED 79 COURIER VERT. SLAMMED 75 VEGA V6 5 SPD 70 CHEV C10 P/U 68 MUSTANG FB CONVERSION |
||||||
|
||||||
|
TV 2M8O
Senior Member
Joined: 20-September-2006 Location: Southern Ohio Status: Offline Points: 2053 |
Post Options
Thanks(0)
Quote Reply
Posted: 24-June-2018 at 5:47AM |
|||||
|
**CLICK ON PICS TO ENLARGE AND CLICK AGAIN TO SUPERSIZE**
More stuff knocked off the TO DO list... checked out the operation of my sirens and one set isn't working, so I'll have to dig into them and see what's going on. Finished the wiring to the lighted visor (found my missing wire clip!!)…    as well as getting the high output alternator wiring wrapped up.    Installed the firewall vacuum tee...  the smaller vacuum canister on the driver side wheelhouse...   and temporarily mounted the AC compressor so I could hang the compressor mounted power steering cooler to determine the routing of the power steering cooling circuit.   Also lit off the 460 to get a bit of heat into the motor to evaporate the remaining coolant in the block. The engine compartment is slowly looking complete once again.   
Edited by TV 2M8O - 24-June-2018 at 6:01AM |
||||||
|
TV 2M8O OUT JOE 1976 Gran Torino S&H season 2-4 Clone Project Blog: http://tv2m8o.blogspot.com/ |
||||||
|
||||||
|
californiajohnny
Moderator Group
Joined: 05-October-2013 Location: winlock, wa Status: Offline Points: 14609 |
Post Options
Thanks(0)
Quote Reply
Posted: 24-June-2018 at 11:10AM |
|||||
 so you don't need any of the dome light clips? |
||||||
|
JOHN
74 GRAN TORINO S&H CLONE 74 VETTE CUSTOM 90 S10 BLAZER 4X4 LIFTED 77 CELICA CUSTOM 75 V8 MONZA SUPERCHARGED 79 COURIER VERT. SLAMMED 75 VEGA V6 5 SPD 70 CHEV C10 P/U 68 MUSTANG FB CONVERSION |
||||||
|
||||||
|
TV 2M8O
Senior Member
Joined: 20-September-2006 Location: Southern Ohio Status: Offline Points: 2053 |
Post Options
Thanks(0)
Quote Reply
Posted: 24-June-2018 at 11:43AM |
|||||
|
Good on the dome light wiring clips... meant to look for my headliner bow clips but forgot to.

|
||||||
|
TV 2M8O OUT JOE 1976 Gran Torino S&H season 2-4 Clone Project Blog: http://tv2m8o.blogspot.com/ |
||||||
|
||||||
|
TV 2M8O
Senior Member
Joined: 20-September-2006 Location: Southern Ohio Status: Offline Points: 2053 |
Post Options
Thanks(0)
Quote Reply
Posted: 24-June-2018 at 11:45AM |
|||||
Yeah I'm pretty lucky that my car was so complete.... What fender panels you talking about CJ??
|
||||||
|
TV 2M8O OUT JOE 1976 Gran Torino S&H season 2-4 Clone Project Blog: http://tv2m8o.blogspot.com/ |
||||||
|
||||||
|
californiajohnny
Moderator Group
Joined: 05-October-2013 Location: winlock, wa Status: Offline Points: 14609 |
Post Options
Thanks(0)
Quote Reply
Posted: 24-June-2018 at 6:20PM |
|||||
|
probably in regards to my smart ass comment about my custom made panels that you were wondering why you couldn't find yours a couple years ago because i custom made mine
 |
||||||
|
JOHN
74 GRAN TORINO S&H CLONE 74 VETTE CUSTOM 90 S10 BLAZER 4X4 LIFTED 77 CELICA CUSTOM 75 V8 MONZA SUPERCHARGED 79 COURIER VERT. SLAMMED 75 VEGA V6 5 SPD 70 CHEV C10 P/U 68 MUSTANG FB CONVERSION |
||||||
|
||||||
|
TV 2M8O
Senior Member
Joined: 20-September-2006 Location: Southern Ohio Status: Offline Points: 2053 |
Post Options
Thanks(0)
Quote Reply
Posted: 24-June-2018 at 10:21PM |
|||||
LOL, now I remember CJ....
|
||||||
|
TV 2M8O OUT JOE 1976 Gran Torino S&H season 2-4 Clone Project Blog: http://tv2m8o.blogspot.com/ |
||||||
|
||||||
|
TV 2M8O
Senior Member
Joined: 20-September-2006 Location: Southern Ohio Status: Offline Points: 2053 |
Post Options
Thanks(0)
Quote Reply
Posted: 03-July-2018 at 3:47PM |
|||||
|
**CLICK ON PICS TO ENLARGE AND CLICK AGAIN TO SUPERSIZE**
Well had to back track a bit this weekend.... was under the car last Saturday and noticed a puddle of oil at the front and back of the engine block right on the centerline. Upon closer inspection, I could see a drop at the pan/timing cover seam as well as a drop coming from the weep hole in the flywheel inspection plate.
Wracked my brain as well as going back thru my pictures and I couldn't remember shooting a blob of RTV sealant into the corners where the oil pan gasket chan...ges direction to go around the timing cover or the rear main at the crank, so today I jacked the engine up a bit and dropped the pan. My suspicions were correct.... I must have dry fit the oil pan gasket and pan on weekend and the following weekend, buttoned everything up thinking I was done.... WRONG Saturday I got the pan dropped, the gasket and corners cleaned and sprayed several times with brake clean to get rid of any oil residue so the RTV and gasket will adhere nicely to the block sealing the corners and then left everything opened up so the cleaner can evaporate away.   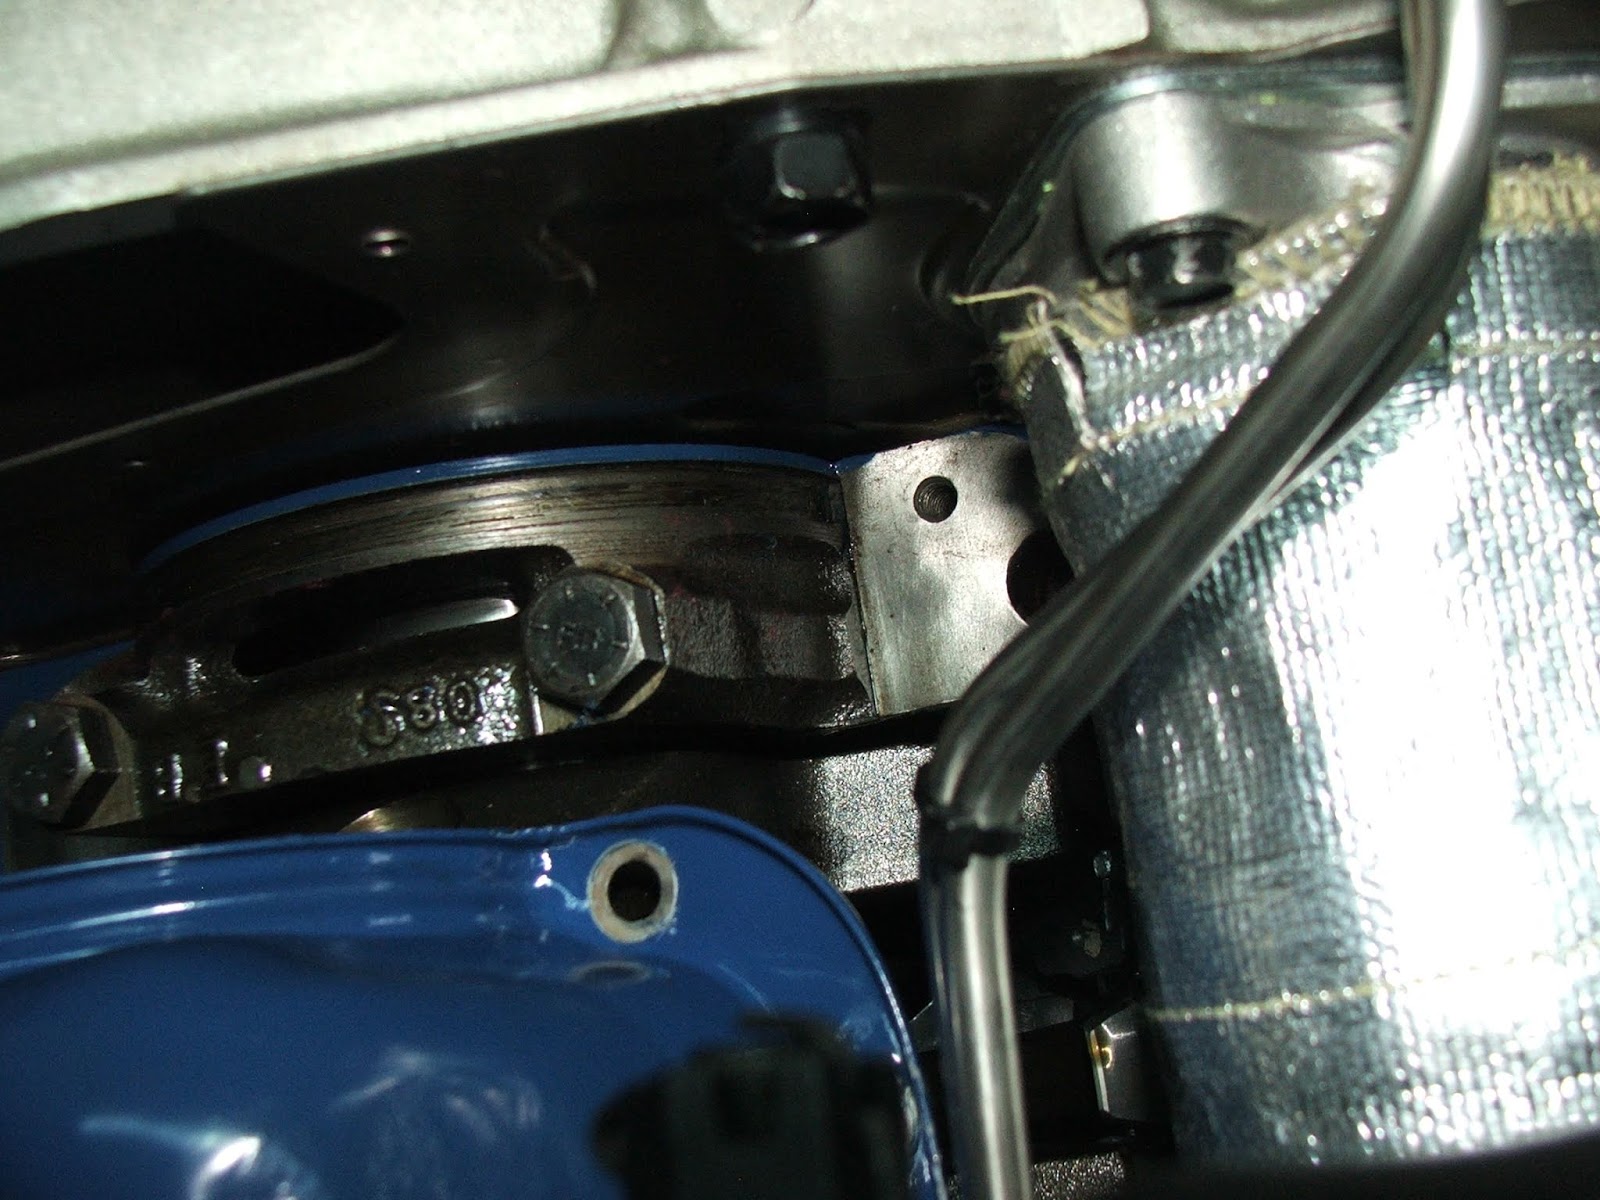  Next weekend I'll hit the corners with a good blob of Ultra Seal, reinstall the pan gasket, button up the oil pan and set the engine back down into the frame and reassemble everything removed to allow the engine to be raised.... then I'll be back on track to getting her ready to turn over to the body shop! Edited by TV 2M8O - 03-July-2018 at 3:48PM |
||||||
|
TV 2M8O OUT JOE 1976 Gran Torino S&H season 2-4 Clone Project Blog: http://tv2m8o.blogspot.com/ |
||||||
|
||||||
|
TV 2M8O
Senior Member
Joined: 20-September-2006 Location: Southern Ohio Status: Offline Points: 2053 |
Post Options
Thanks(0)
Quote Reply
Posted: 07-July-2018 at 10:57AM |
|||||
|
**CLICK ON PICS TO ENLARGE AND CLICK AGAIN TO SUPERSIZE**
Well after wasting over an hour today trying to position the oil pan gasket onto the engine from below, I finally realized it would be much simpler to remove the pan, stick the gasket onto the pan, RTV the corners on the engine and the pan and then position the pan onto the motor, so I pulled the front sway bar off and got the pan out and prepped for the install next weekend.      I'll finish cleaning the cured RTV from the engine next week as well. Edited by TV 2M8O - 07-July-2018 at 1:14PM |
||||||
|
TV 2M8O OUT JOE 1976 Gran Torino S&H season 2-4 Clone Project Blog: http://tv2m8o.blogspot.com/ |
||||||
|
||||||
|
TV 2M8O
Senior Member
Joined: 20-September-2006 Location: Southern Ohio Status: Offline Points: 2053 |
Post Options
Thanks(0)
Quote Reply
Posted: 16-July-2018 at 11:12AM |
|||||
|
No pics from this weekend, but a cancelled visit allowed me to pop into the dealership and get the pan and gasket installed, the engine refilled with oil and the 460 lit off to check for leaks. After initial startup, no visible leaks but I'll be keeping my eye on it.
|
||||||
|
TV 2M8O OUT JOE 1976 Gran Torino S&H season 2-4 Clone Project Blog: http://tv2m8o.blogspot.com/ |
||||||
|
||||||
|
Rockatansky
Senior Member
Joined: 30-July-2010 Location: On The Road Status: Offline Points: 6072 |
Post Options
Thanks(0)
Quote Reply
Posted: 16-July-2018 at 11:36AM |
|||||
|
surprised you got the pan out with the oil pump still attached, no baffles?
|
||||||
|
72 GT Ute
|
||||||
|
||||||
|
72FordGTS
Admin Group 
GTS.org Admin Joined: 06-September-2005 Location: Ontario, Canada Status: Offline Points: 5854 |
Post Options
Thanks(0)
Quote Reply
Posted: 16-July-2018 at 12:47PM |
|||||
|
Nice work Joe, I am glad you were able to get it fixed up with relative ease! I guess having a nice clean car without years of grease and grime makes this job somewhat less of a pain.
|
||||||
|
Vince
1972 Ford GTS Sportsroof - Survivor, One Family car GTS.org Admin |
||||||
|
||||||
|
Dan the ranchero man
Senior Member

Joined: 24-July-2011 Location: Mchenry,IL Status: Offline Points: 1174 |
Post Options
Thanks(0)
Quote Reply
Posted: 16-July-2018 at 1:25PM |
|||||
|
Stock 460 pan has no baffles. I have taken a few off in the car myself. I did have to drop the sway bar and lift it slightly.
|
||||||
|
||||||
|
TV 2M8O
Senior Member
Joined: 20-September-2006 Location: Southern Ohio Status: Offline Points: 2053 |
Post Options
Thanks(0)
Quote Reply
Posted: 18-July-2018 at 5:29AM |
|||||
I went ahead and pulled the sway bar completely out of the car just to insure it didn't get it the way... LOL, getting tired of fighting things!!!
|
||||||
|
TV 2M8O OUT JOE 1976 Gran Torino S&H season 2-4 Clone Project Blog: http://tv2m8o.blogspot.com/ |
||||||
|
||||||
|
TV 2M8O
Senior Member
Joined: 20-September-2006 Location: Southern Ohio Status: Offline Points: 2053 |
Post Options
Thanks(0)
Quote Reply
Posted: 26-August-2018 at 8:09AM |
|||||
|
**CLICK ON PICS TO ENLARGE AND CLICK AGAIN TO SUPERSIZE**
WOW, can't believe it's been a month since my last update! We've had a simple home improvement project blow up into an all out renovation, so my priorities have been elsewhere, but here is what has transpired in my time away.... Well I got the pan reinstalled, but I still have a slight leak at the back of the engine, so I plan to once more pull the sway bar, jack up the engine and drop the pan out and replace the once piece Ford Racing oil pan gasket with a 4 piece Fel-Pro gasket. That way, I can secure the gasket around the crank to the engine and attach the side gaskets to the pan rail and then hit the corners good with RTV just before lifting the pan into position and installing. The following weekend, I got the multi-point distribution block mounted, supply cable ran and designed a bracket to hold the relay box.    I also dragged out the radiator and flushed the antifreeze out of it as well as running the power steering lines.     The weekend after that, I got the power steering belt and water pump pulley installed, put a bit of fluid in the reservoir to make sure pump case wouldn't leak and trimmed the collector reducers to allow the 2 1/2"OD exhaust pipe to snuggly fit inside so I can determine the proper exhaust run.   The weekend before last, I got the radiator drain drilled out and retapped to accept a normal brass petcock rather than the plastic POS the radiator came with, got it scuffed and the first coat of paint applied.      I will hit the core again from an angle to try and get all the fins lightly covered. I then installed the thermostat and snugged up all the hose clamps on the smaller hoses and then got the radiator upper and lower hoses installed.    I then played around a bit with the collectors and transition pipes to try and determine the angle I needed to get so the remaining exhaust ran parallel to the driveshaft before calling it a day. This weekend, I had snuck over earlier and hit the fins with a second coat of paint, so I was able to get the transmission bungs installed in the radiator...    but the ears on the drain petcock broke free and would not operate the drain, so I picked up a new one to install next weekend. I also put together the exhaust cutouts...      and played around with seeing what I needed to get them installed. I believe I'm going to use a braided flex pipe between the collector and the cutout due to the slight bend out of the collector to run parallel with the driveshaft and use a new style rod hanger welded to the cutout pipe with rubber grommeted hanger attached to the floorpan to support the exhaust back to the mufflers. I also decided to resolve the oil leak before installing the radiator and filling the engine with coolant. I'd rather do it now than after the car has been painted! Edited by TV 2M8O - 26-August-2018 at 8:13AM |
||||||
|
TV 2M8O OUT JOE 1976 Gran Torino S&H season 2-4 Clone Project Blog: http://tv2m8o.blogspot.com/ |
||||||
|
||||||
|
Dan the ranchero man
Senior Member
Joined: 24-July-2011 Location: Mchenry,IL Status: Offline Points: 1174 |
Post Options
Thanks(0)
Quote Reply
Posted: 26-August-2018 at 10:52AM |
|||||
|
Progress looks great! Can't wait to see/hear her running.

|
||||||
|
||||||
|
californiajohnny
Moderator Group
Joined: 05-October-2013 Location: winlock, wa Status: Offline Points: 14609 |
Post Options
Thanks(0)
Quote Reply
Posted: 26-August-2018 at 2:42PM |
|||||
|
good job joe!
|
||||||
|
JOHN
74 GRAN TORINO S&H CLONE 74 VETTE CUSTOM 90 S10 BLAZER 4X4 LIFTED 77 CELICA CUSTOM 75 V8 MONZA SUPERCHARGED 79 COURIER VERT. SLAMMED 75 VEGA V6 5 SPD 70 CHEV C10 P/U 68 MUSTANG FB CONVERSION |
||||||
|
||||||
|
TV 2M8O
Senior Member
Joined: 20-September-2006 Location: Southern Ohio Status: Offline Points: 2053 |
Post Options
Thanks(0)
Quote Reply
Posted: 03-November-2018 at 10:59AM |
|||||
|
WOW, can't believe it's been over a month since my last post! Thankfully the home improvement project is completed and took a long weekend guys trip to Vegas last week, but now things are back to normal (whatever that is! LOL) and I should be back on task!
I actually worked on the Tomato today!! Nothing to show for myself, but I chased all the oil pan bolt holes with a bottoming tap, got the front and rear crank gaskets RTV'ed into position as well as the side gaskets and the pan back into place. Will snug everything up next weekend and then rehang the front sway bar and driver side fender. Once all that is done, I'll install the radiator, tighten all the hose clamps and fill the cooling system in preparation for setting the car back onto the ground and getting her mobile so I can get her sent off for final bodywork and paint..... hopefully before the holidays!!! |
||||||
|
TV 2M8O OUT JOE 1976 Gran Torino S&H season 2-4 Clone Project Blog: http://tv2m8o.blogspot.com/ |
||||||
|
||||||
|
californiajohnny
Moderator Group
Joined: 05-October-2013 Location: winlock, wa Status: Offline Points: 14609 |
Post Options
Thanks(0)
Quote Reply
Posted: 03-November-2018 at 11:20AM |
|||||
 really? dreaming of a red and white christmas... that would be cool!!! really? dreaming of a red and white christmas... that would be cool!!!
|
||||||
|
JOHN
74 GRAN TORINO S&H CLONE 74 VETTE CUSTOM 90 S10 BLAZER 4X4 LIFTED 77 CELICA CUSTOM 75 V8 MONZA SUPERCHARGED 79 COURIER VERT. SLAMMED 75 VEGA V6 5 SPD 70 CHEV C10 P/U 68 MUSTANG FB CONVERSION |
||||||
|
||||||
|
handsofstone
Senior Member
Joined: 13-April-2018 Location: Northeast Status: Offline Points: 3946 |
Post Options
Thanks(0)
Quote Reply
Posted: 03-November-2018 at 3:15PM |
|||||
|
This place is awesome. Nice work.
|
||||||
|
||||||
|
TV 2M8O
Senior Member
Joined: 20-September-2006 Location: Southern Ohio Status: Offline Points: 2053 |
Post Options
Thanks(0)
Quote Reply
Posted: 05-November-2018 at 1:31AM |
|||||
|
Something else I did on Saturday was to compare my swoop template with the template my buddy Joe sent me of the TV Hero #1 swoop. Man was I surprised how close I was!!!!
Here in my original side by side comparison....  Here is my template on top of the TV car template....  Here's how much my swoop was off....  I really surprised myself being that close!
|
||||||
|
TV 2M8O OUT JOE 1976 Gran Torino S&H season 2-4 Clone Project Blog: http://tv2m8o.blogspot.com/ |
||||||
|
||||||
|
TV 2M8O
Senior Member
Joined: 20-September-2006 Location: Southern Ohio Status: Offline Points: 2053 |
Post Options
Thanks(0)
Quote Reply
Posted: 18-November-2018 at 6:06AM |
|||||
|
**CLICK ON PICS TO ENLARGE AND CLICK AGAIN TO SUPERSIZE** Last weekend, my buddy Jim and I set about installing the Blowfish Racing MT82 transmission bracket kit...    Hurst Competition Plus shifter...  on my '13 Mustang. Got the car up in the air and started removing the old stuff and hanging the new brackets only to find the hardware had not been put into the kit.  This week the hardware arrived, so we were able to get the car up on the lift and the brackets installed on the transmission on Friday evening...  On Saturday, I went over to the shop and got the shifter installed after working thru a few gremlins with the shifter install..... someone at Ford should have their ass reamed for not moving/increasing the size of the shifter floor cutout so all 4 bolts could be accessed from above. One bolt was partially cover by the sheetmetal, so using a pair of channelocks, I rolled the sheetmetal up out of the way so I could get the fourth bolt out.   Also, someone should be chewed out for hard attaching the floor wire harness connector to the console bezel rather than the console harness connector so it could be unplugged and removed for bench work. Was trying to get the shifter boot unsnapped from the bezel with it tethered to the floor, but after a while, I finally bit the bullet and cut the floor connector loose from the bezel and unhooked the console harness and went over to the workbench so I could flip the bezel completely over and see/access all the clips that retain the boot to the bezel. Was finally able to get the boot freed up so it could be modified a bit to fit over the Hurst shifter base.   With the shifter installed and everything put away, I went upstairs and finished installing the oil pan on the engine. I plan on taking this Friday (day after Thanksgiving) off so I can go over and put in a full day on the Tomato dropping the engine back into place and rehanging the sway bar. Then on Saturday, reinstall the driver side fender, headlight buckets, grill header and the hood in preparation for setting the car back on the ground for the first time in several YEARS! Edited by TV 2M8O - 18-November-2018 at 10:28PM |
||||||
|
TV 2M8O OUT JOE 1976 Gran Torino S&H season 2-4 Clone Project Blog: http://tv2m8o.blogspot.com/ |
||||||
|
||||||
|
californiajohnny
Moderator Group
Joined: 05-October-2013 Location: winlock, wa Status: Offline Points: 14609 |
Post Options
Thanks(0)
Quote Reply
Posted: 18-November-2018 at 7:32AM |
|||||
|
that's a cute little shifter joe.
turkey day tomato |
||||||
|
JOHN
74 GRAN TORINO S&H CLONE 74 VETTE CUSTOM 90 S10 BLAZER 4X4 LIFTED 77 CELICA CUSTOM 75 V8 MONZA SUPERCHARGED 79 COURIER VERT. SLAMMED 75 VEGA V6 5 SPD 70 CHEV C10 P/U 68 MUSTANG FB CONVERSION |
||||||
|
||||||
|
TV 2M8O
Senior Member
Joined: 20-September-2006 Location: Southern Ohio Status: Offline Points: 2053 |
Post Options
Thanks(0)
Quote Reply
Posted: 25-November-2018 at 12:28AM |
|||||
|
**CLICK ON PICS TO ENLARGE AND CLICK AGAIN TO SUPERSIZE** Well had a fairly productive couple days working on the Torino. Friday I got the oil pan all buttoned up, the sway bar rehung, the engine filled with oil, battery charged and engine lit off. On Saturday, I removed the engine block drain plug to insure all the water was out of the motor, got the driver side fender hung and the front wheels back on the car. Since no one locally carries any quality radiator drain cocks (just the Dorman HELP POS's!), I checked and the fitting was still in my old original radiator, so I removed it, blasted it, wire wheeled the brass and painted the steel ears so it can be installed in the new radiator next weekend before dropping it in the car. Picture wise, not a lot to show for myself.....   Next weekend I plan to get the radiator installed and the cooling system filled so I can start the engine and let it run for a good bit to insure everything is sealed tight. Edited by TV 2M8O - 25-November-2018 at 12:29AM |
||||||
|
TV 2M8O OUT JOE 1976 Gran Torino S&H season 2-4 Clone Project Blog: http://tv2m8o.blogspot.com/ |
||||||
|
||||||
|
TV 2M8O
Senior Member
Joined: 20-September-2006 Location: Southern Ohio Status: Offline Points: 2053 |
Post Options
Thanks(0)
Quote Reply
Posted: 02-December-2018 at 8:20AM |
|||||
|
**CLICK ON PICS TO ENLARGE AND CLICK AGAIN TO SUPERSIZE** More progress this weekend. Got the fan reinstalled...   the fan shroud cleaned up
and set in place, then the drain petcock installed...  radiator mounted and everything reconnected to it.    Next week, check that all clamps are tight, add coolant and light this baby off for a long run to check for leaks, timing, etc!! Edited by TV 2M8O - 02-December-2018 at 8:27AM |
||||||
|
TV 2M8O OUT JOE 1976 Gran Torino S&H season 2-4 Clone Project Blog: http://tv2m8o.blogspot.com/ |
||||||
|
||||||
|
Dan the ranchero man
Senior Member
Joined: 24-July-2011 Location: Mchenry,IL Status: Offline Points: 1174 |
Post Options
Thanks(0)
Quote Reply
Posted: 02-December-2018 at 11:08AM |
|||||
|
beautiful work man! Love seeing the progress.
|
||||||
|
||||||
|
Post Reply
|
Page <1 2526272829 42> |
| Tweet |
| Forum Jump | Forum Permissions You cannot post new topics in this forum You cannot reply to topics in this forum You cannot delete your posts in this forum You cannot edit your posts in this forum You cannot create polls in this forum You cannot vote in polls in this forum |


 Topic Options
 Rockatansky wrote:

