
|
My Latest Roll on Paint project |
Post Reply 
|
| Author | |
SquireCJ 
Senior Member 

Joined: 23-October-2009 Location: California Status: Offline Points: 319 |
 Post Options Post Options
") Thanks(0) Thanks(0)
 Quote Reply Quote Reply
 Topic: My Latest Roll on Paint project Topic: My Latest Roll on Paint projectPosted: 21-July-2010 at 10:38AM |
|
Some of you might remember That back in January I found a 1973 Ranchero 500 Cobra Jet for the Family that works for my parents. Overall it is in pretty good condition. The big issue was that the clear coat on the paint had been burned through and peeling away and then a couple months ago the neighbors from across the street backed into the driver side door while the car was parked on the street. I found a replacement door for them and installed it as well as repained the entire car for them.
Here is what it looked like after the door was da 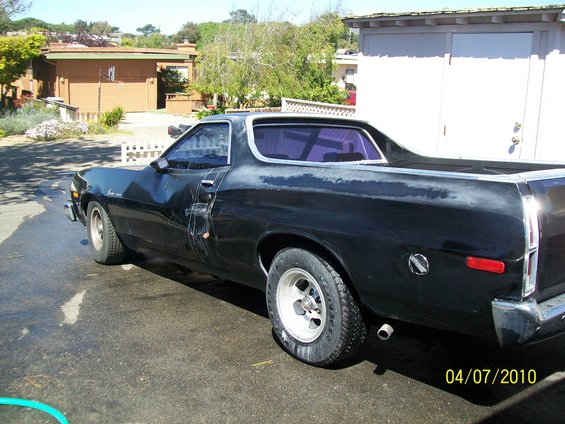 maged. maged.Here it is after door was replaced and the entire car painted but prior to polish and waxing. 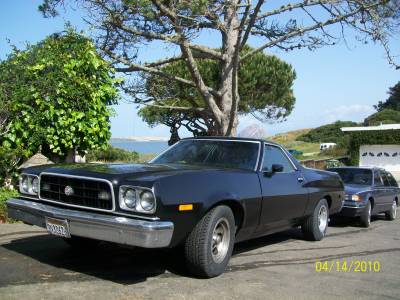 Tailgate after paint, polish, and wax  Passenger side after paint polish and wax 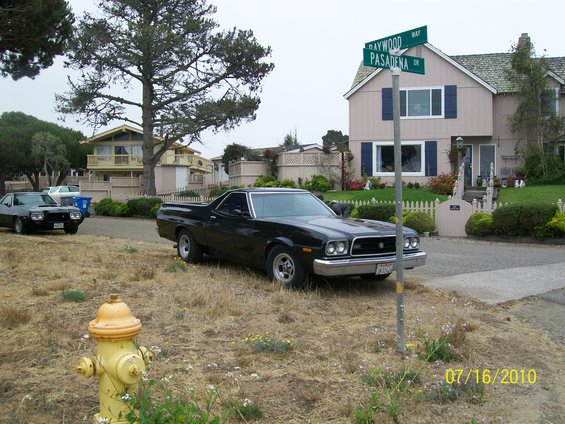 Driver side after paint, polish and wax 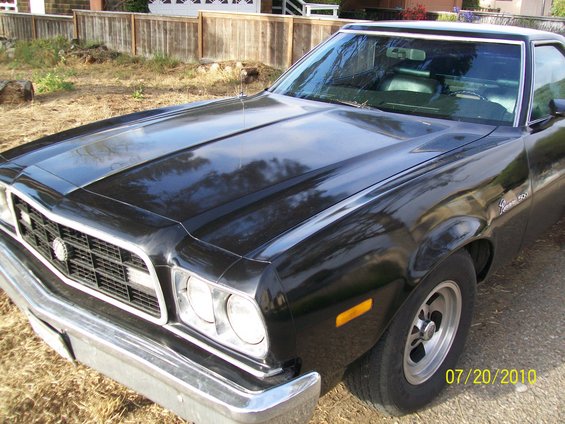  The painting was done with a 4 inch foam roller using Rust-Oleum paint mixed with 50% mineral Spirits. The car was wet sanded between every two coats and a total of twelve coats were applied. I used Rust-Oleum Gloss Black for the first 6 coats and Rust-Oleum Topside Gloss black for the final 6 coats. I waited a couple months for the paint to fully cure and did a final wet sanding polish and waxing. |
|
 |
|
|
occupant
Senior Member

Joined: 23-October-2006 Location: Lawton, OK Status: Offline Points: 1975 |
Post Options
Thanks(0)
Quote Reply
Posted: 21-July-2010 at 11:32AM |
|
These jobs are definitely for folks who are patient enough to mix the thinner in and apply multiple multiple multiple coats. Staying the same color is a very good idea, too.
How many of those little foam thingies did you go through? Edited by occupant - 21-July-2010 at 11:32AM |
|
|
15 Cruze LT, 145K, for the wife
08 Uplander LS, 280K, broken again 08 Explorer EB, 248K, backup work car still looking for another something |
|
|
|
|
picon3
Senior Member
Joined: 20-February-2007 Location: North Carolina Status: Offline Points: 2106 |
Post Options
Thanks(0)
Quote Reply
Posted: 21-July-2010 at 2:59PM |
|
That is incredible! Great job. What was total cost in materials just out of curiousity? P~
|
|
|
1972 GTS 351CJ-4V black/black
|
|
|
|
|
SquireCJ
Senior Member
Joined: 23-October-2009 Location: California Status: Offline Points: 319 |
Post Options
Thanks(0)
Quote Reply
Posted: 21-July-2010 at 4:42PM |
|
I only had to use two rollers. As long as you store the roller in a mix of thinner and water the roller can be reused and does not get clogged or dry. It took a little more than 2 quarts of paint and mineral spirits to complete the car. The regular Rust-Oleum sells for about $10 a quart and the rust-Oleum topside sells for @ $17.00 a quart. The topside is slightly more glossy and has U.V. protection which the regular Rust-Oleum does not. Including sand paper and brushes the cost was @ $70.00
If spraying is not an option and you have the time for sanding you can get a good finish out of rolling on. Also the only place you need to use primer is on body filler. I have pained 7 cars this way so far. Edited by SquireCJ - 21-July-2010 at 4:43PM |
|
|
|
|
The_Trooper
Member 
Joined: 02-July-2010 Location: San Diego, CA Status: Offline Points: 126 |
Post Options
Thanks(0)
Quote Reply
Posted: 21-July-2010 at 9:20PM |
|
Squire CJ where you located in CA? Damn I want to do that to my Torino! It sounds not to bad? I mean only 70$ no spray hassle?
I love your Ranchero!  Edited by The_Trooper - 21-July-2010 at 9:20PM |
|
|
|
|
interceptor460
Senior Member
Joined: 24-February-2009 Location: montreal Status: Offline Points: 409 |
Post Options
Thanks(0)
Quote Reply
Posted: 21-July-2010 at 10:09PM |
|
Very nice the car looks great. The wheels look like the 5 slot used on the S&H torinos ,but the center section has very nice design to them. Would know who makes them.
|
|
|
|
|
SquireCJ
Senior Member
Joined: 23-October-2009 Location: California Status: Offline Points: 319 |
Post Options
Thanks(0)
Quote Reply
Posted: 22-July-2010 at 12:09AM |
|
I live in the San Bernardino Mountains but I visit my Parents along the Central Coast every other month and that is where this Ranchero is located. The rims are five slotted mags. 14 inch on the front and 15 inch on the rear, I don't know the make. The previous owner thought they were Cragar SS rims, but I know they are not, as I have Cragar SS rims on my 1973 Ranchero 500. I guess because one of the center caps on the rim is from a Cragar SS he assumed the rims were Cragar SS.
|
|
|
|
|
antlerfiend
Senior Member
Joined: 14-June-2010 Location: Louisville,KY Status: Offline Points: 3023 |
Post Options
Thanks(0)
Quote Reply
Posted: 22-July-2010 at 8:35AM |
|
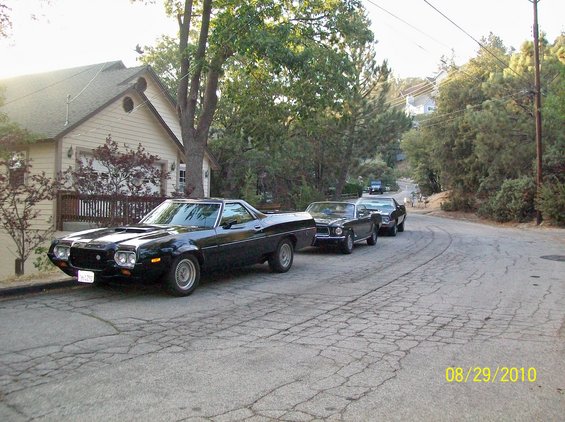
Nice job. I didn't know a roller job could turn out that nice. I have seen some bad ones. Thats a good lookin 72 in the background.
|
|
|
Alex
72 GTS (Morgan's Baby) 68 CJ Drag Car Clone 65 Mustang (first car) 77 LTD II (Drag Car) 78 Mustang II V6 4 speed |
|
|
|
|
SquireCJ
Senior Member
Joined: 23-October-2009 Location: California Status: Offline Points: 319 |
Post Options
Thanks(0)
Quote Reply
Posted: 22-July-2010 at 8:53AM |
Thanks! Like any paint job no matter how much you pay, the end result is only going to look as good as the preparation work under the paint. |
|
|
|
|
interceptor460
Senior Member
Joined: 24-February-2009 Location: montreal Status: Offline Points: 409 |
Post Options
Thanks(0)
Quote Reply
Posted: 22-July-2010 at 9:52AM |
|
On my old 74 police torino it had cragar mach 8 wheels. It looked great and I still have the wheels. The unique thing about the wheels is the ring for different bolt patterns on different cars. If they break "the ring" good luck mount the wheels back on. Anyway I like the the paint job. |
|
|
|
|
SquireCJ
Senior Member
Joined: 23-October-2009 Location: California Status: Offline Points: 319 |
Post Options
Thanks(0)
Quote Reply
Posted: 31-July-2010 at 7:25PM |
|
I am back home and on to the next project.
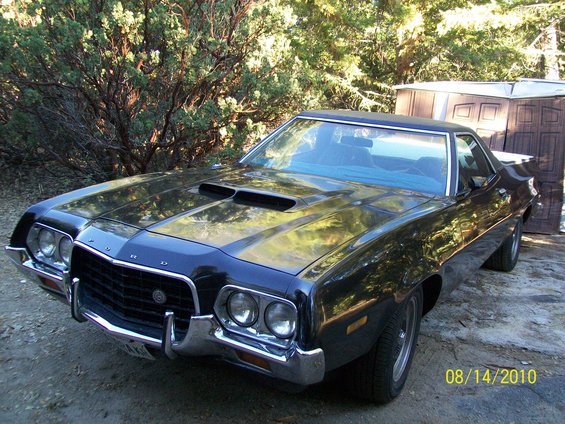
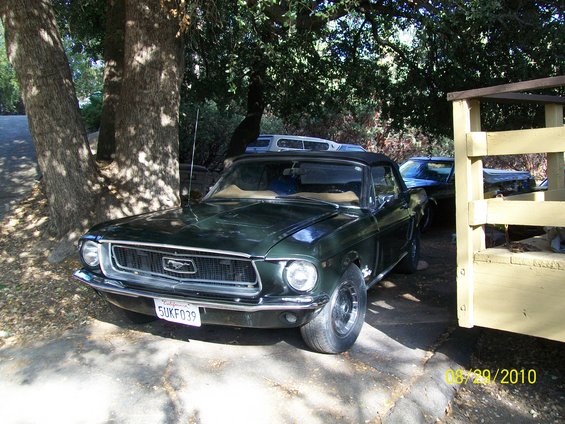
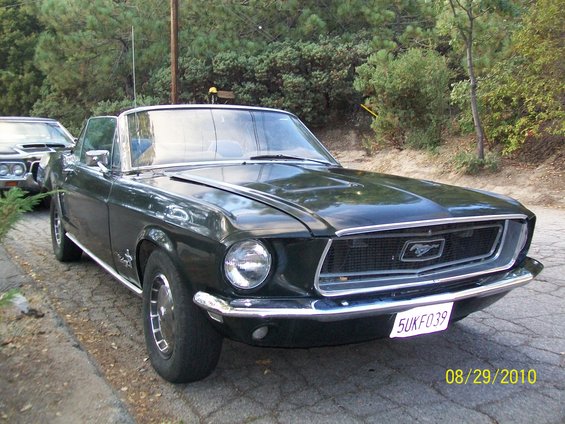
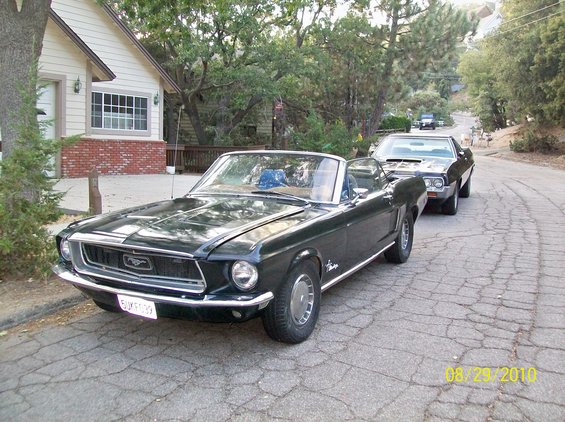
I actually started this one before I went out of town, but now I am home to finish it. This is my 1972 Ranchero GT 4 speed Cobra Jet. I just rebuilt the engine so I thought it was time to address the body issues. The original hood I replaced because of rust around the edges and the replacement hood was going to need to be painted to match the car and then last year I had a blow out that damaged the driver side fender as well as there being a few other small dings that needed to be addressed. Here is what the fender looked like after the blow out. 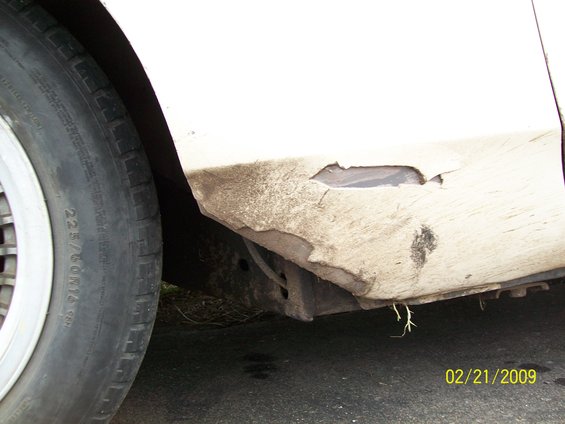 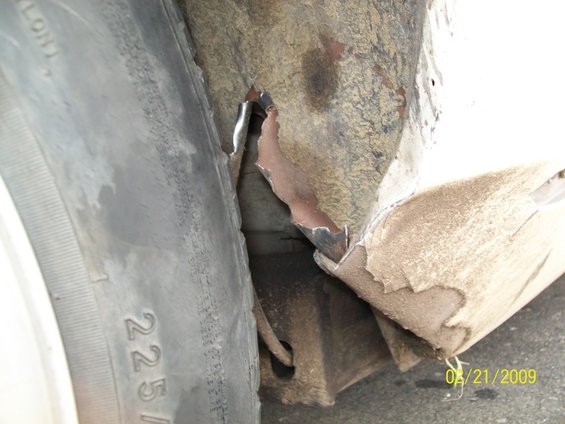 I was going to replace the fender, and when I went to pull it I decided to go ahead and see if I can pull out the part that folded completely under. To my surprise not only was I able to pull it back out I was able to repair it and reuse the fender. I decided to switch from the White paint job that was on the car when I bought it to a gloss black finish. The first eight coats were done with a 3-2-1 combination of Rust-Oleum Gloss Black, mineral spirits, and Penitrol. Original finish was wet sanded with 400 grit and then the car was wet sanded between every two coats. I start with 400 grit and progress up in grit to 600, 800, 1000, 1200, 1500, and a final wet sanding with 2000 before applying polish which brings out the shine. I will over lap the progression in the use of the sand paper. The first wet sanding after new paint will be 400, the next sanding will be 400 followed by 600 and the next sanding will be 600 followed by 800 and so on. Here is what it looked like after 6 coats. 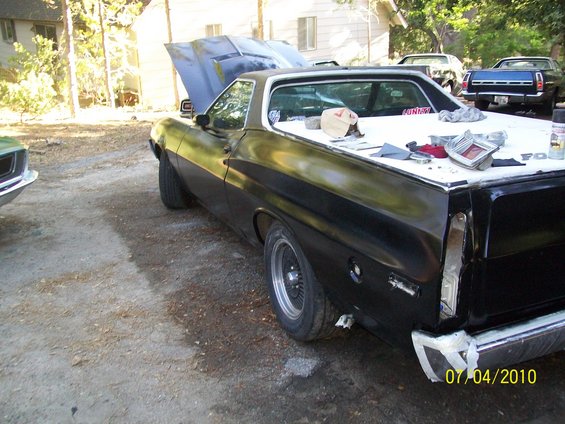 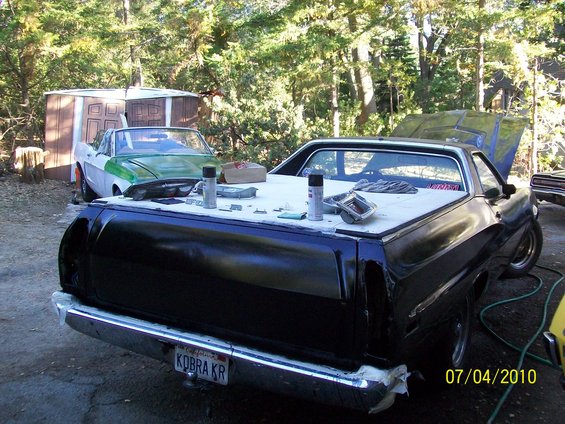  After 8 coats I switched to using the Rust-Oleum Topside brand Gloss Black again mixed with 3 parts paint, 2 parts Mineral spirits, and 1 part Penitrol, which is a product that helps to prevent brush or roller marks in paint when it dries. The Topside brand has a higher gloss than the regular Rust-Oleum and also has U.V. protection. The topside cost more than the regular Rust-Oleum which is why I don't use it for all the coats. Here it is after 10 coats.    Here it is after 14 coats and polish. I only have finished the passenger side rear quarter and door. The front fender is sanded waiting to be polished.  Here is a close up, that is the reflection of the Cyclone GT parked next to it. 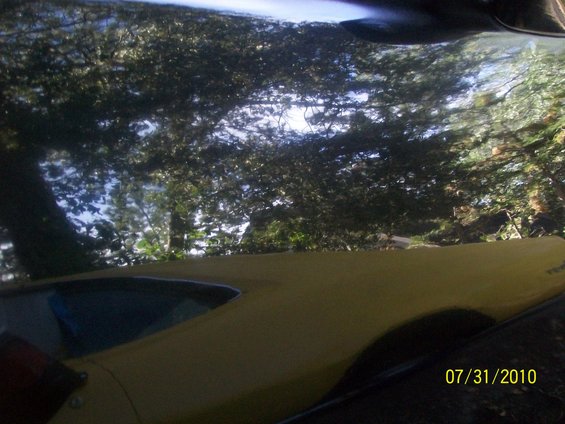 I ran out of Polish and I will finish polishing it as soon as I get some more polish. I like using Meguiars Ultimate compound which I can't find on the Mountain and will have drive down the Mountain to get more. I also still have to do the door jams, bed and bed cover, and I am planing some stripes for the hood center and along the sides. I will post more photos as I progress. The '68 Mustang Convertible in the background is my next paint project, I started with a Gloss Deep Green in the Topside brand But I plan on mixing in some Black to take it to a darker finish. Edited by SquireCJ - 31-July-2010 at 7:56PM |
|
|
|
|
torkair
Senior Member
Joined: 01-May-2010 Location: Tucson, Az Status: Offline Points: 430 |
Post Options
Thanks(0)
Quote Reply
Posted: 31-July-2010 at 8:38PM |
|
I have similar dammage to the same spot on my 72 Gran Torino, could you detail a bit more on how you fixed the dammage please?
Also, paint looks absolutely stunning!!! |
|
|
72 Gran Torino "sport"- in progress
73 Ranchero GT- Q code-460/C6/3.25 open rear |
|
|
|
|
SquireCJ
Senior Member
Joined: 23-October-2009 Location: California Status: Offline Points: 319 |
Post Options
Thanks(0)
Quote Reply
Posted: 31-July-2010 at 10:36PM |
|
I pried out the fold in the fender with the claw end of a hammer and then used a dolly and pounded it back into place and with a little body filler it came out looking good.
|
|
|
|
|
SquireCJ
Senior Member
Joined: 23-October-2009 Location: California Status: Offline Points: 319 |
Post Options
Thanks(0)
Quote Reply
Posted: 12-August-2010 at 5:36PM |
|
I still have not gone down the mountain yet to pick up some more Meguiar's Ultimate Compound.
I went ahead and collected the four other polishes I had on hand and tested them side by side on the hood. What I found was all four seem to give different results, two left very cloudy finishes but did a very good job of leaving a clean smooth surface, one was less cloudy and had a better shine but did not do much in the way of cleaning the surface and the last polish I tested left a very clear finish and shine but also did not seem to much in the way of cleaning like the first two polishes. All polishing was done by hand as my buffer is broken. I ended up finishing the polish job on the driver side and hood by going two rounds with the turtle wax polishing compound which seem to do the best job at cleaning the surface followed by one coat of Meguiar's Scratch X2, which did a good job at cleaning up minor surfaces scratches from sanding. Next I went with one coat of Meguiar's Deep Crystal polish which improved the clearness of the finish but not very glossy. the final coat of polish I applied was Duragloss 101 which really gave it a clear glossy finish. None of these polishes would have done a very good job on their own but using them together I ended up with a decent finish. Meguiar's Ultimate compound which I used on the passenger side as well as other cars I have painted with a roller by far does the best job and better than all four of the other polishes I used to finish the job. What I might do in the future is use the Turtle Wax polishing compound for the first go around and then finish up with the Meguiar's Ultimate compound. I went out to take more picture of the completed polish job and the batteries went out on my camera, so I ended up taking some pictures with my cell phone which does not take very good pictures. I will post the cell phone pictures now and take some better ones with my camera as soon as I pick up some new batteries.   Here is a picture of the front end before paint.  After paint and polish  Close up reflection on door.  
Edited by SquireCJ - 12-August-2010 at 5:55PM |
|
|
|
|
kenneth
Senior Member
Joined: 19-May-2006 Location: New Zealand Status: Offline Points: 1373 |
Post Options
Thanks(0)
Quote Reply
Posted: 12-August-2010 at 6:01PM |
|
I am really amazed and in ore of what you have achieved with the roller , if someone said to me they could get a finish like that with a roller I would have just stood there shaking my head but what I see in your picks has truly got me gobsmacked , NICE WORK , what’s your alcohol ratio per hour , I have some work for you |
|
|
1973 Q code sports roof
|
|
|
|
|
SquireCJ
Senior Member
Joined: 23-October-2009 Location: California Status: Offline Points: 319 |
Post Options
Thanks(0)
Quote Reply
Posted: 12-August-2010 at 6:08PM |
|
Thanks, but I don't drink alcohol.
Here is a link to a good web site about Roll on paint jobs. http://rolledon.forummotion.com/forum.htm |
|
|
|
|
mcford
Senior Member

Joined: 31-May-2003 Location: Utica, Michigan Status: Offline Points: 2174 |
Post Options
Thanks(0)
Quote Reply
Posted: 13-August-2010 at 12:12AM |
|
the wheels definitely arent s/s's but they ARE Cragars. Had a set on my 72 gran torino a few years back.
|
|
|
|
|
SquireCJ
Senior Member
Joined: 23-October-2009 Location: California Status: Offline Points: 319 |
Post Options
Thanks(0)
Quote Reply
Posted: 15-August-2010 at 3:14PM |
|
I picked up some new batteries for my camera and here are some new pictures. I still have to paint the bed and cover as well as I plan on side and hood stripes, but I am going to wait a few weeks before applying the stripes.
Edited by SquireCJ - 23-August-2010 at 6:02PM |
|
|
|
|
SquireCJ
Senior Member
Joined: 23-October-2009 Location: California Status: Offline Points: 319 |
Post Options
Thanks(0)
Quote Reply
Posted: 23-August-2010 at 6:05PM |
|
I finally picked up some more Meguiar's Ultimate Compound and applied it to the panels that did not get the first time around. It by far is the best polishing compound I have used to date.
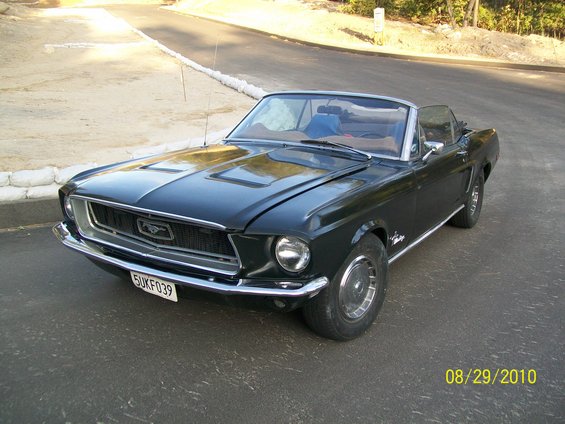
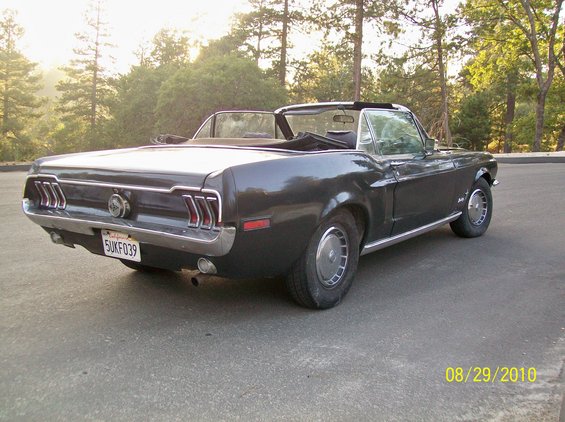
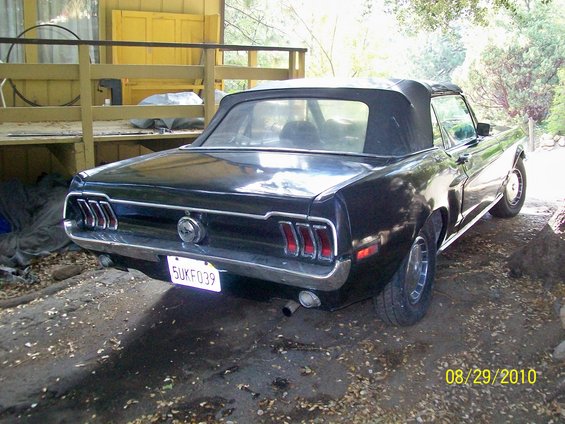
 Also here is my next paint project, I am taking my 1968 Mustang Convertible from white to Buillit Green 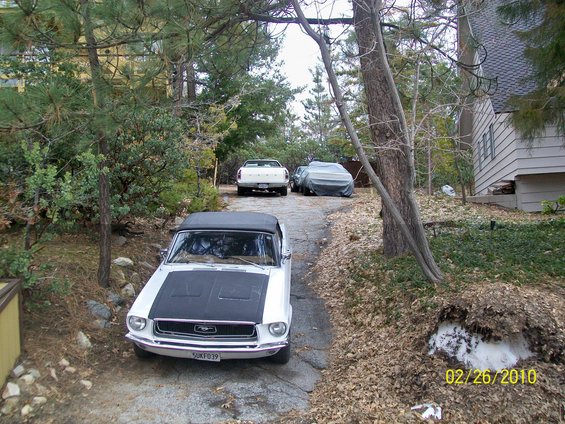  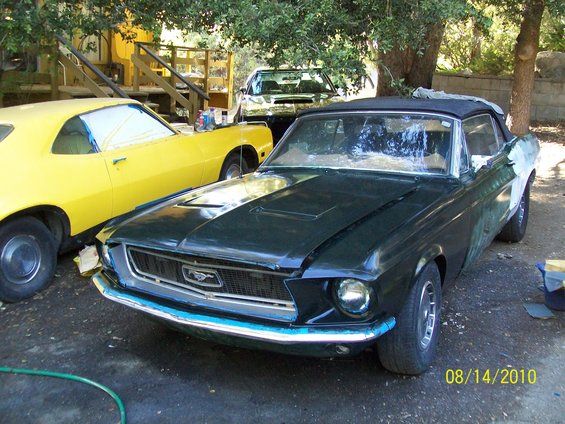  http://www.youtube.com/watch?v=lcW-T-thdoE&feature=related Edited by SquireCJ - 23-August-2010 at 6:13PM |
|
|
|
|
Psquare75
Admin Group 
Member of the Stroker Club Joined: 26-November-2005 Location: United States Status: Offline Points: 4591 |
Post Options
Thanks(0)
Quote Reply
Posted: 24-August-2010 at 9:49AM |
|
I can deal with rolling, but I cringe at what the door jambs must look like, and panel seams. Are you at least removing trim and interior panels?
|
|
|
Paul
77 XR7 460/C6/3.00:1 *SOLD* 78 XR7 523/C6/3.5:1 79 F100 460/TKO500/3.25:1 'I also have some left over potatoes-I understand you can generate electricity from them'- Foote500 |
|
|
|
|
SquireCJ
Senior Member
Joined: 23-October-2009 Location: California Status: Offline Points: 319 |
Post Options
Thanks(0)
Quote Reply
Posted: 24-August-2010 at 6:35PM |
|
When I paint with an off the shelf color such as black, I spray the jams with a rattle can. It comes out looking fine. When I mix a custom color such as on the Mustang, it takes a little more effort, I have to use both roller and foam brush, which makes it real tricky getting everything in the hing area, but I eventually get it all. I don't bother to sand between coats on the jams as I do not polish that area. The last time into the local Hardware store, I spotted a device that you can fill with quart cans of paint and apply like a rattle can. I am thinking of trying it out. If you do have a sprayer, which I do not, it is possible to spray the Rust-Oleum on as well. I do not have any enclosed space that I can do any kind of spraying beyond a rattle can. As for seams and areas like the bumpers, I have yet to do a car that has required me to remove the bumpers in order to get the paint around it. The tight areas are done with a foam brush. Since there is no over spray issues with rolling you do not need to mask off or remove nearly as many parts.
Edited by SquireCJ - 24-August-2010 at 6:45PM |
|
|
|
|
SquireCJ
Senior Member
Joined: 23-October-2009 Location: California Status: Offline Points: 319 |
Post Options
Thanks(0)
Quote Reply
Posted: 30-August-2010 at 9:12AM |
|
Well, I finished up the Mustang and I like the results.
       Now I just need to replace the broken hood latch and install the M-U-S-T-A-N-G letters on the deck lid and I will go back to painting the bed cover and doing some stripes on the Ranchero |
|
|
|
|
Post Reply
|
|
| Tweet |
| Forum Jump | Forum Permissions You cannot post new topics in this forum You cannot reply to topics in this forum You cannot delete your posts in this forum You cannot edit your posts in this forum You cannot create polls in this forum You cannot vote in polls in this forum |


 Topic Options
 antlerfiend wrote: