
|
399W Build |
Post Reply 
|
| Author | |
RacerJames 
Member 
Joined: 25-April-2022 Location: 86401 Status: Offline Points: 128 |
 Post Options Post Options
") Thanks(0) Thanks(0)
 Quote Reply Quote Reply
 Topic: 399W Build Topic: 399W BuildPosted: 15-January-2026 at 5:17AM |
|
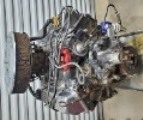
I have a worn out .030 over 69 351W short block. While perusing the interwebs for a 302 build I am considering, I came across the 393 stroker build concept which is a crank stroked to 3.85 inches which uses stock rods and 302 height pistons. I figured with all my existing parts I could build this for not much more than a standard rebuild. Here's the parts list: Block: C9 351W bored .060 Pistons: cast .060 over Perfect Circle TC 1916 which cross to a Clevite 224-1916 -Dish volume is 12 cc Crank: Eagle crank from Summit. Crank stroke is 3.85 and uses standard 351W bearings Rods: stock '69 351W rods 5.956 length (According to google)* Heads: '69 351W heads with 60 cc (According to google)* chambers. Cam: Flat tappet hydraulic. .034 lobe lift = 5.44 valve lift with stock Windsor 1.6 rockers This combo will make an engine which displaces 398.75 CI and has 10.65:1 compression. just a bit over the same compression as an original '69 351W 4V which came with forged flat top pistons. If this build is done using a '79 and later block (such as the very popular roller blocks from the '90s trucks) the CR would be 10.2:1 due to the .020 taller deck. There are various opinions on the internet about how big the chambers on E7TE heads are, I have a set and will measure them once the valves are installed. If google is right these heads should also yield around a 10:1 compression number if a person uses the dished pistons I list above. If you're going racing, forged flat top pistons (such as what came standard in a 5.0 HO engine in the '80s) will yield around 11.5:1 with 60 cc heads. I'll snap some pictures of all the parts, and the completed steps on this build and post them here. Credentials are important to some so here mine are: I am a currently certified ASE master mechanic, who worked for others in the repair industry until 2005. I work out of my own shop nights and weekends fixing family and friends cars now. I have been building small block fords for my weekend oval track (street stock) competition since 1986. Until recently Street Stocks generally required OEM parts, so that's my expertise. If you're expecting aluminum heads and roller cams, I'm not the expert. I am not a machinist and I have the machine shop do a lot of work for which I'm not equipped. In order to keep the thread as useful to everyone as possible (and kind of like the old magazine articles I learned from over the years) please PM me with questions and suggestions, and I'll address them in the build thread as I come to each point. *I will edit these numbers (and remove the google credit) once I have actual measurements of the parts I'm using.
Edited by RacerJames - 17-February-2026 at 4:31AM |
|
|
'73 Torino Stock Car
'71 Mustang Stock Car 351C powered |
|
 |
|
|
72FordGTS
Admin Group 
GTS.org Admin Joined: 06-September-2005 Location: Ontario, Canada Status: Offline Points: 6780 |
Post Options
Thanks(0)
Quote Reply
Posted: 17-January-2026 at 1:49AM |
|
I don't have an questions at the moment, but I am very much looking forward to this build. I think it will be great that you will keep this thread like an old magazine article - showing all your steps and work.
|
|
|
Vince
1972 Ford GTS Sportsroof - Survivor, One Family car GTS.org Admin |
|
|
|
|
RacerJames
Member
Joined: 25-April-2022 Location: 86401 Status: Offline Points: 128 |
Post Options
Thanks(1)
Quote Reply
Posted: 21-January-2026 at 11:21AM |
|
Unlike a magazine article I take photos with my phone when I can.
Here's the pile of parts I've assembled. Pictured are the rod and main bearings, cam bearings, pistons and rings and the double roller timing set. Not in the photo is the camshaft, the new crank and the freeze plugs - but they're in the garage! I am ready to begin. 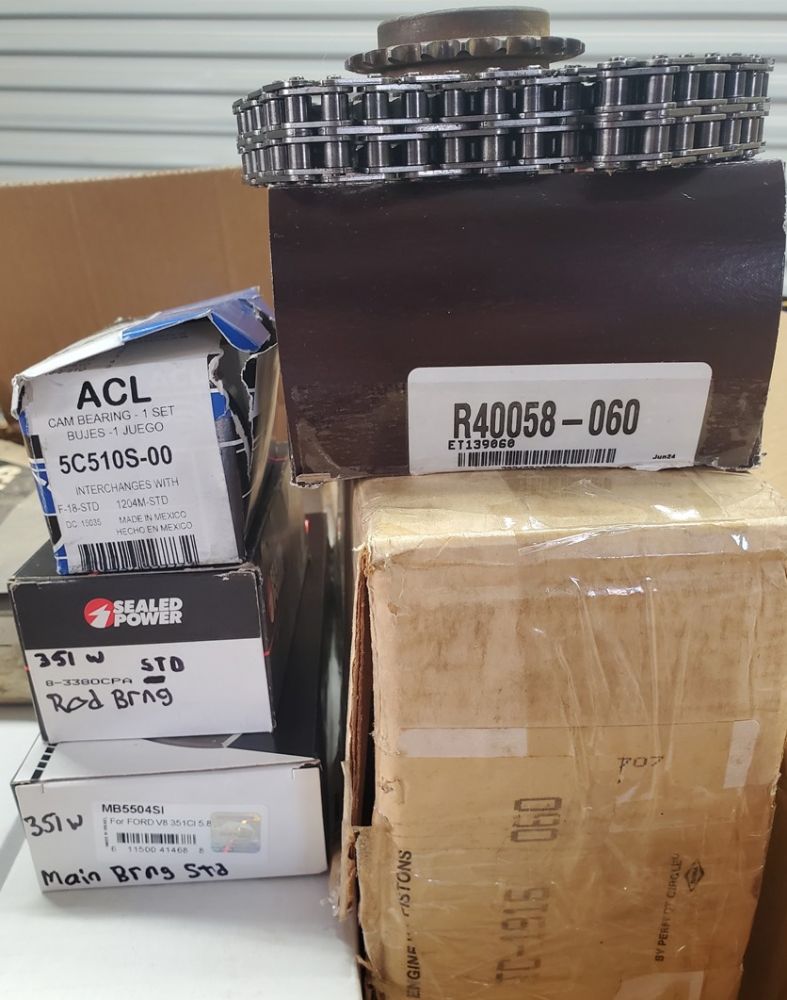 |
|
|
'73 Torino Stock Car
'71 Mustang Stock Car 351C powered |
|
|
|
|
RacerJames
Member
Joined: 25-April-2022 Location: 86401 Status: Offline Points: 128 |
Post Options
Thanks(0)
Quote Reply
Posted: 28-January-2026 at 11:42AM |
|
I took some time to buy a press and build and perfect a jig to press pistons off and on rods without damage. Details here: https://forum.grantorinosport.org/bench-press-6-tons_topic21917.html
The engine I'm using for this build was rebuilt by me in the early 2000s and used in a truck for a few years. Then it went into the stock car and was running when I pulled it back in 2022. Problem was, the engine bay was being overly lubricated with blow-by. I'll pay close attention to the condition of the rings, and the sizes of the cylinders. I plan to make each piston the same weight as the others, and weigh the rods to see how closely they match prior to taking it all to the machine shop for dynamic balancing. Still debating balancing the rods themselves. There is a great deal of talk on the internet about 28oz vs 0 balance (full internal). The Eagle crank is designed to use oem flywheels and balancers. I'll discuss that with the machinist and report my findings.
|
|
|
'73 Torino Stock Car
'71 Mustang Stock Car 351C powered |
|
|
|
|
RacerJames
Member
Joined: 25-April-2022 Location: 86401 Status: Offline Points: 128 |
Post Options
Thanks(1)
Quote Reply
Posted: 04-February-2026 at 12:03PM |
|
I'm closer to taking it to the machine shop.
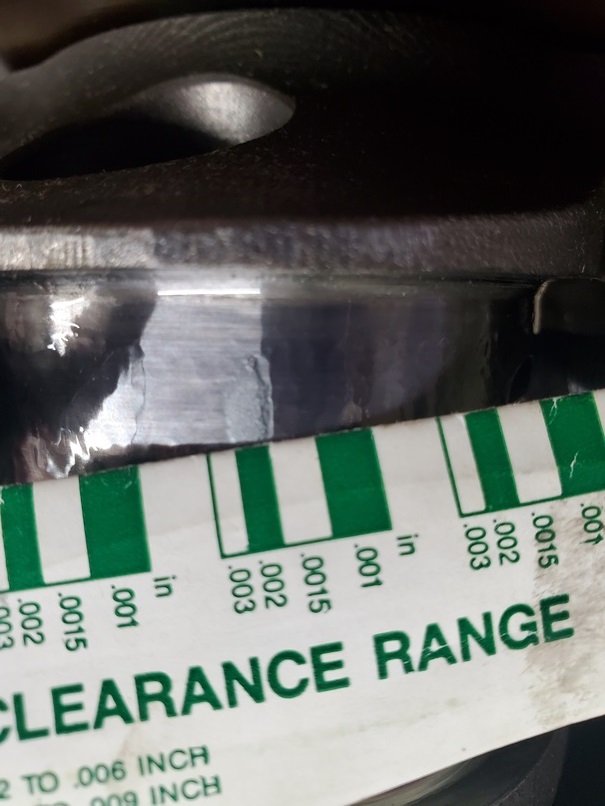
This is the short block with the pan removed. Nice and clean inside. 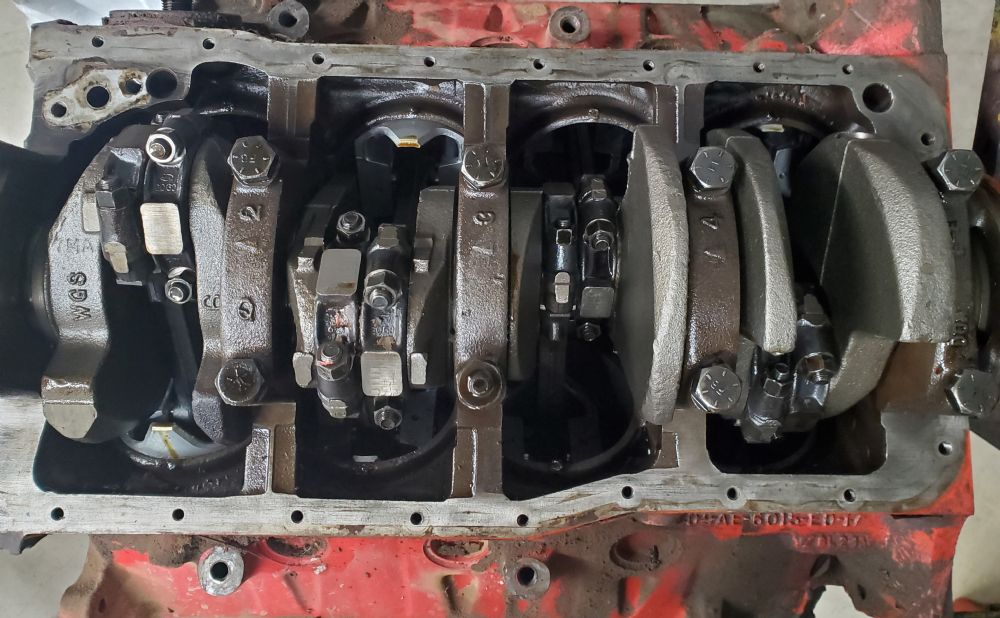 Then I removed the pistons and rods. 0.20 under rod and main bearings. I had forgotten that. The stock crank is pretty tired. Measured the bores, they're at about .050 over, so I'm hoping a .060 overbore will clean it up. 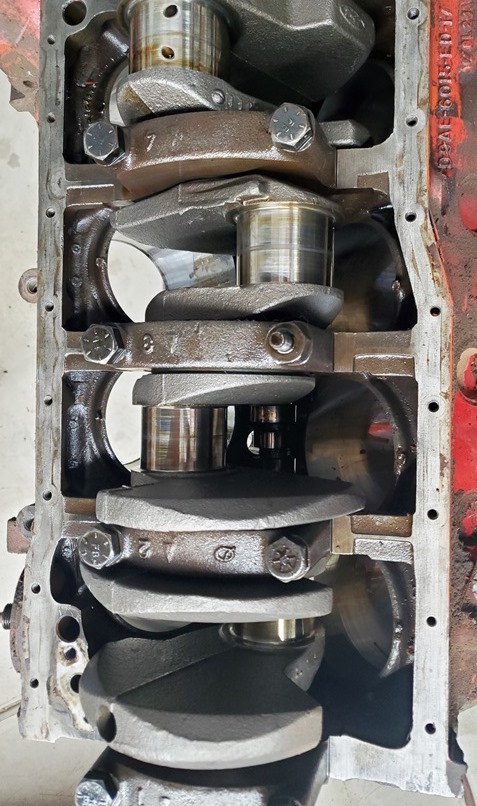 The bottoms of the pistons look normal and nearly new. Notice the extreme wear on the rod bearings. There was an issue with the unrestricted oil flow to the solid lifter cam. Take note, if solid lifters are used in an engine designed for hydraulic ones, the oil passages at the main bearings need to be restricted. The lack of restrictors was the cause of the premature wear and all the blow-by. I didn't know this when I built the engine. 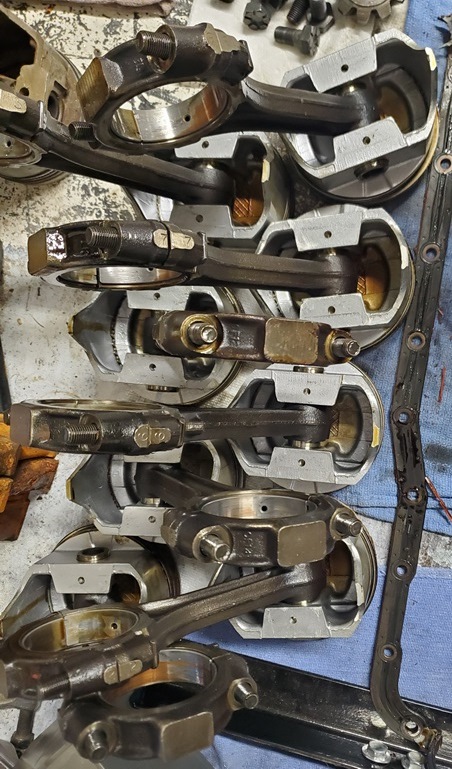 After removing all the old parts and cleaning the bearing bores I installed new main bearings, lubed them and set the new steel crank in place. Ain't it pretty? 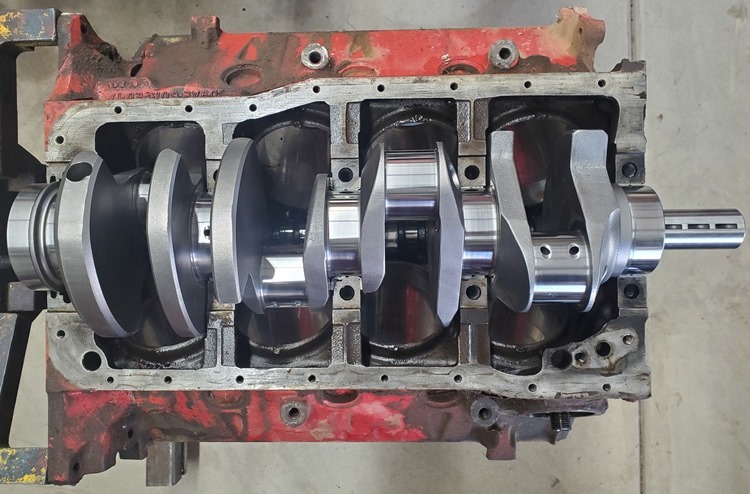 Then I did a bit of measuring using Plastigage. Plastigage is used by placing a small bit of it on the journal, torquing down the cap, and then removing the cap and measuring the squish. Looks like I have close but acceptable oil clearance. Un-squished: 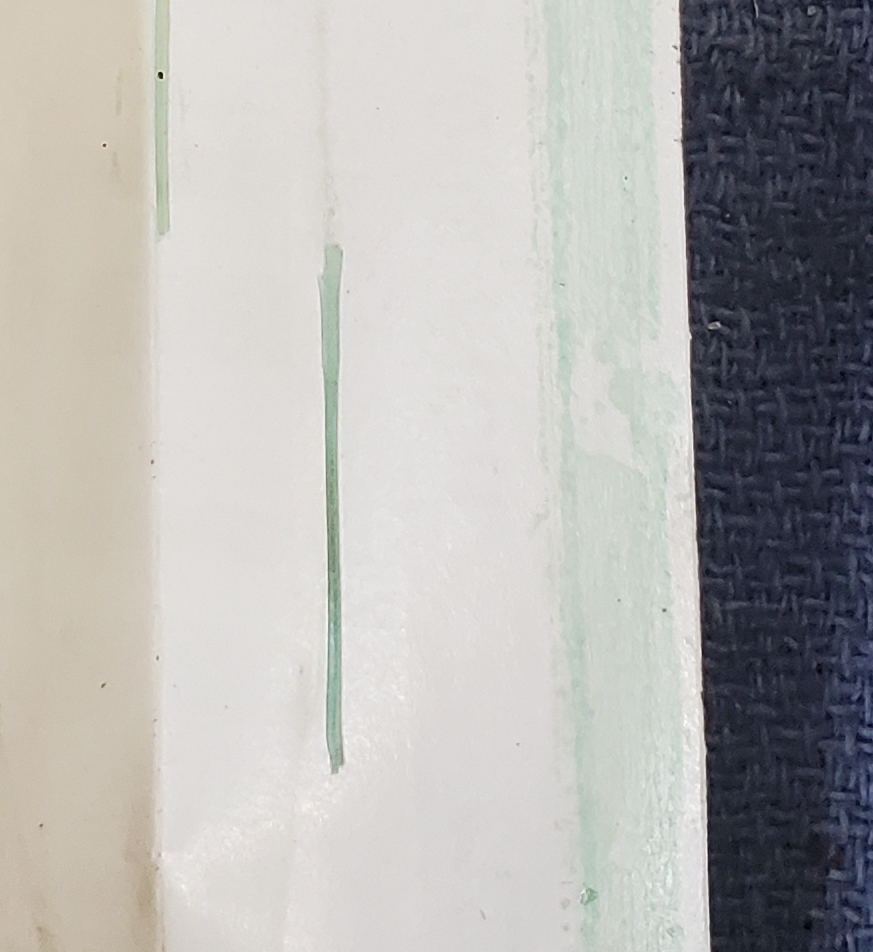 Plastigage comes in a handy measuring container. Looks like I have between .0015 and .0020 oil clearance. Squished:  I spent a little while weighing all the new pistons and filing small bits off until they all matched the lightest one. They were all the same weight except one which was about a half ounce heavier. 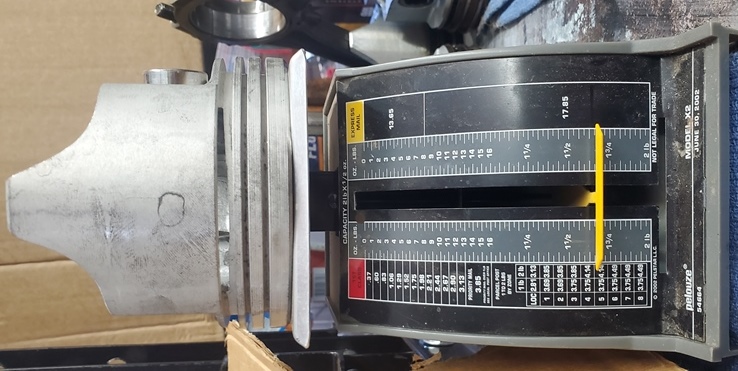 See the file marks on the edges of the piston skirts. there was a bit of casting flash on tis one which I carefully removed. I filed it by hand to ensure I didn't take too much off, weighing often. 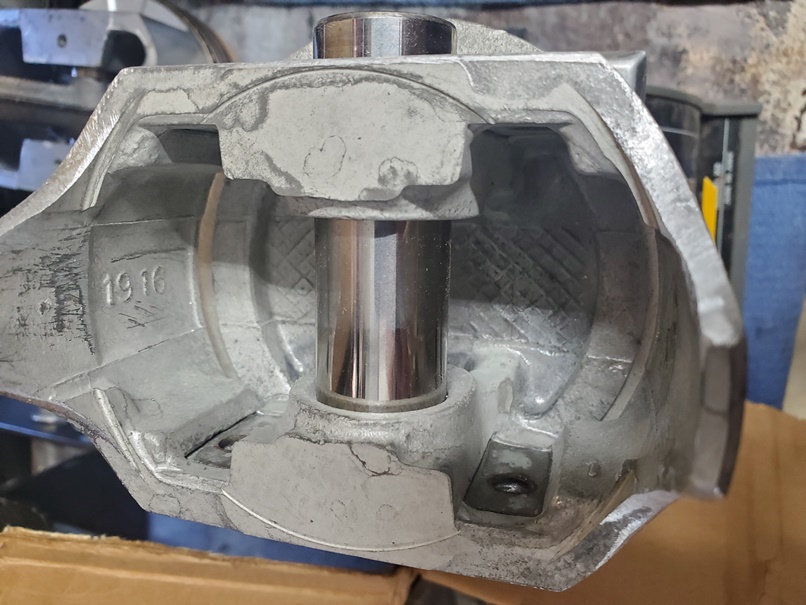 Then I went to put the timing chain on prior to rotating the mocked up assembly with a mock up piston and rod in place, to check clearances with the longer stroke. (I have standard pistons which look identical to the new .060 over ones I plan to use) I noticed immediately that the woodruff keys are not the same. ugh. 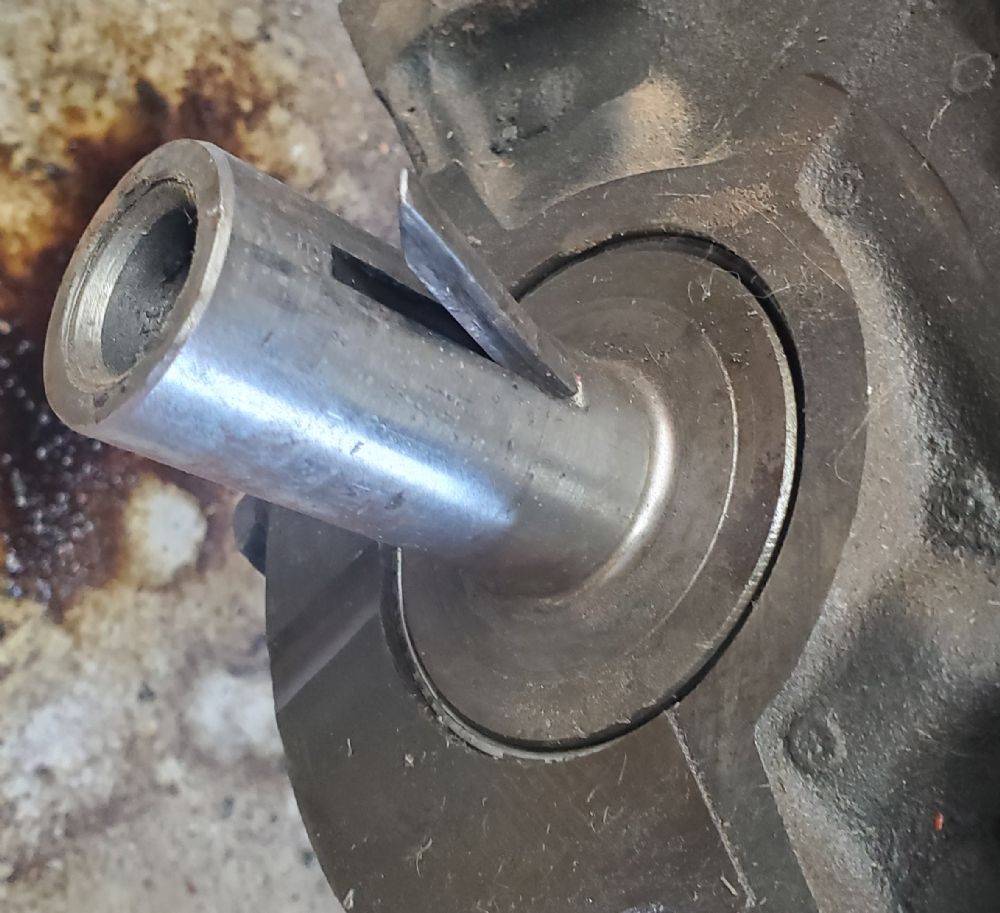 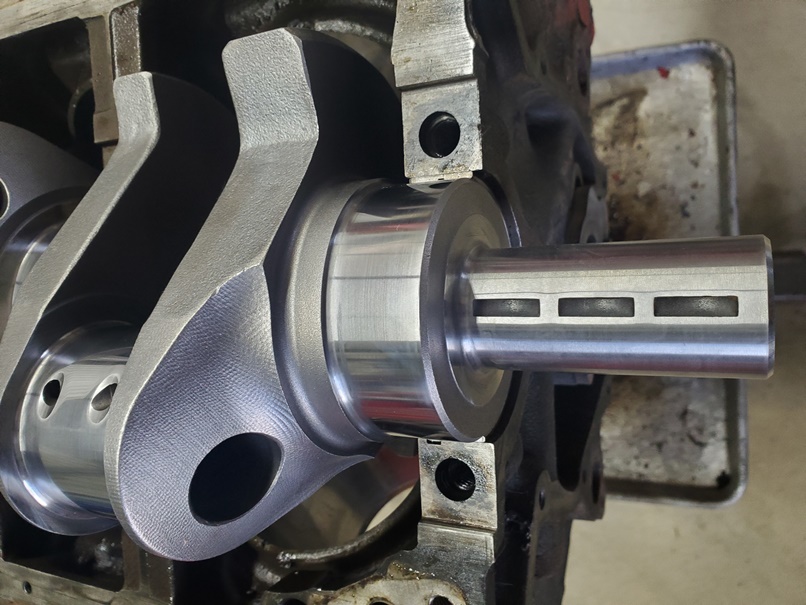 So I ordered new woodruff keys and covered it up and set it all aside until they get here. Stay tuned...
|
|
|
'73 Torino Stock Car
'71 Mustang Stock Car 351C powered |
|
|
|
|
72FordGTS
Admin Group
GTS.org Admin Joined: 06-September-2005 Location: Ontario, Canada Status: Offline Points: 6780 |
Post Options
Thanks(0)
Quote Reply
Posted: 06-February-2026 at 9:07AM |
|
Looking good! That crank is a beaut!
|
|
|
Vince
1972 Ford GTS Sportsroof - Survivor, One Family car GTS.org Admin |
|
|
|
|
RacerJames
Member
Joined: 25-April-2022 Location: 86401 Status: Offline Points: 128 |
Post Options
Thanks(0)
Quote Reply
Posted: 11-February-2026 at 10:27AM |
|
Got the woodruff keys and uncovered the project to see about rod to block (and cam) clearances. I decided to press one of the 030 over pistons off the '69 rod and press the std 302 piston in its place. While I had the piston off the rod I thought I would weigh it to see how much it will change the balance over stock. Surprisingly, it's very close to the weight of the pistons I'm planning to use.
 Looks like it's about a quarter ounce heavier. (The black marker line on the right is where the 302 pistons measured) I then wanted to weigh the assemblies to compare, but they weigh over 2 lb. So I went to the internet and bought a digital scale with a 6 inch weight pad that measures tenths of a gram and up to 11 lb. (Much finer and less subjective than my analog half ounce scale) the $7.50 I spent should pay dividends in precision. How much precision will be known when I can compare my measurements to the Machine shop bob weights when they balance the crank. I'll put a review of the scale in the tools section once I've used it some. I have 6 eagle rods for a 351W which have been on a shelf for 20+ years. I laid one of them side by side with a stock 351W rod from an extra set I also have on a shelf. 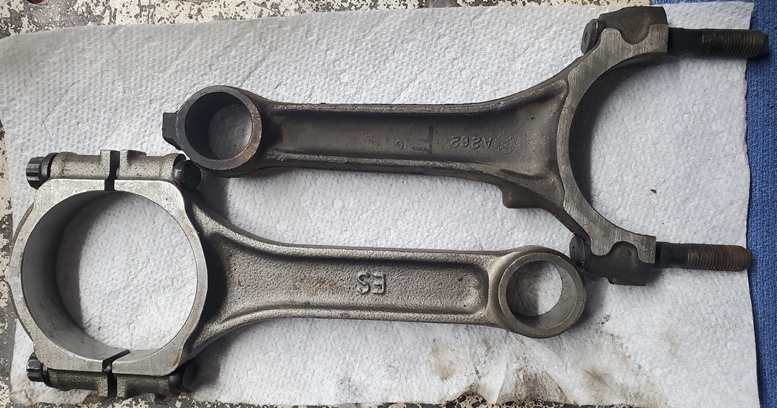 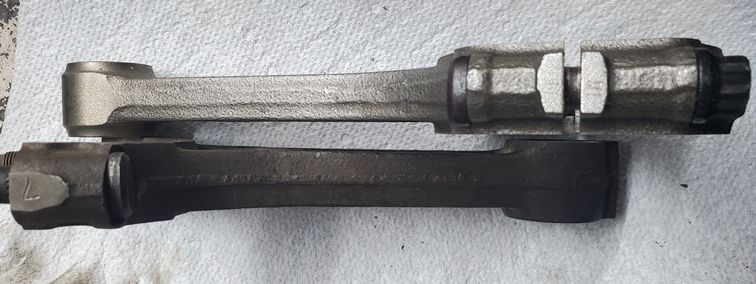  I noticed that the ARP and Stock bolts look very similar. Then I weighed them. The eagle rods are several ounces lighter. I am tempted to buy a couple of matching eagle rods to make a set of eight. Balancing might get interesting if I do that though. With the piston and rod together I got ready to plastigage the rod same as the main bearing. I looked around for the rod bearings. Couldn't find them. I have photographic evidence (in this thread) that I HAD them, but I can't remember where I set them, so, I had to stop again until I can locate them.
|
|
|
'73 Torino Stock Car
'71 Mustang Stock Car 351C powered |
|
|
|
|
RacerJames
Member
Joined: 25-April-2022 Location: 86401 Status: Offline Points: 128 |
Post Options
Thanks(0)
Quote Reply
Posted: 13-February-2026 at 5:25AM |
|
Found the rod bearings right where I had hidden them in plain sight, and stuck the rod and piston in the block, and plastigaged it.
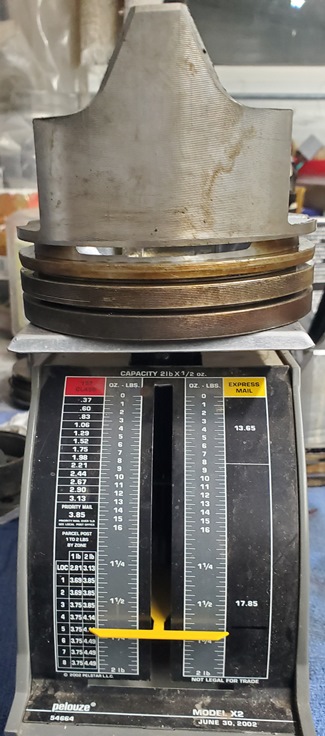
 Looks the same as the mains, between .0015 and .02 clearance. Then I added a timing chain and started rotating the assembly to check deck clearance and see where reliefs might be needed. The deck clearance is not too precise because it's a standard piston in a worn out (.045-.050) bore and not the rod I'll be using, but I put a straight edge on the block face and used a feeler gauge and got about .014 deck clearance. Mostly I was verifying that the piston isn't above the deck, and it isn't. I'll re-check once the machine work is done, but I'm reasonably certain it'll check out at between .005 and .015 below deck. The rods miss the bottoms of the cylinders by about .027 of an inch. I know it's not very precise, but I stuck a feeler gauge in to see just for fun. In #8 cylinder the piston and crank throw are very close. In #7 the crank hit the piston 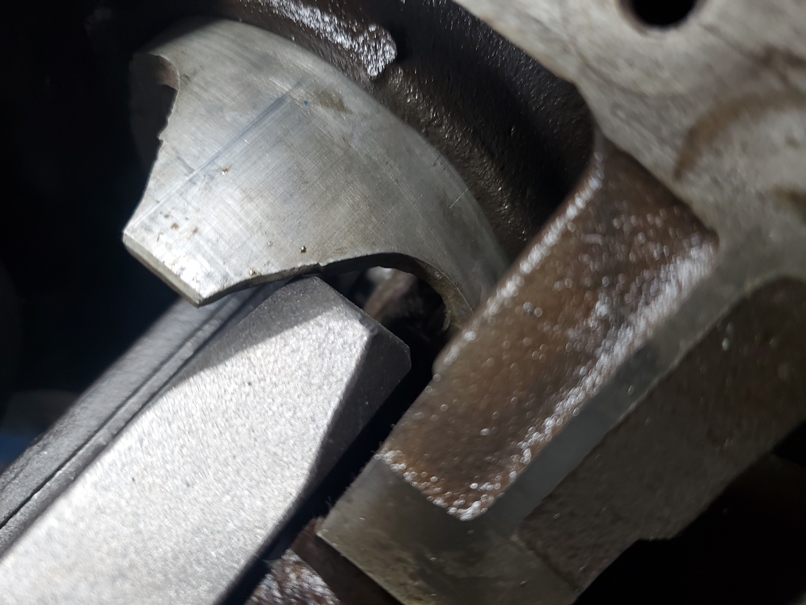  Not sure how grinding a bit of the skirt away will affect the reliability of the piston, or if I should grind a bit off the crank. The crank throws are a bit wavy, ant it's the wavy protrusion that hits the piston. 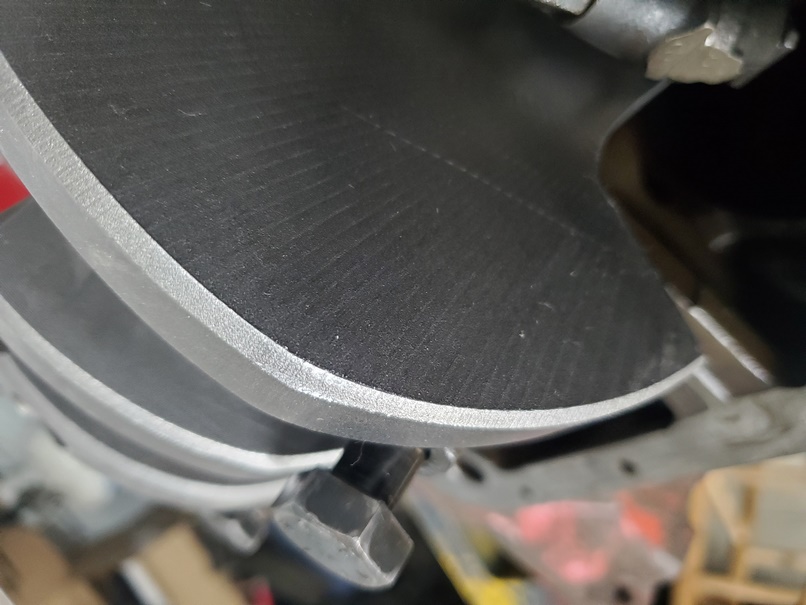 I'll be having the crank balanced, and possibly grinding a bit from the counterweights will be beneficial. no matter which part I modify, It'll definitely make the engine custom, and if stock parts are re-used by someone who doesn't know what I did, the parts will fail. The downside to customization. A side note, Yes I only torqued 3 of the mains. the center and both ends. The deflection at rest is microscopic if at all. I did lube all 5 main bearings, so no worries there. I had read on the interwebs that the Eagle cranks aren't as accurately machined as Scat ones. I think for my purposes, this one is as precise as necessary, at least on the journals. Speaking of precision, my digital scale arrived, and I put it to use almost immediately. The pistons I weighed on my analog scale got re-weighed. The scale reads grams, and tenths of ounces, but not tenths of a gram. For what I'm doing, a gram (about the weight of a metal paper clip) is close enough. 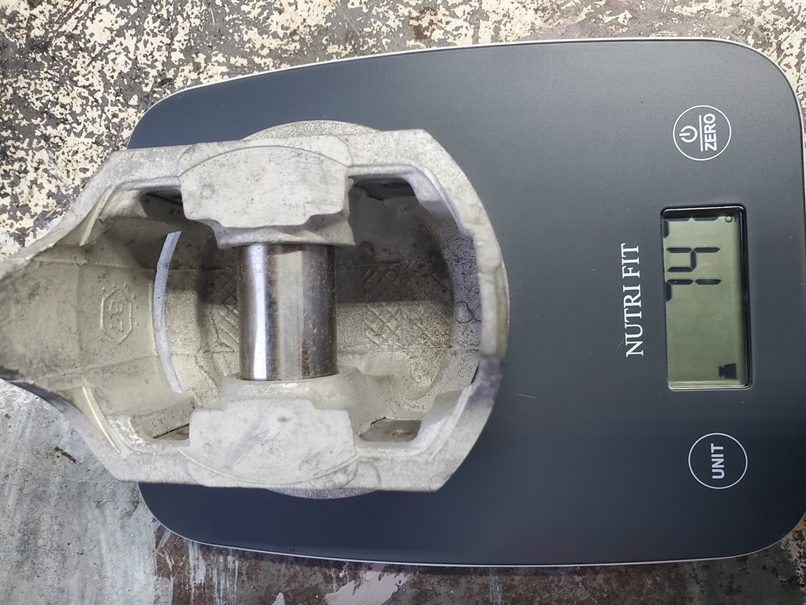  As you can see, the pistons weighed between 747 and 758 grams. 10 grams is about 4 tenths of an ounce. I didn't see that ~half ounce difference on my analog scale I should have which strikes me as odd. The heaviest piston is the one I had used a file on. I guess I didn't take quite enough off, and I'll be matching them up using this scale. Just for fun I weighed one of the 030 over pistons which came out of the 351 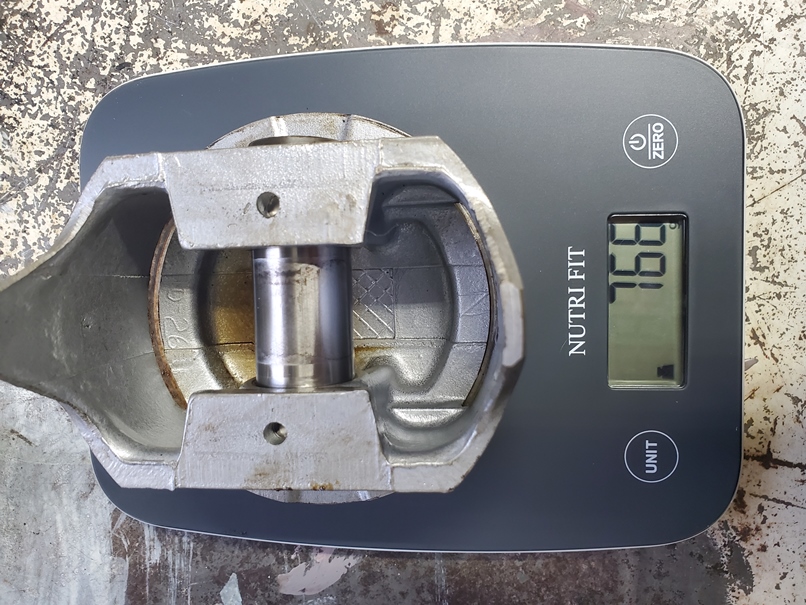 766 grams is 19 grams heavier than the 302 pistons I'm installing. Not much of a difference there. Then I moved on to weighing the rods. I didn't take pictures, but I did record the data. The Eagle SIR5956FP-1 rods with nuts and all: 5 weighed 587 grams 1 weighed 582 grams The D60E Stock Rods with caps but no nuts: 1 Weighed 680 grams 2 weighed 682 grams 4 weighed 685 grams 3 Weighed 697 grams Eagle rods vary by 5 grams (.18oz) between them, and I only have 1 outlier in 6 rods Stock rods vary by 17 grams(.6oz) and I got 4 the same with 6 outliers. Eagle rods are about 100 grams (3.5oz) lighter on average. At 6000 RPM that makes a big difference in reliability and power. The easy button is to spend the money for better balanced rods. The craftsman in me wants to balance and weight match the stock rods. I'll probably push the easy button if I can find two more Eagle rods that match mine for a reasonable price. I plan to spend time weight matching the pistons to within a gram of each other. Still researching what to do about the skirt interference. More in the next installment. |
|
|
'73 Torino Stock Car
'71 Mustang Stock Car 351C powered |
|
|
|
|
72FordGTS
Admin Group
GTS.org Admin Joined: 06-September-2005 Location: Ontario, Canada Status: Offline Points: 6780 |
Post Options
Thanks(0)
Quote Reply
Posted: 13-February-2026 at 1:38PM |
|
That scale works pretty well for engine parts. Interested in what you discover on the skirt interfence as well. Very much enjoying the this build.
|
|
|
Vince
1972 Ford GTS Sportsroof - Survivor, One Family car GTS.org Admin |
|
|
|
|
Rockatansky
Senior Member 
Joined: 30-July-2010 Location: On The Road Status: Offline Points: 6398 |
Post Options
Thanks(0)
Quote Reply
Posted: 14-February-2026 at 8:09AM |
|
does the scale weigh Grains (gn)?
there are 7000 gn's to a lb vs 453.5 grams so grains is a much more sensitive / accurate unit of measure |
|
|
72 GT Ute
|
|
|
|
|
RacerJames
Member
Joined: 25-April-2022 Location: 86401 Status: Offline Points: 128 |
Post Options
Thanks(0)
Quote Reply
Posted: 17-February-2026 at 5:19AM |
|
After using the scale quite a bit I find that it's plus or minus a gram. It's a cheap scale, but it measures accurately enough for evening out the piston weights which vary by over 10 grams.
I don't think it would serve for balancing rods, so I plan to select rods which weigh close to the same overall and just use them. I have eighteen stock rods to choose from, and if I were to buy a set of Eagle rods I'd have 14 to choose from. I clearanced all 8 cylinders because when metals heat they expand, and I didn't want to rely on ~030 clearance. The small cuts I made in each cylinder won't affect the performance of the pistons nor the cylinders, they more than tripled the distance, and they're insurance against a catastrophic failure.  I believe these pistons as-is would be fine in most builds, mostly because back when they were made, we were installing them in our rebuilds with zero balancing at Dad's shop, and they worked like OE stuff. Even when we raced them, they performed as expected. Nothing exploded, and we won a few races in the Street Stock division of the late '80s and early '90s (Back when stock cars were still stock). I took a look at the designs of all the small block pistons I currently have out of their blocks, and researched where to cut weight from the ones I have. Several machinists said not to drill the underside of the crown because that introduces stress risers. Since my pistons are dished, I wasn't going to drill the crown anyhow. I decided to modify the skirts after looking at lightweight cast pistons and the forged pistons which came in 5.0 engines in the mid '80s through the mid '90s. I took a couple of measurements and then freehanded the cuts on the skirts. 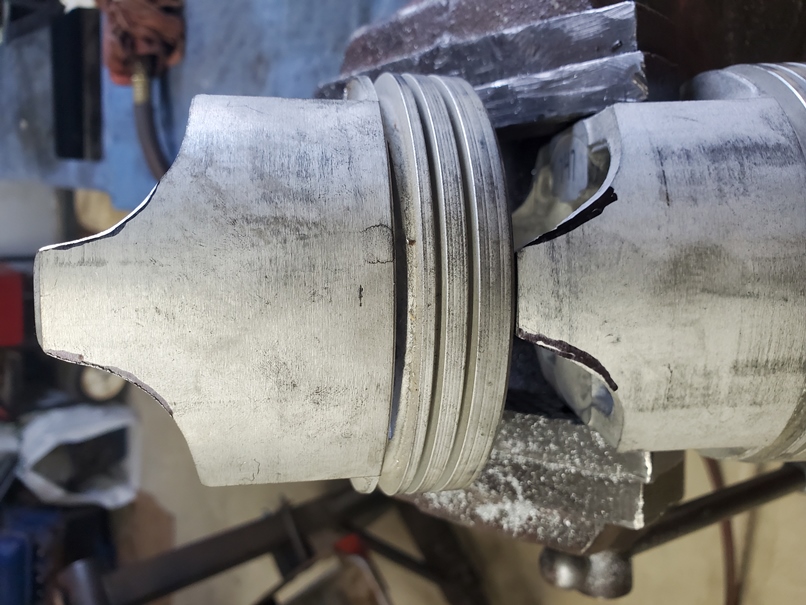 The difference doesn't show well in photos, it's quite a bit more dramatic in person. the needed clearance mods removed a couple of grams from every piston. 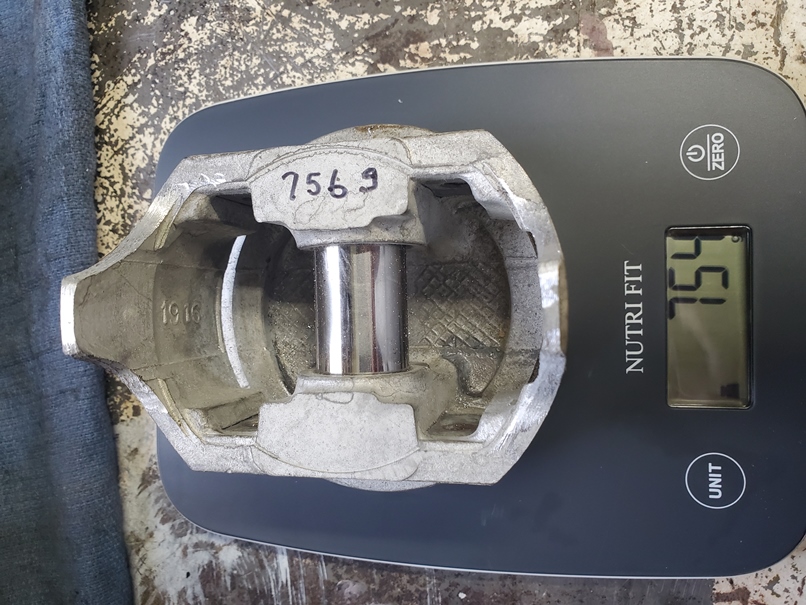 I neglected to take pictures of the most dramatic weight reduction procedures prior to this post, so I'll have to take a few and add them in the next post. The pistons at present all have a target weight of 745 grams, which means taking 10 grams or so from some of them. Having looked at many modern piston designs and noticing the short skirts they wear, I'm thinking I'll reduce the length of all the skirts by about a quarter inch because I'm afraid they'll crack if I don't. They seem too long and skinny to hold up to the violence inherent in a piston engine, and If I do cut them down slightly I expect it'll bring the piston weight down to a nice round 740 grams each. |
|
|
'73 Torino Stock Car
'71 Mustang Stock Car 351C powered |
|
|
|
|
72 RS 351
Senior Member

Joined: 04-September-2014 Location: Knoxville TN Status: Offline Points: 3443 |
Post Options
Thanks(0)
Quote Reply
Posted: 17-February-2026 at 7:09AM |
|
Good job at trying to make the weights equal. I recall that high end SBF pistons can be in the low 500gram range, the $750 stuff.
I wonder what the stock 302 HO pistons weigh, the last engine I built was my first 91 Mark VII engine after I wrecked it. The cylinders were beautiful at 113k miles, but one piston had some tiny crack. The machine shop I used then in about 2001 had a spare set of HO pistons, and used one of those. If those HO pistons were any lighter than what you have, you might check on the price for a .030" over set.
|
|
|
Don
73 Ranchero "Sport 72 front end", floor shift/console, planning EFI 7000 rpm 351 stroker 73 Ranchero GT 351C-4V &4R70W for sale later. 92 Lincoln Mark VII SE GTC, OBDII 347/4R70W |
|
|
|
|
RacerJames
Member
Joined: 25-April-2022 Location: 86401 Status: Offline Points: 128 |
Post Options
Thanks(0)
Quote Reply
Posted: 24-March-2026 at 4:31AM |
For anyone else doing this build the 5.0 HO pistons are the recommended parts. They require no removal of the skirts because the skirts are much shorter than the ones I'm using. I'd guess they're quite a bit lighter as well. The compression will be higher because the dishes are much smaller than the ones I'm installing. I searched for some and found prices between 25 and 55 dollars each. https://www.ebay.com/itm/276730132027 Because I am disinclined to spend money I don't have, and I wanted a bit less compression so I can run 87 octane gas, and I plan to use this in my truck hauling the racecar at low RPMs, and the fact that this is a bit of an experimental toy, I searched up the dishy .060 pistons I'm modifying, and got the set, new, for about 12.50 per piston. My bores will be .060 over when done, because the engine is worn now to .050 in spots.
Edited by RacerJames - 24-March-2026 at 4:49AM |
|
|
'73 Torino Stock Car
'71 Mustang Stock Car 351C powered |
|
|
|
|
Post Reply
|
|
| Tweet |
| Forum Jump | Forum Permissions You cannot post new topics in this forum You cannot reply to topics in this forum You cannot delete your posts in this forum You cannot edit your posts in this forum You cannot create polls in this forum You cannot vote in polls in this forum |


 Topic Options
 72 RS 351 wrote: