
|
Clock dummy plate -> gauge mount? |
Post Reply 
|
| Author | |
Dubz 
Member 
Joined: 26-April-2020 Location: Manitoba Status: Offline Points: 67 |
 Post Options Post Options
") Thanks(0) Thanks(0)
 Quote Reply Quote Reply
 Topic: Clock dummy plate -> gauge mount? Topic: Clock dummy plate -> gauge mount?Posted: 26-April-2025 at 2:40AM |
|
Howdy everyone!
Some of the friends half my age have started to muck around with these fancy 3d printers out there, and it's got me thinking about potential Torino applications. Has anyone come across a print for the late model Torinos to replace the clock dummy plate with something that could hold a gauge? I may be explaining the part wrong, so I've snapped a few pics of what i'm talking about. I'd cut a hole in mine years ago, but you'll get the gist. 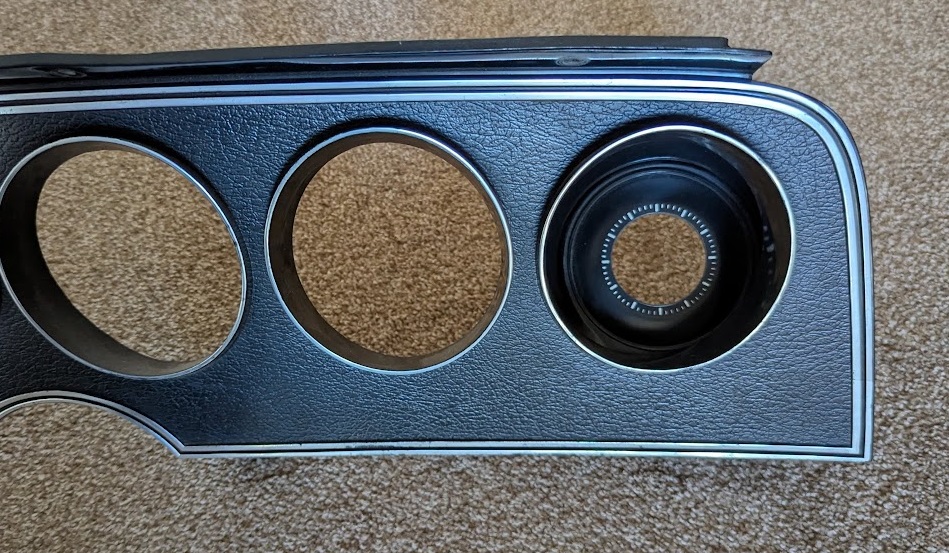 If nobody has come across such a think I may try my hand at modeling this to fit an Autometer Z series tach as the font looks quite similar to the stock tTorino gauges, so it might look right at home.
|
|
|
1974 Gran Torino in flat black 351W/C6
|
|
 |
|
|
hogfiddles
Moderator Group 

Moderator Joined: 19-September-2016 Location: Central NY Status: Offline Points: 1695 |
Post Options
Thanks(0)
Quote Reply
Posted: 26-April-2025 at 6:39AM |
|
Just pull the three screws out and remove it. Then you can put whatever you want there
|
|
|
1973 Gran Torino Sport - Q code “Q-Clone” project-on-hold
1972 Gran Torino Sport - Q code new project 1972 Gran Torino - parts 1969 Torino GT - M code 100+ mid-80's Yamaha XJ-Series (14 trophies) |
|
|
|
|
Dubz
Member
Joined: 26-April-2020 Location: Manitoba Status: Offline Points: 67 |
Post Options
Thanks(1)
Quote Reply
Posted: 29-April-2025 at 2:22PM |
|
I was thinking of something more like this that would replace the existing part and the gauge could mount into:
 First test print is off by a bit, but I'm sure with enough tries I'll be able to get something workable.
|
|
|
1974 Gran Torino in flat black 351W/C6
|
|
|
|
|
handsofstone
Senior Member 
Joined: 13-April-2018 Location: Northeast Status: Offline Points: 4229 |
Post Options
Thanks(0)
Quote Reply
Posted: 30-April-2025 at 1:02AM |
|
@Spriegel will be along shortly.
|
|
|
|
|
Eliteman76
Admin Group 
Joined: 20-March-2006 Location: Nebraska, USA Status: Offline Points: 5450 |
Post Options
Thanks(0)
Quote Reply
Posted: 30-April-2025 at 3:24AM |
|
I’d love to talk to someone that could 3D scan grills and grill surrounds.
Also do a scan of the grill trim and 3D print that out as well.
|
|
 Andrew:GTS.ORG admin, '72 Q code 5 speed Restomod Andrew:GTS.ORG admin, '72 Q code 5 speed RestomodPondering: #99Problems |
|
|
|
|
Dubz
Member
Joined: 26-April-2020 Location: Manitoba Status: Offline Points: 67 |
Post Options
Thanks(0)
Quote Reply
Posted: 02-May-2025 at 11:41AM |
|
Model #2 is more round, tweaked the size of the opening to hopefully be right this time, and adjusted the one tab I got wrong last time.

Should know in a day or two when I get the print back if I'm on the right track.
|
|
|
1974 Gran Torino in flat black 351W/C6
|
|
|
|
|
Rockatansky
Senior Member
Joined: 30-July-2010 Location: On The Road Status: Offline Points: 6398 |
Post Options
Thanks(0)
Quote Reply
Posted: 03-May-2025 at 4:35AM |
|
nice, what diameter opening and how much clearance for the OD ring?
|
|
|
72 GT Ute
|
|
|
|
|
spriegel
Senior Member
Joined: 28-September-2021 Location: Fairview, PA Status: Offline Points: 992 |
Post Options
Thanks(0)
Quote Reply
Posted: 03-May-2025 at 7:13AM |
|
Nice job on the design, looks great! -Chris
|
|
|
Chris
Fairview, PA '1973 Ford Gran Torino |
|
|
|
|
Dubz
Member
Joined: 26-April-2020 Location: Manitoba Status: Offline Points: 67 |
Post Options
Thanks(1)
Quote Reply
Posted: 06-May-2025 at 6:54AM |
The measurements are all in mm as I'm using Tinkercad (it's free), so everything needs to be converted. Outer diameter = 115mm = 4.528" Inner diameter = 105mm = 4.134" Gauge mount hole = 88mm = 3.465" Autometer lists their Z series gauge bezel as being 3 13/16" or 96.8375mm so should clear the bezel by 4mm each side. The gauge opening is 3 3/8" or 85.725mm so I could likely go a touch smaller on the gauge hole, but I'll try a test fit for bezel depth before I futz with that measurement. I have one mounting tab still off by a few mm, so I'll need to tweak and reprint at least once more before I can test mount the gauge in the pod and the pod in the dash. Edited by Dubz - 06-May-2025 at 7:01AM |
|
|
1974 Gran Torino in flat black 351W/C6
|
|
|
|
|
Rockatansky
Senior Member
Joined: 30-July-2010 Location: On The Road Status: Offline Points: 6398 |
Post Options
Thanks(0)
Quote Reply
Posted: 06-May-2025 at 11:23AM |
|
ouch $175 but good choice for match IIRC i hope you're planning to pump these mounts out? |
|
|
72 GT Ute
|
|
|
|
|
Inkara1
Senior Member

Joined: 17-November-2021 Location: Ridgecrest, CA Status: Offline Points: 515 |
Post Options
Thanks(0)
Quote Reply
Posted: 08-May-2025 at 8:10PM |
I'm running this same tach except mine goes to 6,000 instead of 8,000. It's just a little bit too big to completely fit in the hole, but I have it in there at a bit of an angle toward the driver, which makes it a bit easier to see anyway.  |
|
|
1972 Gran Torino station wagon, light blue, 351C 2V, prior owner upgraded to 4V (2V heads), originally had a C4 but prior owner changed to C6 for some reason.
|
|
|
|
|
Rockatansky
Senior Member
Joined: 30-July-2010 Location: On The Road Status: Offline Points: 6398 |
Post Options
Thanks(0)
Quote Reply
Posted: 09-May-2025 at 1:57AM |
|
shoulda bought at $175, now $232.99 ? this search has it narrowed down to 3 tach's with a black bezel & red pointer, 6,8 & 10k rpm |
|
|
72 GT Ute
|
|
|
|
|
Dubz
Member
Joined: 26-April-2020 Location: Manitoba Status: Offline Points: 67 |
Post Options
Thanks(0)
Quote Reply
Posted: 10-May-2025 at 11:06AM |
|
Print #3 turned out pretty good, but still 1mm or so off on the mounting tabs. I had angled this one 15 degrees so it should point towards the driver, and that should help show the whole gauge similar to like Inkara1 has done.
I should get out at my shop (a few hours away) by the end of the month to test fit in the dash with the tach mounted before I make a fourth version. I've got a sneaking suspicion there may be a bracket in the way, as projects aren't really projects without a few speed bumps.   |
|
|
1974 Gran Torino in flat black 351W/C6
|
|
|
|
|
Dubz
Member
Joined: 26-April-2020 Location: Manitoba Status: Offline Points: 67 |
Post Options
Thanks(3)
Quote Reply
Posted: 25-May-2025 at 11:17AM |
|
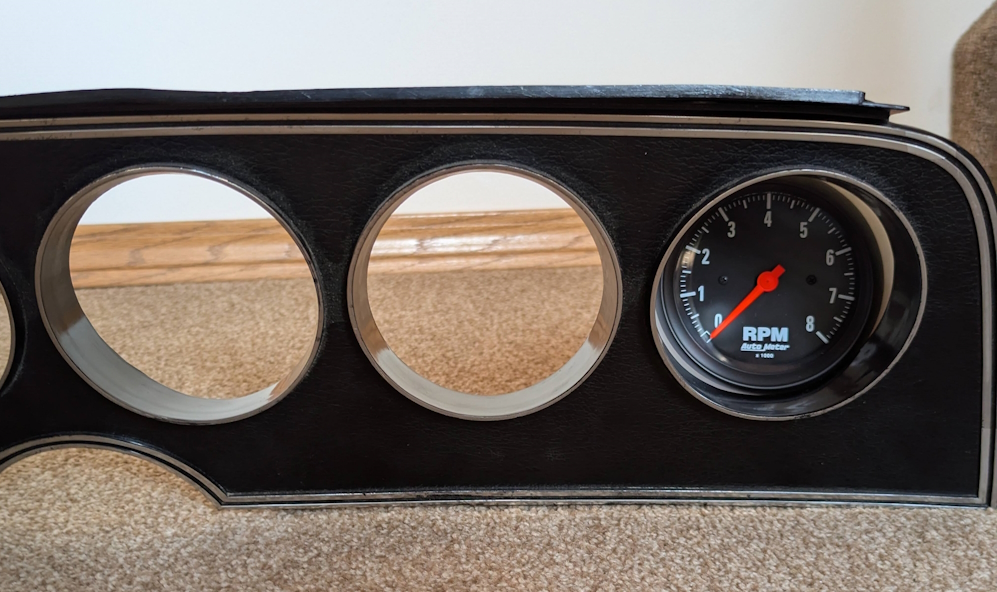
Dimensions of model #3 are close but not quite there yet.
The gauge fits nice and snugly in the mounting hole, I nailed that measurement from the spec sheet :)  Now that I have the gauge, I see it's bezel is taller than expected, so I'll need to make a new print that is deeper, so the pod can still screw onto the dash panel without having to cut apart anything in the original panel. 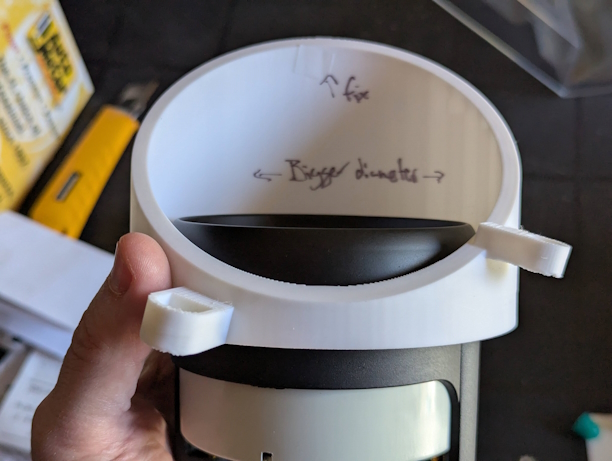 The angle looks good from the driving position at 15 degrees. There is indeed a bracket further back in the dash that may be close, so I'll make the new version 12 degrees instead to hopefully clear it. Hopefully doesn't make a huge difference to the viewing angle.  Stay tuned for more updates.
|
|
|
1974 Gran Torino in flat black 351W/C6
|
|
|
|
|
Rockatansky
Senior Member
Joined: 30-July-2010 Location: On The Road Status: Offline Points: 6398 |
Post Options
Thanks(0)
Quote Reply
Posted: 26-May-2025 at 10:55AM |
|
Rock'n & Rollin
|
|
|
72 GT Ute
|
|
|
|
|
Dubz
Member
Joined: 26-April-2020 Location: Manitoba Status: Offline Points: 67 |
Post Options
Thanks(0)
Quote Reply
Posted: 07-June-2025 at 4:53AM |
|
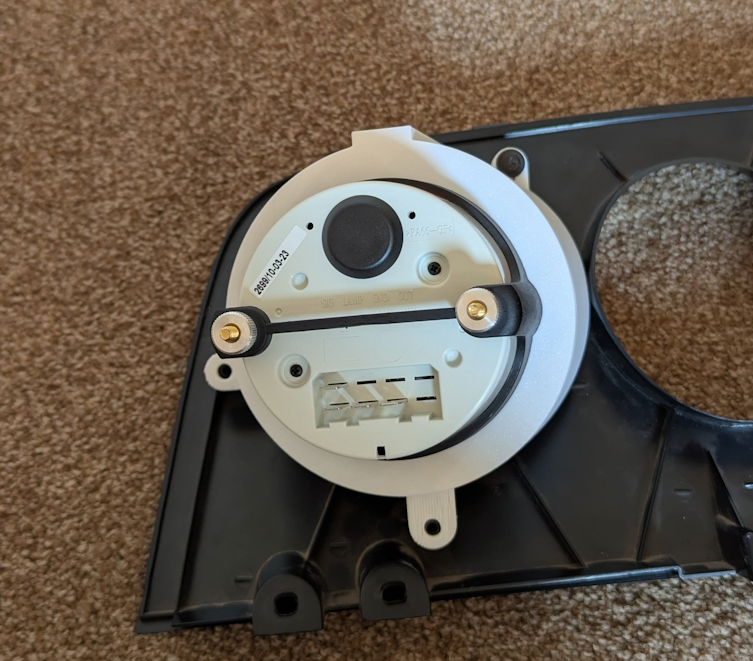
Print 4 is a success for lining up all the holes! Won't be back out for a test fit in the car for another few weeks, but it's looking like this should be pretty darn close.
    |
|
|
1974 Gran Torino in flat black 351W/C6
|
|
|
|
|
peter.jenerette
Senior Member

Joined: 08-February-2023 Location: Nevada, TX Status: Offline Points: 1054 |
Post Options
Thanks(0)
Quote Reply
Posted: 07-June-2025 at 11:47PM |
|
This looks great!
|
|
|
Pete Jenerette
1972 Gran Torino (H-Code - 4R70W) 2022 F250 XLT 7.3 2003 Thunderbird |
|
|
|
|
Eliteman76
Admin Group
Joined: 20-March-2006 Location: Nebraska, USA Status: Offline Points: 5450 |
Post Options
Thanks(0)
Quote Reply
Posted: 08-June-2025 at 2:45AM |
|
That’s a really nice piece!!
Now here is the kicker…you know how many cars came with base clusters? You could easily sell something like that because it would cover all the 72-76 Torino/montego/ranchero models. Not sure of print time, materials and cost but that’s such a nice example of making something with technology man, well done! Now I just need a 72-73 rally cluster rear shell 3D scanned and printed
 |
|
|
Andrew:GTS.ORG admin, '72 Q code 5 speed Restomod Pondering: #99Problems |
|
|
|
|
Eliteman76
Admin Group
Joined: 20-March-2006 Location: Nebraska, USA Status: Offline Points: 5450 |
Post Options
Thanks(0)
Quote Reply
Posted: 08-June-2025 at 2:50AM |
|
Actually now that think about it:
How hard would it be to take and scan a stock rally cluster housing and design something to accept modern aftermarket gauges? You would to retain the speedometer I’d think unless you did an aftermarket piece like I want to do. At one point Autometer had Ford Cobra gauges with the drag racing snake on them. I just didn’t want to drop $700 for the full set at that time.
|
|
|
Andrew:GTS.ORG admin, '72 Q code 5 speed Restomod Pondering: #99Problems |
|
|
|
|
Dubz
Member
Joined: 26-April-2020 Location: Manitoba Status: Offline Points: 67 |
Post Options
Thanks(0)
Quote Reply
Posted: 08-June-2025 at 4:22AM |
The plan is to give away the print file for free after I've got it sorted, so anyone can print a copy. A bit of pay it forward for some free headers I got for the Torino 20ish years ago.
|
|
|
1974 Gran Torino in flat black 351W/C6
|
|
|
|
|
Rockatansky
Senior Member
Joined: 30-July-2010 Location: On The Road Status: Offline Points: 6398 |
Post Options
Thanks(0)
Quote Reply
Posted: 08-June-2025 at 4:54AM |
|
that's all great & fabulous but i can't even get my paper printer to work much less do i have a 3D printer
|
|
|
72 GT Ute
|
|
|
|
|
Booyah45828
Member
Joined: 28-February-2022 Location: Ohio Status: Offline Points: 163 |
Post Options
Thanks(0)
Quote Reply
Posted: 09-June-2025 at 4:44AM |
|
Looks great!
I just bought a creality ender 3, so this might have to be my first project.
I too have the standard cluster and want to add additional gauges like volts, trans temp, etc. and it would be nice to make the coolant temp and oil light functional gauges as well. Multiple manufacturers have triple and qaud gauges in 3 3/8" diameter. The problem is I can't find the ones I want in the order I want, along with having a turn bulb in them as well(wouldn't be hard to add after the fact, or come up with an alternative). Then I crawl down the rabbit hole of digital gauges using tft displays and dear god this simple gauge project is really going off the rails. |
|
|
|
|
Jaybee
Member
Joined: 28-July-2024 Location: Chesapeake, VA Status: Offline Points: 51 |
Post Options
Thanks(0)
Quote Reply
Posted: 09-June-2025 at 1:34PM |
|
That came out looking really great. I think there's huge potential for 3D printing in the car hobby. Even more so for niche cars or applications.
|
|
|
Cars are meant for driving
|
|
|
|
|
The Torino Kid
Senior Member
Joined: 23-November-2003 Location: United States Status: Offline Points: 268 |
Post Options
Thanks(0)
Quote Reply
Posted: 25-June-2025 at 8:30AM |
|
I'd be interested in buying one without the hole...
|
|
|
1973 Gran Torino Sport CJ 351
'Q' code 63R body |
|
|
|
|
Dubz
Member
Joined: 26-April-2020 Location: Manitoba Status: Offline Points: 67 |
Post Options
Thanks(0)
Quote Reply
Posted: 03-July-2025 at 6:55AM |

Needs a few more tweaks before I'll be super happy with it, but it's coming along!!
|
|
|
1974 Gran Torino in flat black 351W/C6
|
|
|
|
|
Inkara1
Senior Member
Joined: 17-November-2021 Location: Ridgecrest, CA Status: Offline Points: 515 |
Post Options
Thanks(0)
Quote Reply
Posted: 03-July-2025 at 9:29AM |
|
Will the final product still be white? The one change I'd make is black paint or black filament. But I'm guessing you're using whatever is cheapest or most convenient to make the test pieces.
|
|
|
1972 Gran Torino station wagon, light blue, 351C 2V, prior owner upgraded to 4V (2V heads), originally had a C4 but prior owner changed to C6 for some reason.
|
|
|
|
|
Dubz
Member
Joined: 26-April-2020 Location: Manitoba Status: Offline Points: 67 |
Post Options
Thanks(0)
Quote Reply
Posted: 03-July-2025 at 3:03PM |
|
Correct, just using white for test prints as it's cheap. I may be up to $3 in cost after 4 prints!
|
|
|
1974 Gran Torino in flat black 351W/C6
|
|
|
|
|
72 RS 351
Senior Member

Joined: 04-September-2014 Location: Knoxville TN Status: Offline Points: 3443 |
Post Options
Thanks(0)
Quote Reply
Posted: 04-July-2025 at 1:18AM |
How do you like that steering wheel, the size and fit of it? I sent you a PM about it.
|
|
|
Don
73 Ranchero "Sport 72 front end", floor shift/console, planning EFI 7000 rpm 351 stroker 73 Ranchero GT 351C-4V &4R70W for sale later. 92 Lincoln Mark VII SE GTC, OBDII 347/4R70W |
|
|
|
|
The Torino Kid
Senior Member
Joined: 23-November-2003 Location: United States Status: Offline Points: 268 |
Post Options
Thanks(0)
Quote Reply
Posted: 01-December-2025 at 9:57AM |
|
ttt any word on these being for sale?
|
|
|
1973 Gran Torino Sport CJ 351
'Q' code 63R body |
|
|
|
|
Sak7788
Member
Joined: 08-August-2025 Location: GA Status: Offline Points: 45 |
Post Options
Thanks(0)
Quote Reply
Posted: 01-December-2025 at 2:06PM |
|
Same.
|
|
|
|
|
Post Reply
|
|
| Tweet |
| Forum Jump | Forum Permissions You cannot post new topics in this forum You cannot reply to topics in this forum You cannot delete your posts in this forum You cannot edit your posts in this forum You cannot create polls in this forum You cannot vote in polls in this forum |


 Topic Options
 Rockatansky wrote: