
|
1 wire alternator and gauge |
Post Reply 
|
| Author | |
Montego01 
Senior Member 

Joined: 16-December-2012 Location: Largo Status: Offline Points: 565 |
 Post Options Post Options
") Thanks(0) Thanks(0)
 Quote Reply Quote Reply
 Topic: 1 wire alternator and gauge Topic: 1 wire alternator and gaugePosted: 09-July-2014 at 6:57AM |
|
Anyone here install a 1 wire alternator and wire it in to their amp gauge on the dash?
Would this require a 'two' wire alternator? Seems 100 amp is a common 1 wire alternator. I guess if you hood this up, the gauge would read all the way to the max (with higher revs) since the amp gauge only goes to +65 amps. Anyone have info? Thanks
|
|
 |
|
|
aquartlow
Senior Member
Joined: 19-December-2011 Location: Summerfield, Fl Status: Offline Points: 2341 |
Post Options
Thanks(0)
Quote Reply
Posted: 09-July-2014 at 7:58AM |
|
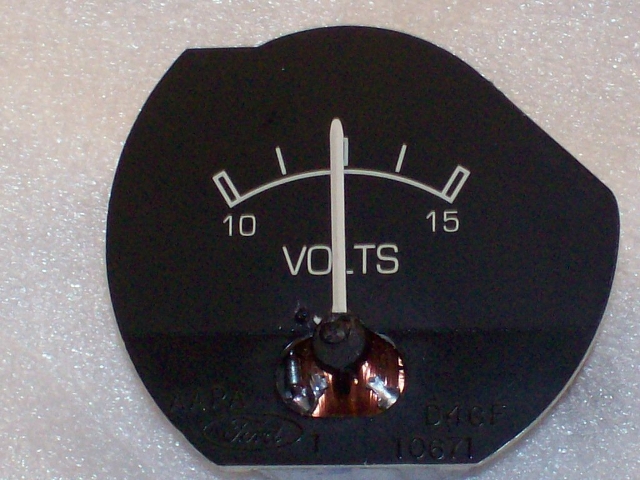
I don't know if this info will be helpful, but here goes. The only time the gauge will be pegged out is when there is an electrical load requiring 65 amps and above, not sure what additional electrical loads you have but IMO, it is always better to have too much alternator power/amperage than not enough. I installed a 130 amp 3G Ford alternator, due to the double amperage output the 3G has over the original 65 amp 1G alternator, but it wasn't a good idea for me to keep the original ammeter's shunt type wiring. The shunt only has a 10ga wire that handles the charging/electrical loads from the alternator to the battery, while this is fine for a 55-65 amp alternator, it would be a "choke point" for the 130 amp alternator and potentially a fire hazard. The 130 amp 3G was required due to amperage increases caused by stereo system, dual electric cooling fans, electric fuel pump, aftermarket ignition and etc. I used a DC current clamp meter and found I was pulling over 120 amps with everything on, not good with a 65amp ammeter gauge and associated wiring. I originally read a post from PSQUARE75(Paul) where he sent his ammeter to rccinnovations.com and had him change it over to a voltmeter, after reading this post I decided to send (2) ammeter gauges in for the modifications, having one as a spare. The gauges look and perform great, here is a pic of what his modified gauge looks like:
 |
|
|
www.supermotors.net/22468
Yeah, It's a Hybrid...It burns gas and tires. No matter how good she looks, somebody, somewhere, is tired of her sh*t. Beauty is skin deep, ugliness goes clear to the bone. |
|
|
|
|
Montego01
Senior Member
Joined: 16-December-2012 Location: Largo Status: Offline Points: 565 |
Post Options
Thanks(0)
Quote Reply
Posted: 09-July-2014 at 8:28AM |
|
Thanks for all the info Todd.
I like the volt gauge idea. I'll take a look at that website. Sounds like it might be the way to go I'll have read more on the amp/alternator shunt. Where is that located? My car (Montego GT) has been disassembled and I don't remember seeing it. Possibly in the alternator wiring? So if I added a bigger shunt that is meant for to work with a 100amp alternator, this should also work?
|
|
|
|
|
aquartlow
Senior Member
Joined: 19-December-2011 Location: Summerfield, Fl Status: Offline Points: 2341 |
Post Options
Thanks(0)
Quote Reply
Posted: 09-July-2014 at 8:43AM |
|
The shunt is located on the passenger side inner fender. One end of the shunt attaches to the battery side of the starter solenoid, the other end attaches to the "power distribution" stud mounted about 6-8" below the starter solenoid toward the alternator. Sorry, I do not have a pic available, I will try to find and post one.
You can use a larger gauge wire but will require it to be CONSIDERABLY long due to the resistance needed for the gauge to work. I tried an 8ga cable in place of the original 10ga and it was over 5ft long, a 4ga cable would require, IMO the length to be quite long and unsightly. It almost seemed like the original 10ga wiring had a "special" value of resistance as compared to regular 10ga insulated copper wiring. If your electrical loads haven't changed a "whole lot" you can try to stay with the original ammeter shunt wiring, just check the shunt for increased heat or the wire's protective jacket deterioration. I will say replacing the ammeter/wiring with the volt meter eases my mind and reduces the chance of an electrical mishap. Good luck. Todd
|
|
|
www.supermotors.net/22468
Yeah, It's a Hybrid...It burns gas and tires. No matter how good she looks, somebody, somewhere, is tired of her sh*t. Beauty is skin deep, ugliness goes clear to the bone. |
|
|
|
|
aquartlow
Senior Member
Joined: 19-December-2011 Location: Summerfield, Fl Status: Offline Points: 2341 |
Post Options
Thanks(0)
Quote Reply
Posted: 09-July-2014 at 9:34AM |
|
Here is an illustration showing the way ammeter shunt is wired. Courtesy of Psquare 75 and 72GTVA.
 Here is a pic of the insulator junction block(just below the starter solenoid), I referred to it as the "power distribution" stud. Courtesy of Kversch, it shows the junction block on a '72 Torino, later models have similar units. This was used for a GT gauge package(ammeter) as well as for power windows, power seats, rear window defroster and/or other accessories. 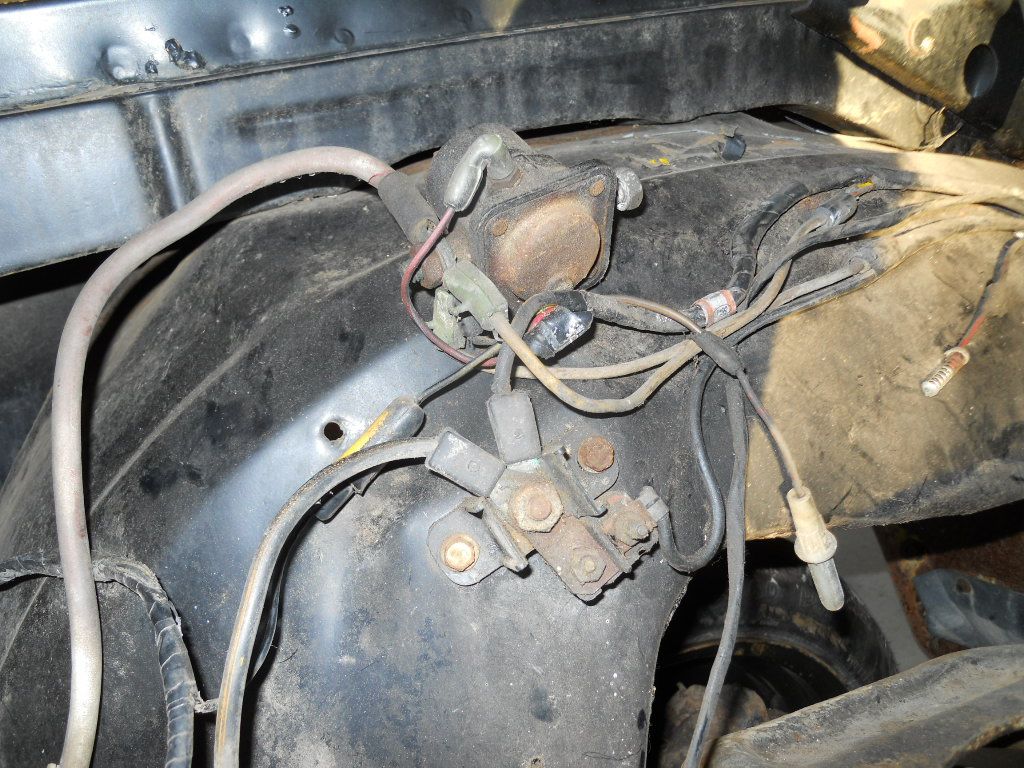 Hope this helps. Todd
|
|
|
www.supermotors.net/22468
Yeah, It's a Hybrid...It burns gas and tires. No matter how good she looks, somebody, somewhere, is tired of her sh*t. Beauty is skin deep, ugliness goes clear to the bone. |
|
|
|
|
72FordGTS
Admin Group 
GTS.org Admin Joined: 06-September-2005 Location: Ontario, Canada Status: Offline Points: 6780 |
Post Options
Thanks(0)
Quote Reply
Posted: 09-July-2014 at 2:32PM |
|
Scott,
why the need to step up to a 100 Amp unit? Are you planning on adding something that draws a lot of power? I run a 70 AMP 1G alternator with my car, (stock was 65 but looks the same) and it handles everything on my car. I have the electric defrost too which draws a ton of juice. I think you can even get a stronger 1G than 70 AMP too. At least that way all your stock wiring remains the same, and no issues with the gauges. My original Alternator lasted until last year, so I don't think the 1G's are that bad. BTW, are you sure you Ammeter won't be going to 65 amps, unless you have a serious overcharge situation. It typically sits at ) or just above zero to show that the system is charging on my car. |
|
|
Vince
1972 Ford GTS Sportsroof - Survivor, One Family car GTS.org Admin |
|
|
|
|
Robbdtme
Senior Member

Joined: 06-June-2012 Location: Central WI Status: Offline Points: 765 |
Post Options
Thanks(0)
Quote Reply
Posted: 09-July-2014 at 5:33PM |
|
I have pinned the ammeter gauges pretty hard and it does not hurt them. No different than when your fuel tank is full and the gas gauge is pegged past full.
I have a 1 wire 100 amp on one of mine and the gauge really doesn't hit extremes. Actually just doesn't hit discharge as often idling at night with lights, AC etc all running. |
|
|
Johnny cash Special 74-75-76 freak. 77 XR7. 78 LTD II sport looks pretty but poop 302 in it.
|
|
|
|
|
Montego01
Senior Member
Joined: 16-December-2012 Location: Largo Status: Offline Points: 565 |
Post Options
Thanks(0)
Quote Reply
Posted: 09-July-2014 at 11:09PM |
|
Interesting. I don't remember that on my 72. I'll have to check my 73. I think I do have that on the 73.
I looked at my 72 harness and I do have a small circuit breaker looking thing on my starter solenoid. Have to recheck it out today. I'm sure I'll come across it. Thanks for posting the pics Todd. Vince - Really the only thing that will be added that will need more power is the stereo amp. I know my brown MX, it draws quite a bit off the battery. Don't have a defrost...I could see where that would be a power drain. Looks like I could still go 'one wire' so I don't have to use the external regulator, and use the original wiring/shunt for the amp gauge like Robb did. Would love to clean up those wires on the right wheel well. May just go voltmeter. I'll need to do some looking into what I have and what I need. Thanks again |
|
|
|
|
Post Reply
|
|
| Tweet |
| Forum Jump | Forum Permissions You cannot post new topics in this forum You cannot reply to topics in this forum You cannot delete your posts in this forum You cannot edit your posts in this forum You cannot create polls in this forum You cannot vote in polls in this forum |


 Topic Options