
|
My 1970 Ranchero 500 |
Post Reply 
|
| Author | |
1970_Raunchero 
New Member 
Joined: 02-February-2026 Location: Alabama Status: Offline Points: 13 |
 Post Options Post Options
") Thanks(0) Thanks(0)
 Quote Reply Quote Reply
 Topic: My 1970 Ranchero 500 Topic: My 1970 Ranchero 500Posted: 10-February-2026 at 6:00PM |
|
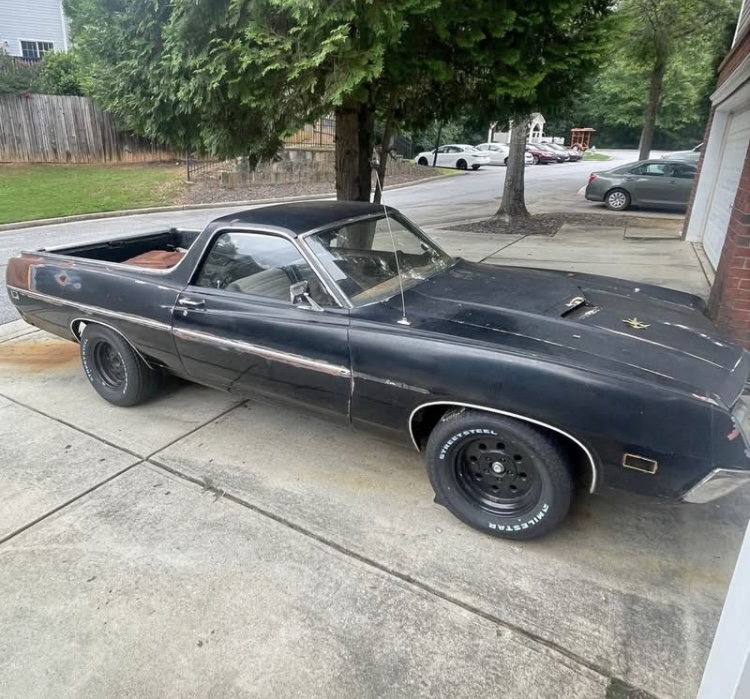
Hey everyone, Excited to share the story of my Ranchero 500. It’s a 302 car with long tube headers, aluminum 4-barrel intake and carb, backed by a 3-speed manual on the floor. I picked it up off Marketplace (traded my 200,000 mile 2005 ranger fx4 from the midwest for it). It ran, but not well, and it had absolutely no brakes when I got it. My goal is simple: turn it into a solid, dependable driver. Getting It Sorted – Interior & Electrical First thing I did was clean up the chaos inside. The cabin was full of random spare parts, so I emptied everything out, organized what I had, and installed the missing interior pieces like the door panels. Nothing glamorous, but it made it feel like a car again instead of a parts bin. The battery wouldn’t hold a charge, so that was replaced right away. I also replaced the starter solenoid, which was acting up while trying to start the car. After that, I tracked down some sketchy wiring. Cut out bad connections and soldered everything properly instead of relying on twisted wires and old crimp connectors. That alone made a big difference, the car now starts reliably every time. Engine is Running Way Too Rich Once it was starting consistently, I focused on how it ran. It ran like hot garbage — extremely rich and reeked of fuel. I spent about 30 minutes tuning the carb and dialing it in. Nothing major, just basic adjustments, but it cleaned up noticeably. It’s still not perfect, but it’s at least manageable now. Brakes – Zero Pedal Next up was the biggest issue: no brakes at all. The pedal went straight to the floor. I started by bleeding the system. I got some air out of the rear and managed to build a little pressure, but it still didn’t feel right. The pedal was weak and inconsistent. That led me to suspect the master cylinder wasn’t working as it should. They’re cheap enough, so I ordered a new one and waited out the weekend. When it came in, I bench bled it before installing. Once installed, I bled the system again and immediately had a much better pedal. That confirmed the old master was definitely part of the problem. But even with the new master, the pedal still felt terrible. It had pressure, but it wasn’t confidence-inspiring. So I put the car on stands, pulled the rear wheels, and opened up the drums. That’s when I found an issue. The rear hardware was a mess — loose springs and adjusters basically flopping around. No way the shoes were adjusted correctly like that. I reinstalled the springs properly, set up the adjusters correctly, and adjusted the drums until I had the proper drag. Put everything back together feeling pretty good about it. Bled the system again… and somehow I was back to basically no brakes. At that point it was dark and late, so I called it for the night. I’ll be digging back into it after work and figuring out what I missed. The Brake Saga Continues (And Finally Ends) A few days and several more bleeding sessions later… Still no solid pedal. At this point I started second-guessing everything. I went digging online for reference photos of factory disc brake setups on these cars. Every picture I found looked like mine. Everything appeared to be installed correctly. Then I came across a Facebook post where someone was asking if their calipers looked right — and they were set up exactly like mine. The comment section was peak internet. Half the people were saying: “Yep, that’s correct.” The other half were saying: “Those are on the wrong sides.” So I figured… forget it. Let’s just flip them and see what happens. Swapped the front calipers left to right, bled the system again. Bam. Instant pedal. Four days of bleeding, chasing ghosts, and questioning my sanity — solved by putting the calipers on the correct sides so the bleeders were actually at the top where they belong. For context, I got the car after the previous owner had already replaced all the front suspension components and the entire brake system with RockAuto parts. Everything was new — just not necessarily installed correctly. Once the calipers were on the proper sides and bled correctly, I finally had real brakes. First Drive With actual pedal under my foot, I was finally able to drive the car. The alignment is way off — it tries to put me in the ditch every time I shift — but it moves under its own power and stops when I tell it to. And honestly, after fighting the brake system for days, that first drive felt pretty good. Still a long way to go, but at least now it’s officially a running, driving Ranchero instead of a yard ornament. Lighting & Electrical Adventures Next on the list was lights. I had one headlight and nothing in the rear. Found a wiring diagram posted here on the forum and started chasing circuits. The brake pedal switch was bad, so I replaced it. Then I found voltage wasn’t making it through the turn signal switch in the column. Pulled the aftermarket steering wheel and found more twisted-and-taped wiring going to a replacement switch. Verified voltage going into the lead, cut everything apart, soldered it properly, cleaned the switch contacts — and suddenly I had working tail lights and brake lights. Turn signals were questionable at best, but I know hand signals. I drove it to work for a few days and eventually took it to a local alignment shop (our in-house rack was down with a blown hydraulic line). They aligned it to old Ford specs I found on forums. While it was on the lift, they used a pedal depressor to hold the brake… and left it engaged for about two hours. That’s when 55-year-old brake light wiring decided it had enough. Cue smoke coming out of the cabin and a young tech thinking the car was burning to the ground. To their credit, they fixed the alignment (and discovered the previous owner had installed the tie rods backwards), handed me some electrical tape, and sent me home to fix the mess. Dash Out… The next morning I pulled the dash, split open the harness, and traced the brake light circuit. Cut out the melted wiring and soldered in new sections properly. The brand-new brake light switch that had just cooked went back under warranty. Installed another one, buttoned everything up, and now I had working lights again — with fresh wiring in the dash. Reassembled the interior and took it out for another drive. This time, with good brakes, correct alignment, and working lights, I was grinning ear to ear. It’s now the beginning of January and I finally have a Ranchero I can actually enjoy……until she decided to puke coolant everywhere. Cooling System Chaos So three weeks ago I decided to drive the car to my parents’ house for Sunday dinner. It made it 7 miles. Then it puked its guts out. Blew a hose. Replaced the hose. Drove it again… another 7 miles and now it’s pushing coolant out of the radiator cap. Up to this point most of my drives had only been a mile or two at a time, maybe five round trip. This was the first real “stretch its legs” run. I made it to my parents’ place, let it cool down, and checked for coolant flow with the engine running. Very slow flow. Pulled the thermostat, cut a new gasket, topped it off, and checked again. Flow was a little better. Good enough to eat dinner and leave the car there for the week. Next weekend I came back with a water pump and swapped it out. Way better flow. Sweet. Fixed. Nope. Still puking coolant. At that point I flushed the cooling system three times. Finally got clean water running through it. With the big winter storm in the beginning of 2026 rolling in, I filled it back up with antifreeze and took it for a drive. Puked again. Parked it inside the shop so it wouldn’t freeze and finally admitted what I should’ve checked sooner — the radiator is partially clogged. Perfect.... Making It Work With What I’ve Got I have two spare radiators. One is a massive aluminum unit that came with the Ranchero parts pile. Absolutely not fitting without major surgery. The other is another radiator from another project truck (Also wrong for it but out of the return window). Not correct for the Ranchero… but only a few inches off dimensionally. So, what’s the move when you’re broke, in the middle of moving, and the project still has to move forward? Make it work. Spent this past weekend in the shop with my dad fabricating a new radiator mounting setup and installing the “wrong” radiator in the car. Got everything mounted up, filled it, bled it, and took it for a test drive. It ran good. Didn’t seem to overheat. For the first time in weeks, it actually acted like a normal car. Because It Can’t Ever Be Easy Somehow during all of this, I lost rear running lights and brake lights when the headlight switch is on. They worked before. So that’s waiting for me this coming weekend. But at least it’s not puking coolant anymore… for now. More to come. Thanks for reading my first post my next post will be a bunch of pictures of the car. ***edited post as cooling issues was actually 3 weekends ago as of 2/8/26****
Edited by 1970_Raunchero - 10-February-2026 at 6:11PM |
|
|
Thanks,
Joe |
|
 |
|
|
1970_Raunchero
New Member
Joined: 02-February-2026 Location: Alabama Status: Offline Points: 13 |
Post Options
Thanks(0)
Quote Reply
Posted: 10-February-2026 at 6:05PM |
       |
|
|
Thanks,
Joe |
|
|
|
|
72 RS 351
Senior Member 

Joined: 04-September-2014 Location: Knoxville TN Status: Online Points: 3444 |
Post Options
Thanks(0)
Quote Reply
Posted: 11-February-2026 at 12:27AM |
|
Well done Joe, it sounds like you know enough about working on cars to handle anything. Keep at it, I think you will have a handle on all of it soon.
|
|
|
Don
73 Ranchero "Sport 72 front end", floor shift/console, planning EFI 7000 rpm 351 stroker 73 Ranchero GT 351C-4V &4R70W for sale later. 92 Lincoln Mark VII SE GTC, OBDII 347/4R70W |
|
|
|
|
1970_Raunchero
New Member
Joined: 02-February-2026 Location: Alabama Status: Offline Points: 13 |
Post Options
Thanks(0)
Quote Reply
Posted: 11-February-2026 at 5:34AM |
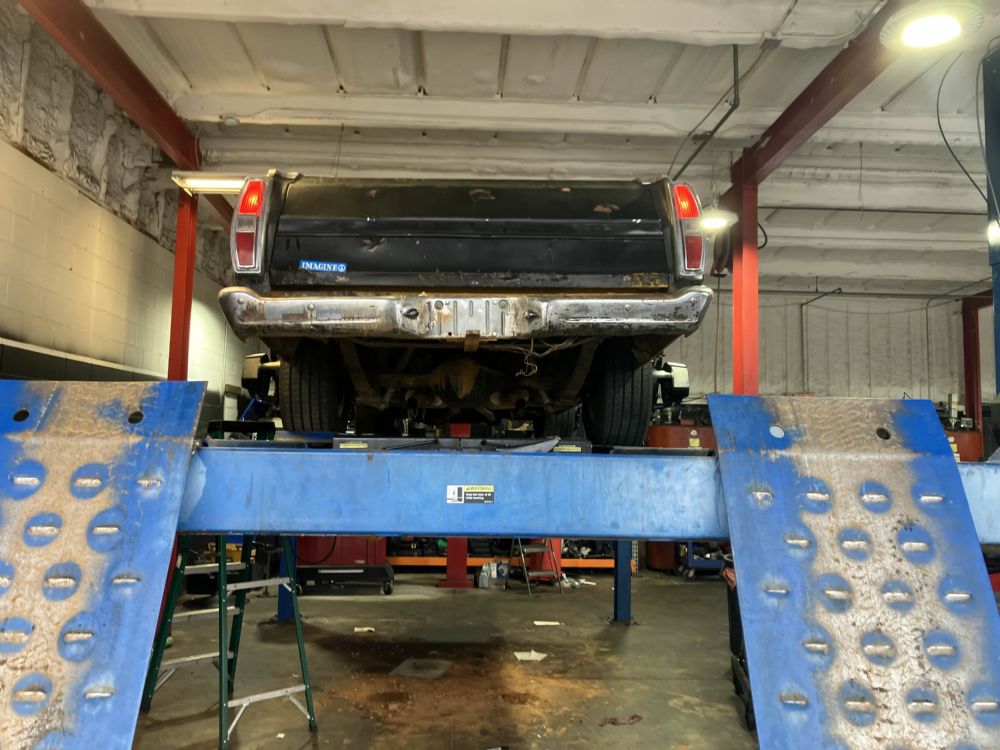
      These are all pictures i was able to get under the car at the alignment shop not to much rot under her.  this one is from the first drive after rewiring the dash after the alignment shop.
|
|
|
Thanks,
Joe |
|
|
|
|
1970_Raunchero
New Member
Joined: 02-February-2026 Location: Alabama Status: Offline Points: 13 |
Post Options
Thanks(0)
Quote Reply
Posted: 15-February-2026 at 5:58PM |
|
Update – Overheating… Or So I Thought Change of plans this weekend. Last week I had installed a coolant temp gauge and an oil pressure gauge, but I wasn’t getting good readings from either. Figured I had a bad temp sender and possibly a junk oil pressure gauge. Waited on payday, then hit the local parts house and picked up: • New temp sending unit • On/off temp switch for my electric fan • Wiring supplies • Wiper blades (pretty sure the ones on it were from 1973…) Got to my dad’s shop and started wiring everything correctly and replacing the sensors. The temp gauge started reading properly — around 100° on startup — and then slowly climbing as it warmed up. And climbing. And climbing. Eventually it pegged. Now I’m confused. New radiator. Block flushed multiple times. Good coolant flow. Then I remembered… I had removed the thermostat earlier while chasing cooling issues. So now I need to put a thermostat back in. Thermostat Housing Disaster The intake is an aluminum Edelbrock. Someone in the past had already drilled and tapped one side of the thermostat housing bolt holes to 3/8-16, while the other side was still 5/16. I tested both a 160 and a 180 thermostat beforehand. The 180 opened exactly like it should, so that’s what I ran. While installing it, I used a little RTV to hold the thermostat in the housing with the gasket. Apparently it shifted without me noticing. As I was tightening the housing down evenly, I thought I had just one more thread to go — not much pressure on it — but because the thermostat had slipped and gotten between the housing and intake, it pulled the threads out of the 5/16 hole. Choice words were said, that ended Saturday immediately. I went home aggravated. Sunday Redemption Came back Sunday morning. My dad has tap and die sets, so we drilled and tapped the damaged side to 3/8-16 to match the other bolt. Cleaned everything up, re-seated the thermostat properly (more RTV this time to keep it in place), got the gasket aligned correctly, bolted it down, hooked everything back up. Fired it up. Gauge climbs again… and pegs at 250°. But the engine isn’t acting hot. No boiling over. No dieseling. No smell. Nothing that suggests 250°. So now I’m suspicious of the gauge itself. Out of frustration, I went back to the parts house and bought a brand-new mechanical temp gauge. Installed it. Removed the AutoMeter electric gauge. Wouldn’t you know it — perfect readings. Running right at 180°, sometimes a few degrees cooler. I watched it climb to 180, thermostat open, and drop back down. Let it idle for an hour. No issues. Took it for a drive. Got up to about 190°, cooled back down, behaved exactly like it should. I do not believe this thing is overheating anymore. The electric gauge was lying to me. Small Wins After dinner, I installed a tachometer I had ordered and wired in the lighting for the new temp gauge. By 8:00 PM: • Working mechanical temp gauge • Working tach • Working gauge lights • Car runs great • Confirmed not overheating Still no taillights when the headlights are on… but I let myself get distracted by shiny new gauges. Calling it a win anyway. I have a new headlight switch on order. I’m going to clean the original one and check for bad contacts first. If that doesn’t fix the rear light issue, the new switch is going in. I’ll post some pictures of the engine bay, the radiator setup we fabricated, and the gauges. Honestly kind of impressed with the cheap tach I picked up. More to come at the end of the week. for now here is some pics 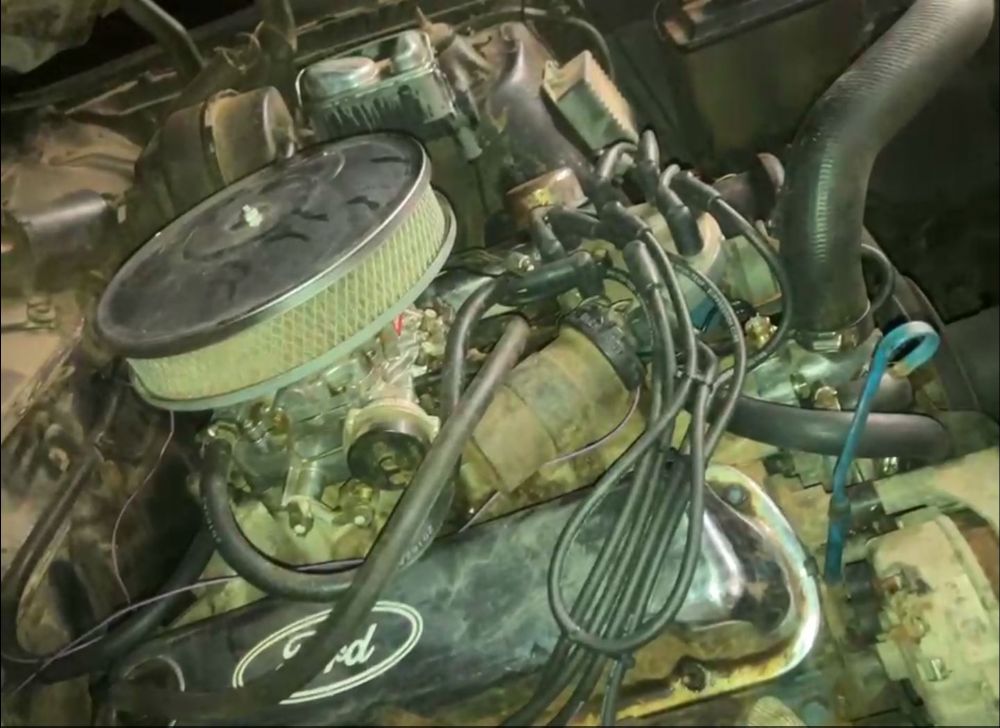 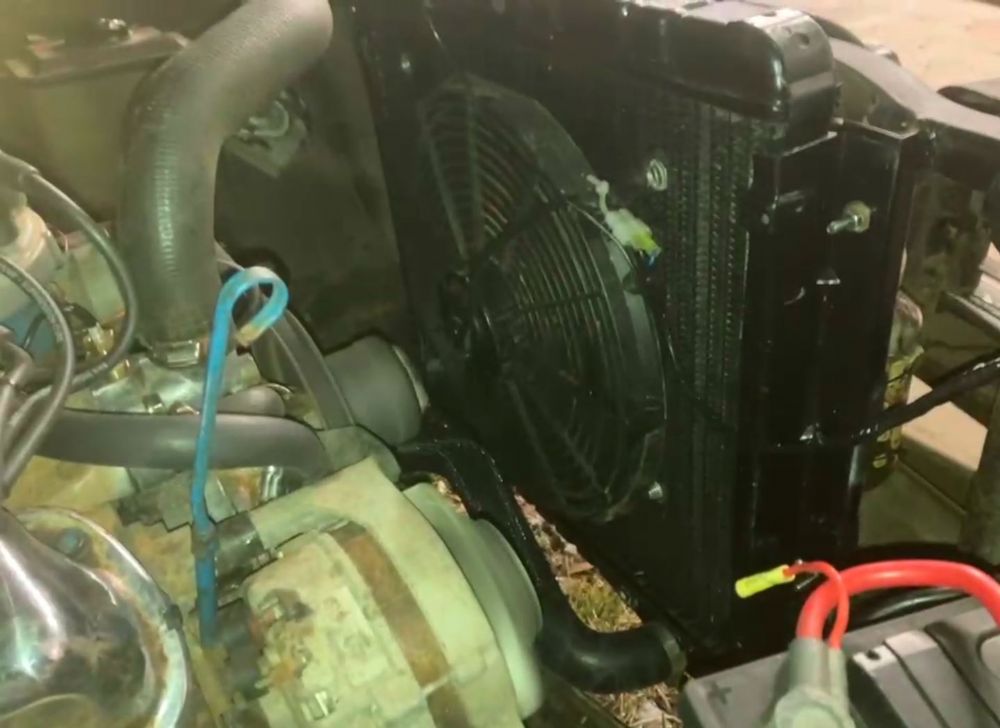 here is a shot of the radiator on how it is fabbed in now.  here is my tach and coolant gauge
|
|
|
Thanks,
Joe |
|
|
|
|
1970_Raunchero
New Member
Joined: 02-February-2026 Location: Alabama Status: Offline Points: 13 |
Post Options
Thanks(0)
Quote Reply
Posted: 18-February-2026 at 5:16PM |
|
Update – Headlight Switch Fixed Everything (Night Drive Success) Went over to my folks’ place today because my new headlight switch came in. At this point, I’ve learned it’s easier to just pull the dash any time I need to mess with switches or wiring, so out it came again. I started by testing the old switch. Verified power was going in and checked outputs. Every time I turned the switch on, I would lose power to the taillight circuit. That confirmed the switch itself was the problem. I unplugged the connector, cleaned all the contacts, reconnected it, and tested again. Same issue. So I pulled the old switch out and installed the new one. Instant fix. I now have: • Working taillights • Working brake lights • Working tag lights (which I didn’t have before at all) • Proper dash light function A bonus when I wired in my tach and temp gauge, I chose the correct circuit for illumination. Both the tach and temp gauge lights come on with the headlight switch and dim properly using the factory dimmer knob, just like the original dash lights. That was a really nice surprise, especially considering the amount of questionable wiring this car has had over the last 55 years. I reassembled the dash, tightened everything up, and took the car out for its first night drive in about a month. Everything worked exactly like it should. Being able to drive it at night, watch the tach working, see the gauges lit up properly, and know the cooling system is behaving was a great feeling after all the work this thing has needed. I still don’t have functioning turn signal flashers. The signals themselves work, but they don’t flash. I’ll be checking the flasher relay next, and I do have a spare to try. If that’s not it, the turn signal switch in the column may need attention. But overall, massive progress. Here is some pictures of: 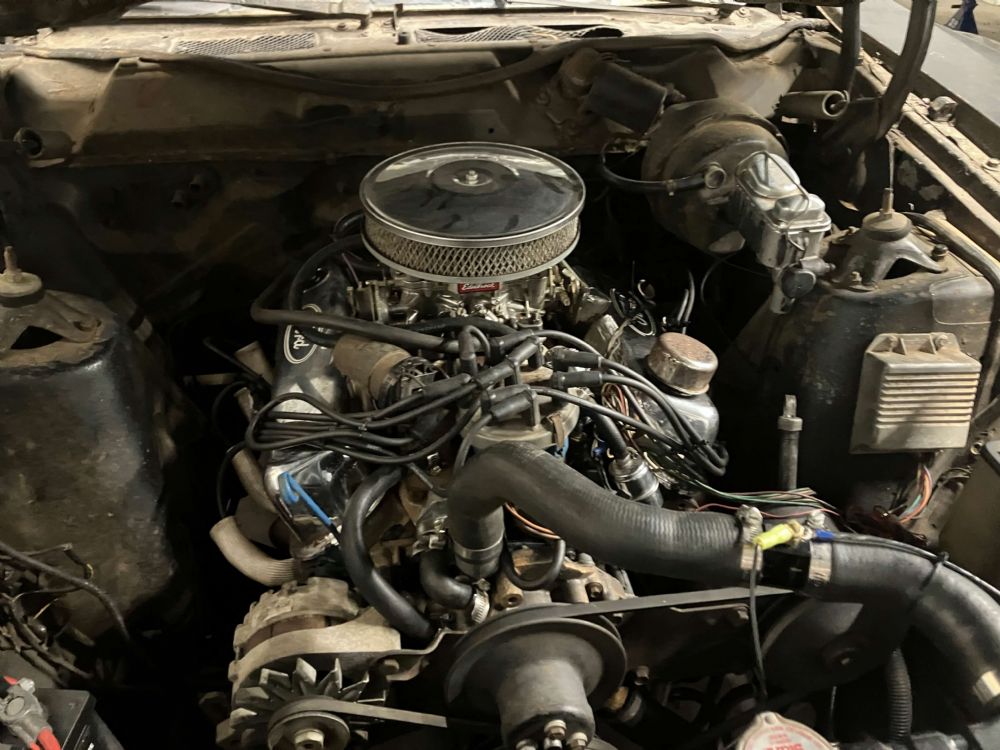 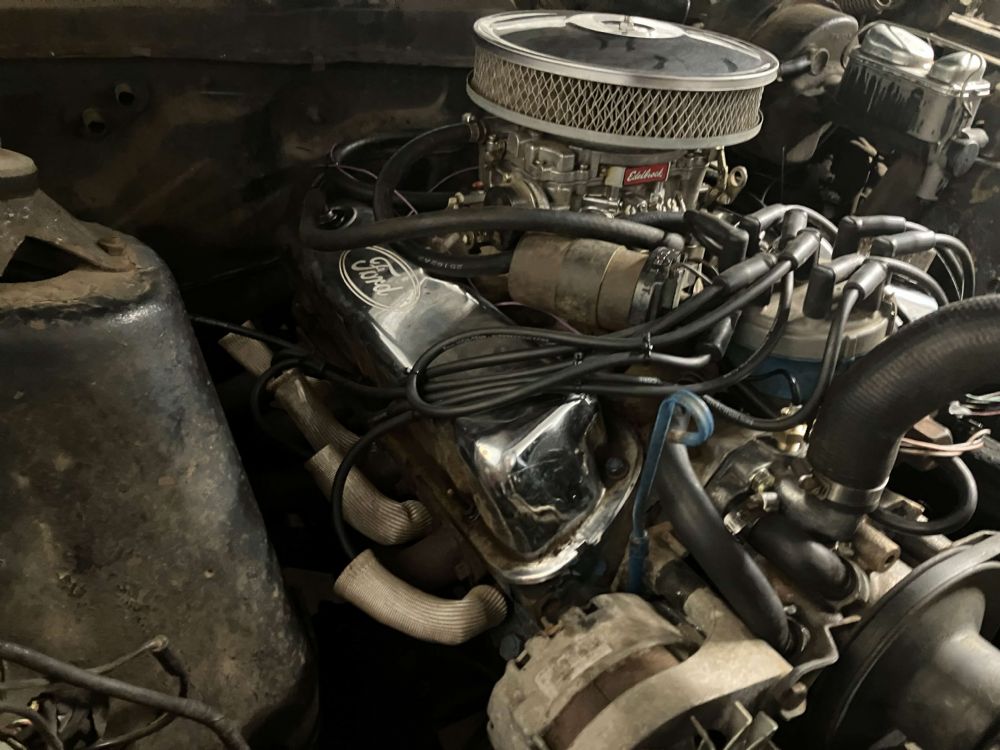 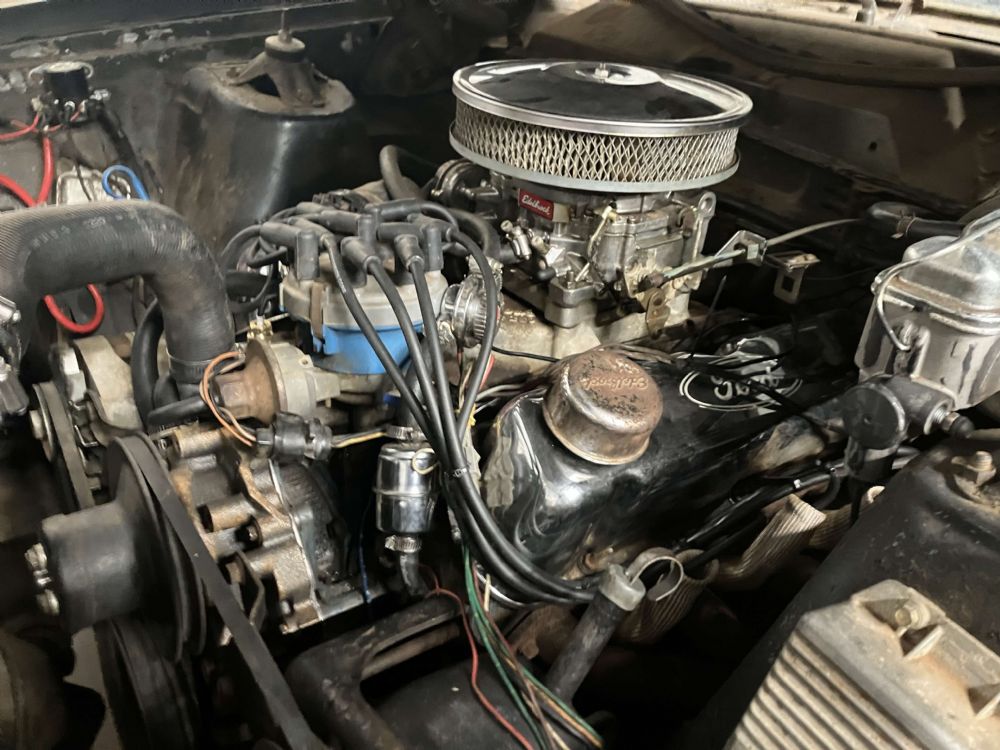 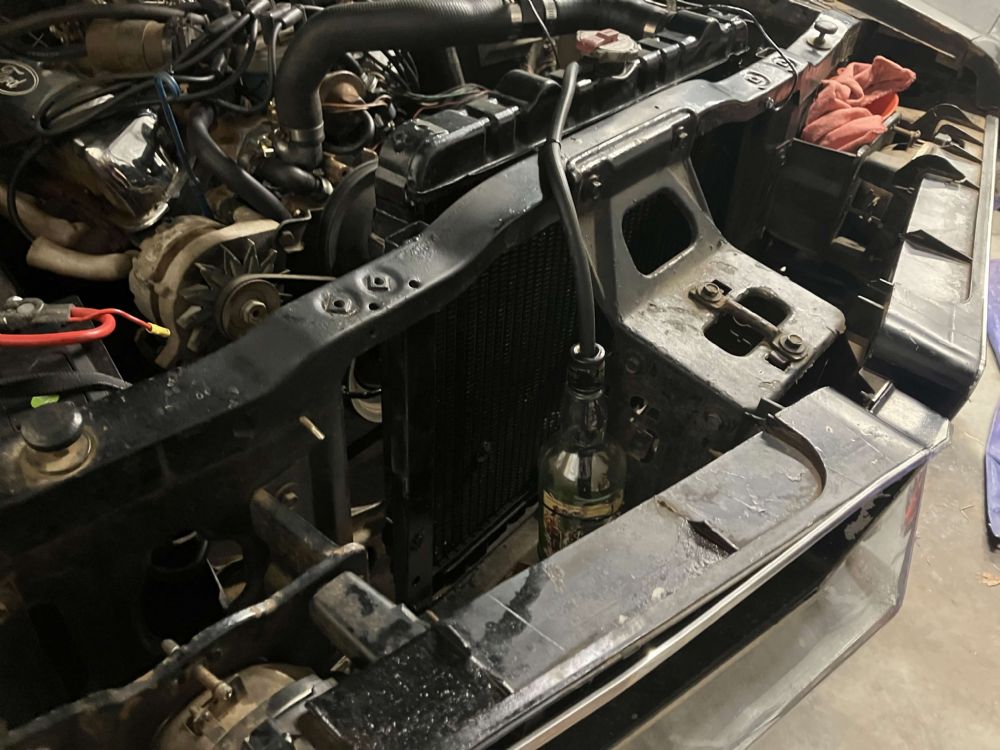 • Engine bay in the shop 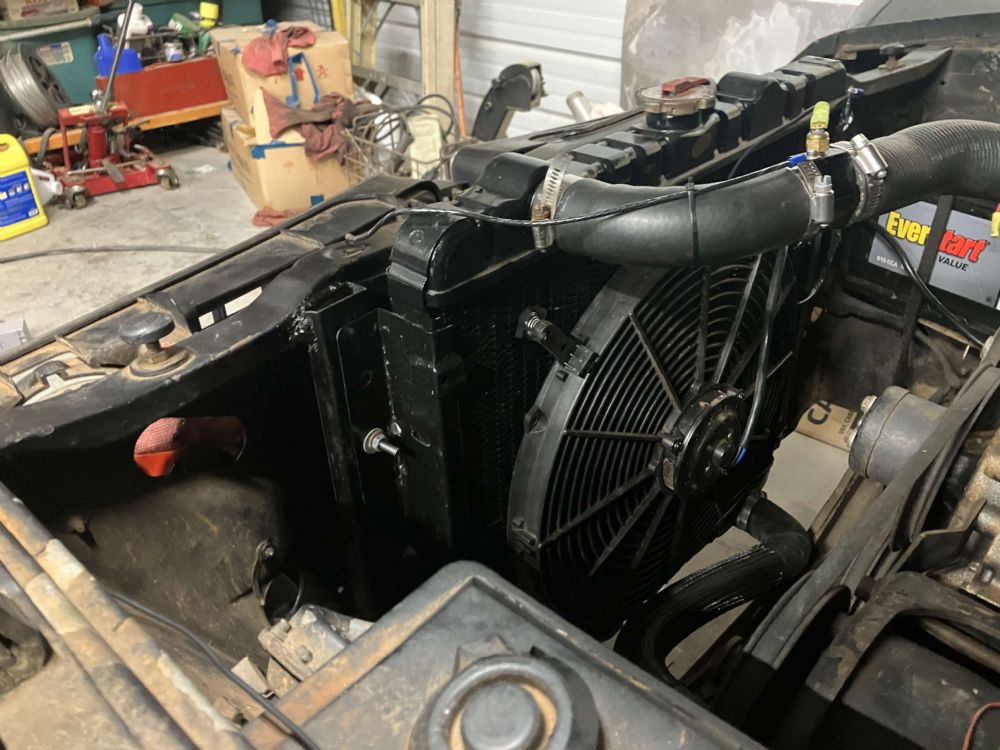 • Radiator setup and mounting  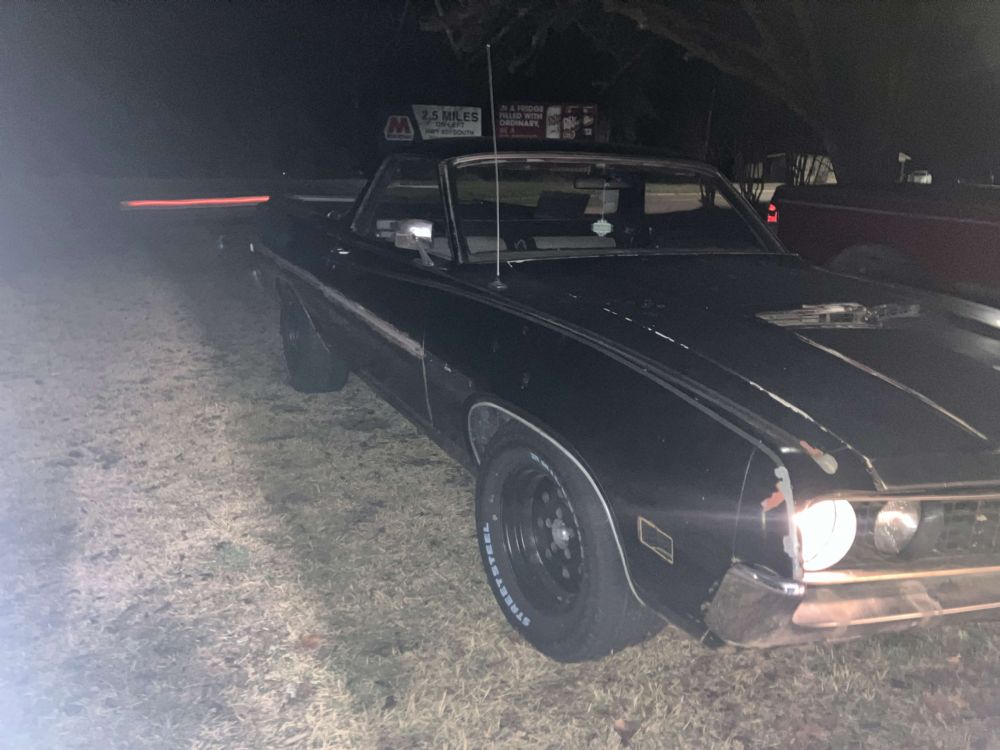 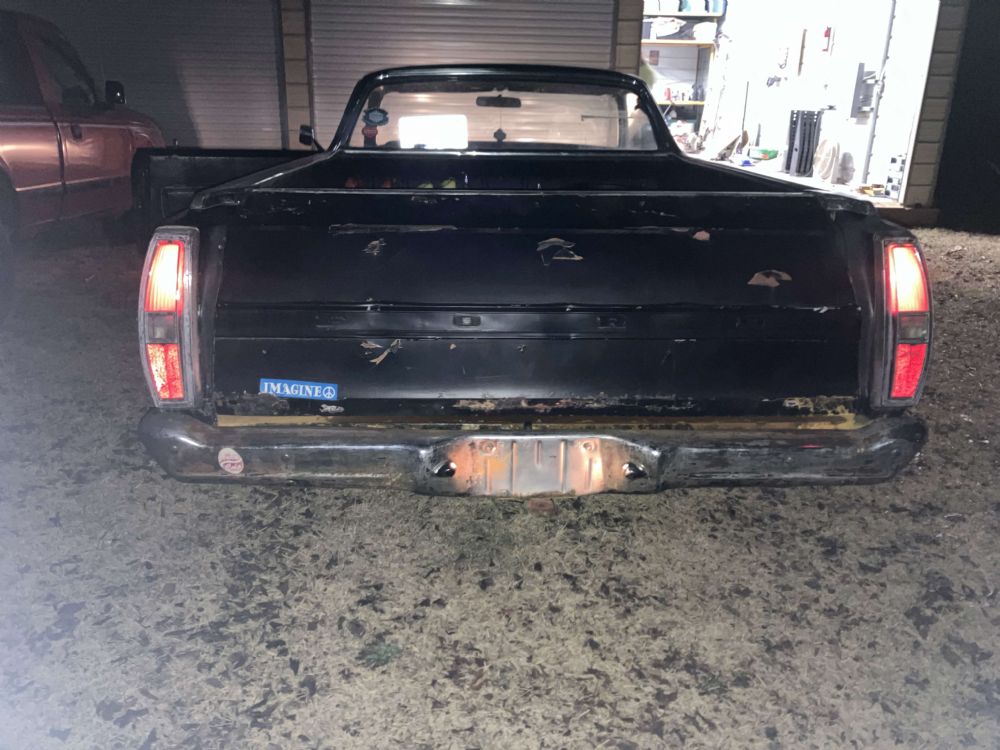 • Exterior shots with the lights working 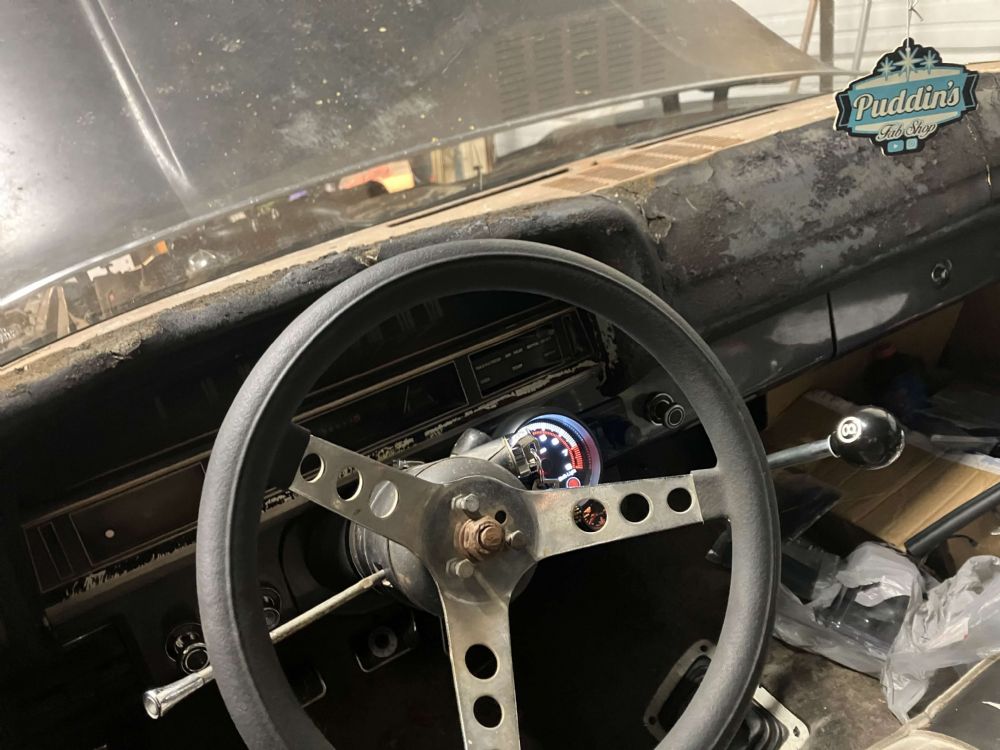 • Interior gauge setup Ignore the mess inside — it’s been a rolling toolbox for the past month. Planning to clean everything out soon so I can finally start driving and enjoying the car more regularly. Planning to take it home next weekend after a local car show with my dad and little brother. For the first time since I bought it, this Ranchero is starting to feel like a real car again instead of a constant project. More updates soon. Let me know what you think of the car so far, if there is anything you would recommend or change.
|
|
|
Thanks,
Joe |
|
|
|
|
Post Reply
|
|
| Tweet |
| Forum Jump | Forum Permissions You cannot post new topics in this forum You cannot reply to topics in this forum You cannot delete your posts in this forum You cannot edit your posts in this forum You cannot create polls in this forum You cannot vote in polls in this forum |


 Topic Options