Any advice is Appreciated
Printed From: The Ford Torino Page
Category: Model Specific Forum
Forum Name: Ranchero Forum
Forum Description: Technical discussion for Rancheros
URL: https://forum.grantorinosport.org/forum_posts.asp?TID=21167
Printed Date: 26-March-2026 at 3:20PM
Software Version: Web Wiz Forums 12.06 - https://www.webwizforums.com
Topic: Any advice is Appreciated
Posted By: Tinkergirl
Subject: Any advice is Appreciated
Date Posted: 09-March-2024 at 4:44PM
I am new. I inherited a 1972 Ranchero. I need to get it back on the road. I am the 3rd owner. Only 68k original miles. First thing, I need to replace the heater core, evaporator, and speaker while I have the dash out. This car has a a/c and I want it to run. Thing is I am clueless on how to get the dash out. Now don’t laugh.  My brother gave me this car. I want to restore it for him. I am an only girl who grew up in the seventies. Again don’t laugh. My first car was a 66 Chevelle. One of my oldest brothers and I built this car. So I am very mechanical. I just need some guidance please. My brother gave me this car. I want to restore it for him. I am an only girl who grew up in the seventies. Again don’t laugh. My first car was a 66 Chevelle. One of my oldest brothers and I built this car. So I am very mechanical. I just need some guidance please. Thanks in advance. Stacey
|
Replies:
Posted By: 72 RS 351
Date Posted: 10-March-2024 at 3:21AM
|
Welcome Stacey. There are no dumb questions about these old cars, even great mechanics will have tons of questions about such rare things. I haven't worked on my old Fords in decades really, I will have to figure out a lot myself. The dashes have many bolts that are a little hard to find. There are two main bolts on the sides behind the kick panel trim, the easiest to spot. There are several along the back edge of the top, going into the firewall. Take the dash top cover off first, several screws and it can be carefully lifted/pulled off. There will be many electrical connectors to disconnect from the dash, and several bolts going into the middle area, bracket etc. Go at it slow, take pictures before and during the process. The big key is to be easy with the dash, all of the plastic is thin and fragile. ------------- Don 73 Ranchero "Sport 72 front end", floor shift/console, planning EFI 7000 rpm 351 stroker 73 Ranchero GT 351C-4V &4R70W for sale later. 92 Lincoln Mark VII SE GTC, OBDII 347/4R70W |
Posted By: schufitz
Date Posted: 10-March-2024 at 4:20AM
Here is an exploded view diagram from 65-72 MPC. it's quite 'busy', but hopefully some help.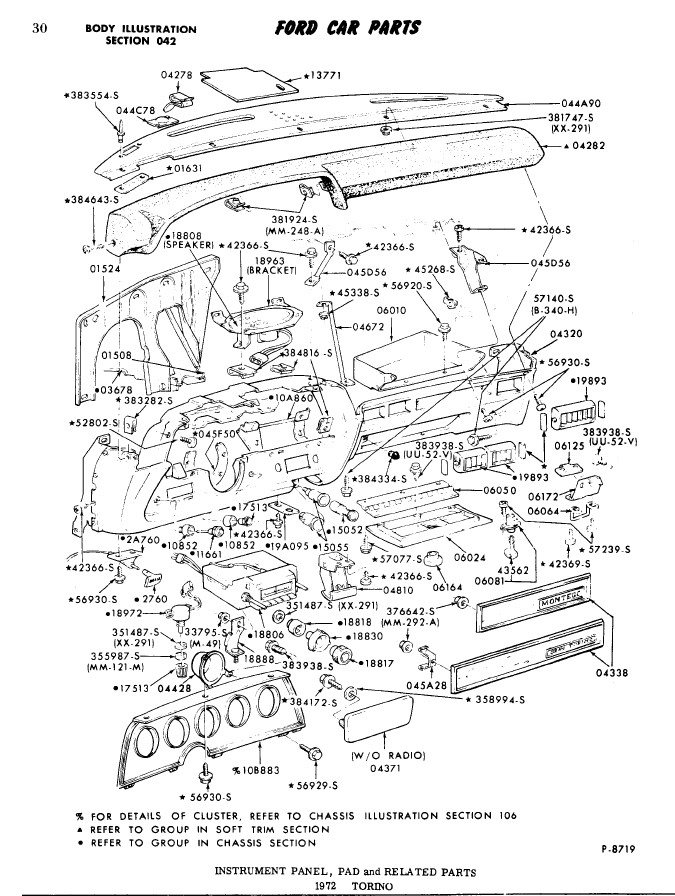 ------------- Dave 1969 Torino GT/351W 2V/FMX/Vinyl Top/Black Jade/Gold Stripes/Nugget Gold Buckets/Console/Racing Mirrors/AC/PS/PDB |
Posted By: Rockatansky
Date Posted: 10-March-2024 at 4:41AM
|
you got this. the top cover of the dash comes off 1st, don't miss the 1 screw on each end that you can only see with the doors open, and the screw on the top near the windshield. there are 2 slide clips under the dash top near the windshield that tend to hold on very firmly, it takes a good pull to get them to release. the glove box door comes off easy enough with a wiggle sideways to unhook the stop IIRC. if you need to remove the gauge cluster there's a speedo cable connector that uses a squeeze release, get that loose before anything else. from there it's pretty much just a matter of finding the fasteners and taking stuff apart. and yes the cluster housing plastic gets exceptionally brittle, be careful! ------------- 72 GT Ute |
Posted By: Tinkergirl
Date Posted: 10-March-2024 at 5:51AM
|
Oh my. You two have helped me so much. Waiting for the weather to break then I can get started. Thank you so much! May God richly bless you!
|
Posted By: Eliteman76
Date Posted: 17-March-2024 at 2:18PM
|
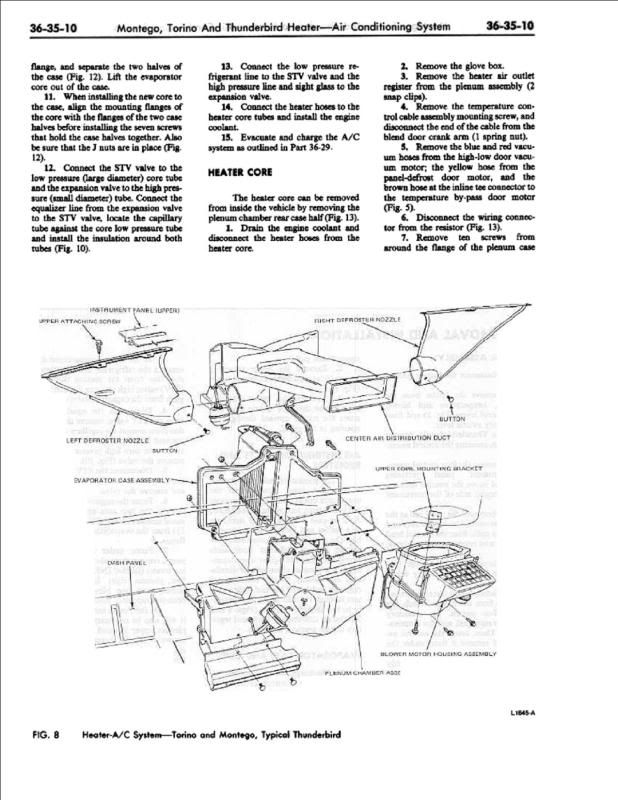
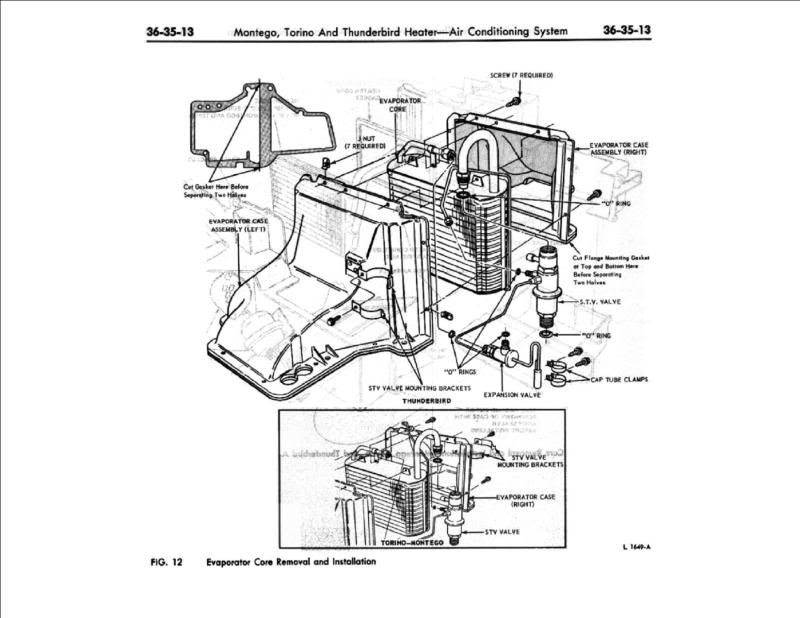
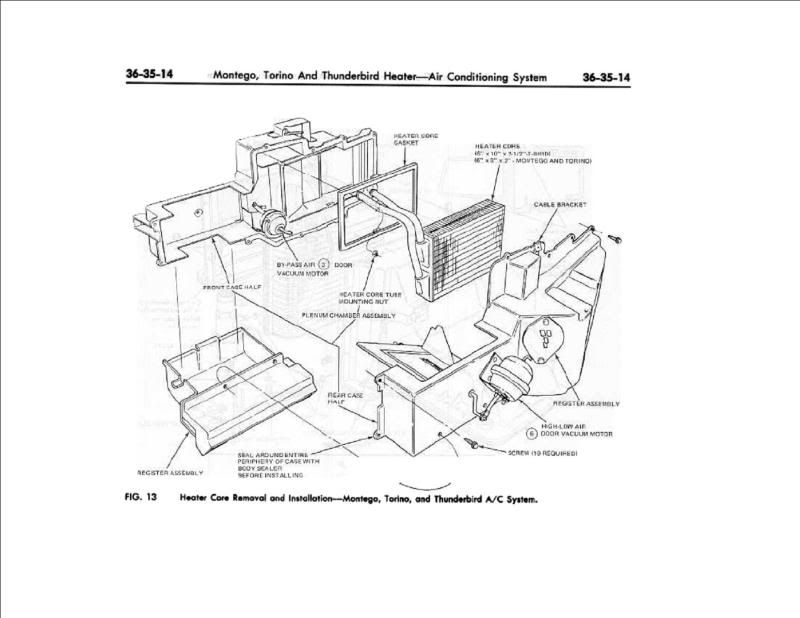
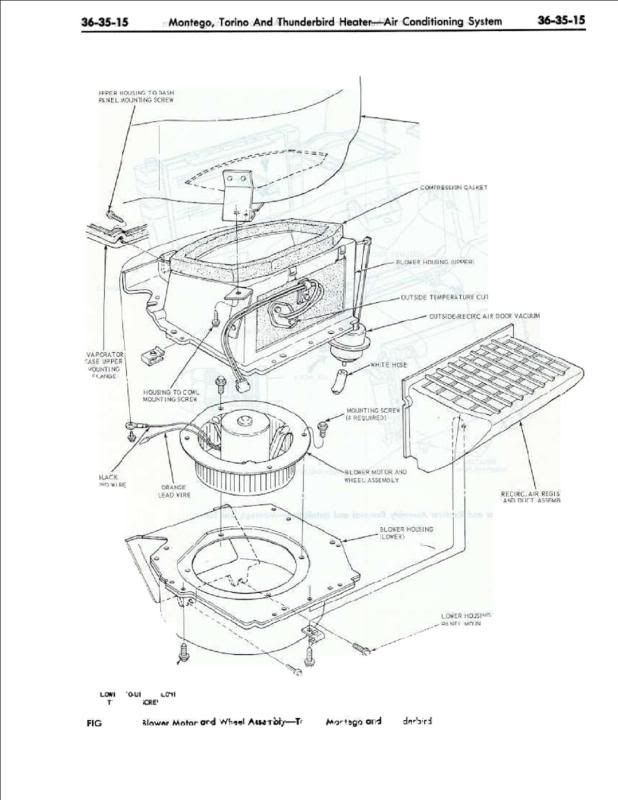
This will be a but long winded by me. Bear with me on this one. From memory basically the Process of dash removal: Stubby phillips screw driver, undo 2 screws for horn pad. Steering wheel retaining nut I think is an 11/16" or 3/4"? Will need a steering wheel puller. remove instrument cluster trim - Phillips screws three on top - there should be 5? screws on the bottom. Best to use standard length screw driver with magnetic tips. Remove dash pad - Phillips screws to inside area each side of the dash cluster trim ends of dash pad - you will want to check for Phillips screws on the outside ends. Passenger side of the dash, there will be a couple Phillips screws where the dash pad (top of dash) connects to the area/trim piece above the glove box. Like 2-3 screws. On the top of the dash, you will need a stubby Phillips screw driver. I use a right angle screw driver. Lowes has a Craftsman, otherwise Lang makes a nice set. These are handy for difficult areas. https://www.amazon.com/Lang-Tools-5220-7-Piece-Wrench/dp/B007TX0HS6/ref=asc_df_B007TX0HS6/?tag=hyprod-20&linkCode=df0&hvadid=312003160272&hvpos=&hvnetw=g&hvrand=5565111869421926466&hvpone=&hvptwo=&hvqmt=&hvdev=c&hvdvcmdl=&hvlocint=&hvlocphy=9023984&hvtargid=pla-491699913040&psc=1&mcid=693a94fcd6743112a564ba25d374fa91&gclid=Cj0KCQjwqdqvBhCPARIsANrmZhNgyA8epRlFlOYH8-V57RlKI3JX83szZ-dGn-Dzhfm9wBkIdKlPKu4aAiVKEALw_wcB" rel="nofollow - https://www.amazon.com/Lang-Tools-5220-7-Piece-Wrench/dp/B007TX0HS6/ref=asc_df_B007TX0HS6/?tag=hyprod-20&linkCode=df0&hvadid=312003160272&hvpos=&hvnetw=g&hvrand=5565111869421926466&hvpone=&hvptwo=&hvqmt=&hvdev=c&hvdvcmdl=&hvlocint=&hvlocphy=9023984&hvtargid=pla-491699913040&psc=1&mcid=693a94fcd6743112a564ba25d374fa91&gclid=Cj0KCQjwqdqvBhCPARIsANrmZhNgyA8epRlFlOYH8-V57RlKI3JX83szZ-dGn-Dzhfm9wBkIdKlPKu4aAiVKEALw_wcB You will need to pull the kick panels on both A pillars. two Phillips screws. Undo the top one. Undo lower screw. Likely will need a flashlight or light to see both. Unscrew screws off door sill plates in door jamb. Remove the sill plates from both left and right side cars. The kick panels, lift the bottom and pull inwards towards the transmission tunnel. Be gentle here, the A pillar trim above the dash tends to break off if one gets a bit rough during removal. Open the glove box door. There are a couple Phillips screws that hold the glove box liner. You should be able to drop the fan box for room. I need to find my manuals for specific instructions. I don't have the manual set saved on my new computer. I do suggest going on eBay and getting an actual paper manual set, these are something well worth buying. https://www.ebay.com/itm/394410141210?itmmeta=01HS7D0D0FH4PJYSMTK7H1MHZQ&hash=item5bd4ad261a:g:c9IAAOSw13hjuIuE&itmprp=enc%3AAQAJAAAA0Ka7vvN4P05o1wXVahPGBKdNfEHrKwjz6eWAhf23yTElSUf0ka7pSxcFXO6JU3veMxfdsfQ6491hC8lg4IJYXjIvYY2NNuUmxvzoZKVbK6Gq9qbXDAr7CSRvUAYoIAxdPxe9nCY7ar3pDV7BUJ5gq%2Be35z7FvphOHfe9haeDzy%2FJWGvZyTafFqj4NTsA8IwxFLeZxXZLkUU7Tw1BW%2FSb0L6SJQajaqoemIl%2FaqEfbJrx3Gb8ieUIpWl4P9pZ5Nc9PKMVgrT1RbMsg8mTp%2FYgfik%3D%7Ctkp%3ABk9SR8zQge3JYw" rel="nofollow - https://www.ebay.com/itm/394410141210?itmmeta=01HS7D0D0FH4PJYSMTK7H1MHZQ&hash=item5bd4ad261a:g:c9IAAOSw13hjuIuE&itmprp=enc%3AAQAJAAAA0Ka7vvN4P05o1wXVahPGBKdNfEHrKwjz6eWAhf23yTElSUf0ka7pSxcFXO6JU3veMxfdsfQ6491hC8lg4IJYXjIvYY2NNuUmxvzoZKVbK6Gq9qbXDAr7CSRvUAYoIAxdPxe9nCY7ar3pDV7BUJ5gq%2Be35z7FvphOHfe9haeDzy%2FJWGvZyTafFqj4NTsA8IwxFLeZxXZLkUU7Tw1BW%2FSb0L6SJQajaqoemIl%2FaqEfbJrx3Gb8ieUIpWl4P9pZ5Nc9PKMVgrT1RbMsg8mTp%2FYgfik%3D%7Ctkp%3ABk9SR8zQge3JYw Side notes: Pulling the entire dash out of the car isn't bad however disconnecting the electrical harness can be a real pain in the backside at times. Disconnect battery Disconnect the wiring from the firewall takes a little effort but not bad. The bulkhead connector had two 3/8" hex head bolts. Unscrew the single bolt off each harness plug. Grab the block of the connector. Try to not yank on the wiring. On the firewall bulkhead connector, two small regular screw drivers (flat blade) to gently push the retaining clips on each side of the bulk head. two per plug. Gently push the block into the car on one side. Repeat the process for the other side of the block. The bulkhead connector will pop into the passenger compartment. I typically pull and disconnect the HVAC control head (heat vent AC control panel) This means disconnecting the control cables. Wiring harness connectors. Some clips are sort of a pain. Small regular flat blade screw driver, etc. Disconnect wiring going to E brake/parking brake cable There is a panel under the driver's floorboard carpet. Flip back the carpet. Four Phillips screws. There will be two plugs to disconnect. There also the door jamb light switches that need to be unplugged. Reason for doing all this is to unbolt the dash and pull with the harness complete with the dash. At the same time, it's a really good idea to fully inspect the dash harness. The dash harness can suffer melt downs on the fan switch plug, and the fan harness blower motor plug. The fan power wire if it's never been messed with will have a single plug on the orange wire. Fan Ground wire uses a 5/16" hex. The dash shell will require popping retaining pins on the HVAC duct work from the dash shell (retains plastic tubes to the dash vents on the passenger side of the dash. Driver side, a couple Phillips screws and pull the black vent on the far left side of the dash. The instrument cluster has 4 Phillips screws. On the back side, there are a couple connectors and light bulb sockets to carefully twist out of the dash. Handle the cluster carefully. These can literally turn back to dust due to being made from cornstarch material. You will need to pull the black vent from behind the cluster, to gain easier access from the top of the dash. There is a clip retaining the speedometer cable to the cluster. Sometimes you can take and pinch with fingers to release the retaining clip from the back of the speedometer. I sometimes use pliers to gently squeeze to release the cable. Pull the cluster. Other items, dash shell is held in with four 9/16" hex bolts. two up high, two at the bottoms of each end of the bottom of the dash (have to pull the kick panels to see these) One other bolt is in the center bottom of the dash over the transmission tunnel, 1/2" text bolt. Remove this bottom center bolt before the other bottom two. I typically sit on the seat, and gently roll the dash into my lap after carefully pulling over the steering column. Heatercore replacement, you will need to go in the engine bay. Disconnect the heater core hoses. There are a couple 3/8" bolt/screws that screw into the heater core box to the firewall from the engine bay side of the firewall. Down low bottom of the box. Inside the dash, there are a couple more 3/8" bolts. There will also be some vacuum lines that need disconnecting. You can remove the housing. Be aware the thing will dump antifreeze if tilted tube downward. (The tubes that go through the firewall). The housing for the heater core has a bunch of 1/4" hex head screws. Best to use a hex driver, avoid prying this housing apart or it can break. There will be a couple Dampener doors connected to vacuum motors. Not hard to take apart, just keep in mind during disassembly. I'll see what I can find on the pages and post the actual instructions though here in a bit. -------------  Andrew:GTS.ORG admin, '72 Q code 5 speed Restomod Andrew:GTS.ORG admin, '72 Q code 5 speed RestomodPondering: #99Problems |
Posted By: Eliteman76
Date Posted: 17-March-2024 at 2:28PM
         ------------- Andrew:GTS.ORG admin, '72 Q code 5 speed RestomodPondering: #99Problems |