1976 S&H LE Gran Torino
Printed From: The Ford Torino Page
Category: Model Specific Forum
Forum Name: Starsky & Hutch
Forum Description: Technical discussion for original and replica S&H Torinos
URL: https://forum.grantorinosport.org/forum_posts.asp?TID=6228
Printed Date: 26-March-2026 at 11:02AM
Software Version: Web Wiz Forums 12.06 - https://www.webwizforums.com
Topic: 1976 S&H LE Gran Torino
Posted By: Paul W
Subject: 1976 S&H LE Gran Torino
Date Posted: 14-November-2011 at 7:48AM
| So...this thursday we are finally going to start the project of restoring it. The first thing we are going to accomplish is cleaning it out. While we are cleaning i am going to be looking for the original build sheet. I am hoping to find out that it is a true Startsky and Hutch edition. After that, we are going to figure out if the motor works. It only has 42k miles on it, but has been sitting not running for 20+ years. We are going to start with the mystery oil down the spark plug holes, and replacing the plugs and wires. Any suggestions besides that? |
Replies:
Posted By: Psquare75
Date Posted: 14-November-2011 at 8:05AM
|
change the oil and filter. Pull the distributor and prime the oil pump. (making sure to keep in mind the location of the rotor and distributor). I wouldn't even bother with the fuel tank.. run a hose to a 5 gallon catch can from the inlet on the fuel pump, and run it that way.
------------- Paul 77 XR7 460/C6/3.00:1 *SOLD* 78 XR7 523/C6/3.5:1 79 F100 460/TKO500/3.25:1 'I also have some left over potatoes-I understand you can generate electricity from them'- Foote500 |
Posted By: Guests
Date Posted: 14-November-2011 at 10:12AM
|
look under the back seat for the build sheet as Paul said ,disconnect the fuel hose from the fuel pump leading to the fuel tank,then get yourself about 18 inches of fuel hose and attach the one end onto the fuel pump and then take a small 1.5 -2 gal gas can with fuel and shove the end of the fuel hose in the gas can and try starting it off that as it will make sure that you are getting good clean fresh gas with no rust particles to clog the fuel filter on the carb. I would replace the fuel filter on the carb with a new one before starting as who knows if the old one is clogged.Valve seals may be toast from sitting that long but won't effect it from starting but they may need repalacing later after you find out if the engine still runs or not |
Posted By: Ranchero Fan
Date Posted: 14-November-2011 at 1:47PM
------------- Brian 1973 Ford Ranchero Big Block. ''THE OTHER WOMAN'' |
 Psquare75 wrote:
Posted By: Paul W
Date Posted: 17-November-2011 at 11:57AM
| I will be putting the marvel in the plug holes when i get to that point. today i found the build sheet, whats left of it. and i changed out the rims and tires to something that hold air. |
Posted By: Paul W
Date Posted: 17-November-2011 at 11:58AM
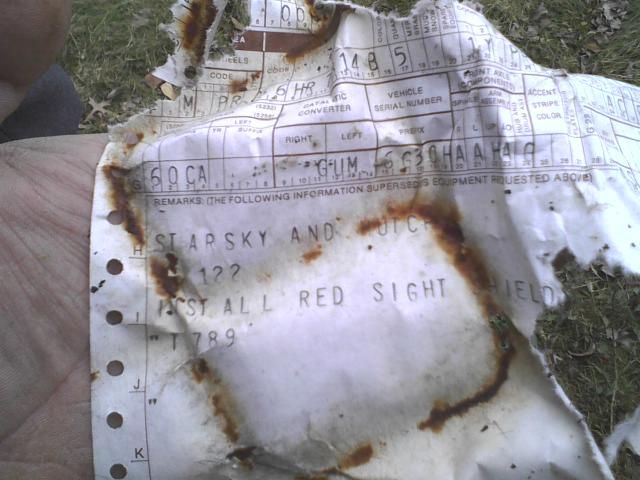 This is what i found today for whats left of the build sheet. This is what i found today for whats left of the build sheet.
|
Posted By: picon3
Date Posted: 17-November-2011 at 12:52PM
|
Often there is/are more than one build sheet. Keep looking. BTW, that's great you at least found a partial one with all of the goodies listed on the bottom. Paul~ ------------- 1972 GTS 351CJ-4V black/black |
Posted By: Paul W
Date Posted: 17-November-2011 at 1:10PM
| do you know where the normal spots are i should look for another one? |
Posted By: interceptor460
Date Posted: 17-November-2011 at 9:55PM
| Two ohter places I found build sheets were in the trunk under the mat near the spare and under the front seat. It is not for certain in your car ,but its worth a look. Place what you got of the build sheet in sheet protector. If it been seating out doors the gas pump will have dried up and not work ,so to the carb. I hope it still turns freely. |
Posted By: Guests
Date Posted: 18-November-2011 at 9:06AM
|
I have heard some say they found build sheet inside the front seat the upholstry like under the seat back are of the front seat.not that you want to start removing the seat cover just to find if one is there as if the seat is not ripped you don't want to take a chance just to see if one exists there how about posting a few photos in this thread of the StarsKy & Hutch car as all the photos are in your welcome thread. I'm also gonna change the name of this thread now you now it is actually and S&H limited edition |
Posted By: unlovedford
Date Posted: 19-November-2011 at 11:12AM
|
My '72 GTS had a build sheet in the front upper seatback under the springs. Would have never found it if we had not torn the cover when scrapping it. ------------- Joe 1972 Mom's Squire Wagon 1972 Torino Wagon 1976 Torino 1968 Cougar XR7-First batch 1972 Torino 460 1989 BroncoII/Jeeps/Titanimous Popeye and Brutus (Rams) |
Posted By: Paul W
Date Posted: 07-December-2011 at 4:33PM
|
Sorry i havent updated in a while. but here is what has happened. We aquired a matching set of rims that were on a 72 mach1 with tires for $100. Last weekend we installed them and this is what they look like. The same day i also tried to remove the spark plugs to see how bad they are. But they didn't move at all. A bunch of people told me different ideas on how to remove them, but we went with using PB Blaster on them to try and lossen them. This saturday, 12-10-11, i will be trying to remove them again. I will update again then. The first picture is of the new rims. look how wide the back ones look!! The second one is what the from seat looked like the day we decided to move it. 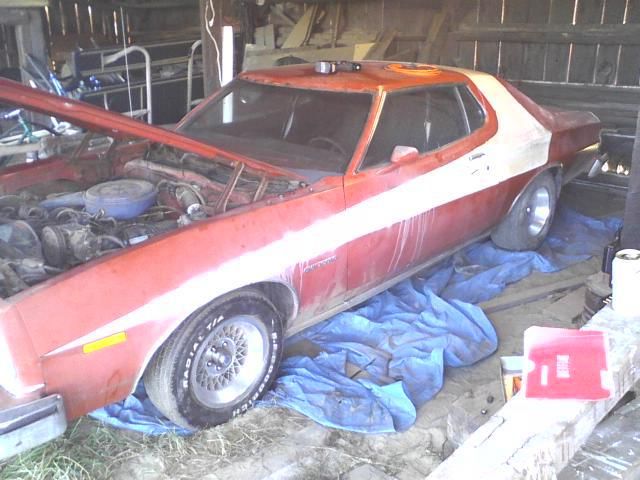  |
Posted By: TV 2M8O
Date Posted: 08-December-2011 at 9:57PM
|
Paul, First, welcome to the forum and congrats on a great find! I had one of the factory S&H LE back in the day and had her for years until one day I had a brain fart and sold her... she hadn't moved three feet when I realized I had made a BIG mistake, so I'm currently building a new one!! Anyway, look forward to watching your progress.
I agree with John's (75GranMan) comment on you "Hurting 1976 Torino" topic that the engine has been replaced because none of the other AC parts are present in your engine bay... dehydrator, refrigerant lines nor the condensor box on the firewall. Does the heater control mention Air Conditioning? Both my cars have been AC cars so I'm not 100% sure what the heater control panel would say on a non-AC car. Losing the York compressor and associated bracketry will save you a BUNCH-O-WEIGHT!! Does the engine decal say 1976 model year?
Again GOOD LUCK on your build... I'll be watching! -------------  TV 2M8O OUT JOE 1976 Gran Torino S&H season 2-4 Clone Project Blog: http://tv2m8o.blogspot.com/ |
Posted By: Paul W
Date Posted: 09-December-2011 at 1:08AM
Where is the decal i should look for? it this what i should get a better picture of?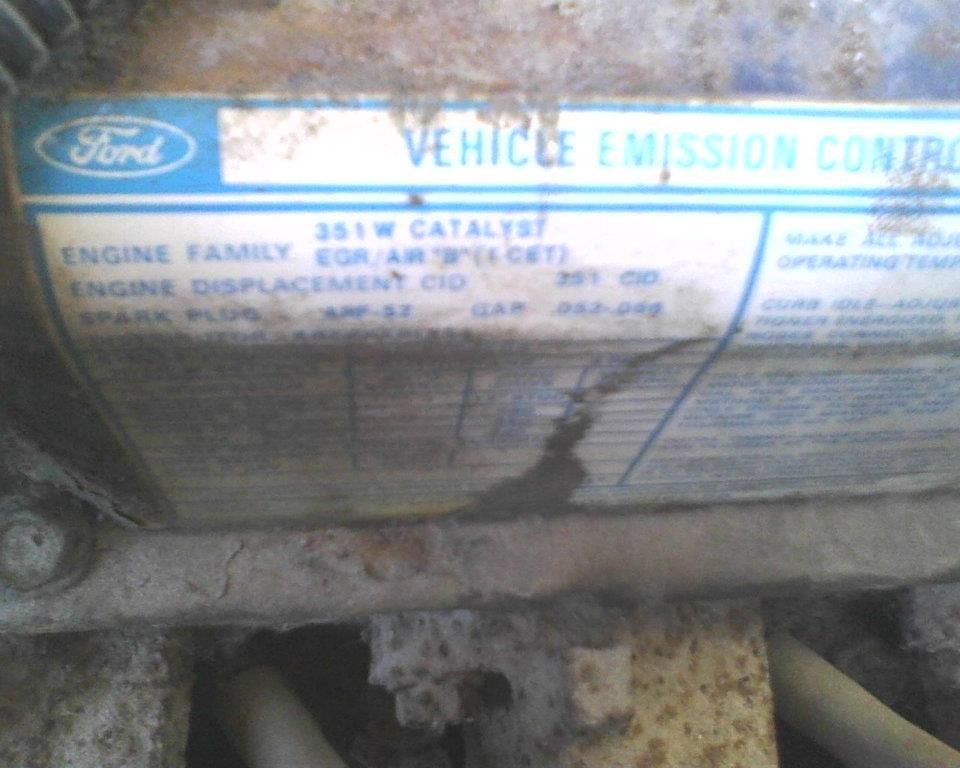 |
Posted By: TV 2M8O
Date Posted: 09-December-2011 at 1:59AM
|
Paul, Yup, that's the decal. In the lower left corner it should specify the year of the engine. Was going to attach a reference pic but can't get it to upload....
Hope this helps! ------------- TV 2M8O OUT JOE 1976 Gran Torino S&H season 2-4 Clone Project Blog: http://tv2m8o.blogspot.com/ |
Posted By: Paul W
Date Posted: 09-December-2011 at 7:03AM
We framed the build sheet. Here is what it looks like.
 |
Posted By: Psquare75
Date Posted: 09-December-2011 at 7:36AM
 ------------- Paul 77 XR7 460/C6/3.00:1 *SOLD* 78 XR7 523/C6/3.5:1 79 F100 460/TKO500/3.25:1 'I also have some left over potatoes-I understand you can generate electricity from them'- Foote500 |
Posted By: Paul W
Date Posted: 09-December-2011 at 7:49AM
| I dont remember what is in there, but i will bring my camera with me tomorrow and take a bunch of new pictures. The really nice thing is, the headliner(to me) looks to be in really good condition. It just needs to have a couple spots fixed up on the seems. |
Posted By: TV 2M8O
Date Posted: 09-December-2011 at 9:32AM
|
Here is a reference engine decal... lower left corner specifies year of certification. 1977 in this case
 Hope this does the trick. ------------- TV 2M8O OUT JOE 1976 Gran Torino S&H season 2-4 Clone Project Blog: http://tv2m8o.blogspot.com/ |
Posted By: Paul W
Date Posted: 10-December-2011 at 9:21AM
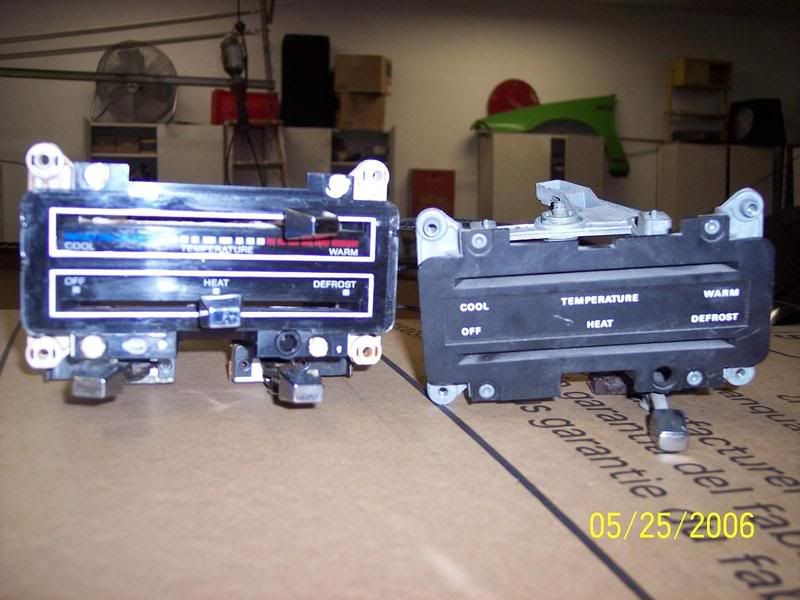
ok, so we were finally able to get a spark plug out. I am going to try to work hard to get the rest out before it gets to cold to do anything. i was able to get a couple pictures for you guys. My friend looked at the car and said that there is an a/c installed in the car with not really correct a/c tubes. The ac control on the inside is completely seperate from the other temperature controls. And the sticker on the valve cover says 1976 on it. i couldnt get a good picture of it really.   |
Posted By: Ranchero Fan
Date Posted: 10-December-2011 at 9:58AM
|
Your car wasn't a factory A/C car, as it would have, as metioned above, the black plastic box on the firewall containing the evaporator & such. And your heater control head would have the A/C designation. Your A/C that you have was most likely Dealer installed, a popular option, back in the day. My '74 Ranchero gt was such, & had the 2'' thumb type wheels (on-offf & speed, temp settings) by the center vent registers. Also, factory A/C vech. did not have manual cable controled fresh bair vents, where the non A/C vech. did.(a knob on the lower dash on each side by the kick panels) ------------- Brian 1973 Ford Ranchero Big Block. ''THE OTHER WOMAN'' |
Posted By: Paul W
Date Posted: 10-December-2011 at 10:17AM
| yeah, the ac control is on the right side oposite of the other controls |
Posted By: occupant
Date Posted: 11-December-2011 at 6:03AM
|
See you've got the best of both worlds. Strong factory heater and vent and defrost. Manual fresh air vents which work GREAT when you're moving. And then the air conditioner you can flip on when it's just too darn hot or you're not rolling. Sweet. ------------- 15 Cruze LT, 145K, for the wife 08 Uplander LS, 280K, broken again 08 Explorer EB, 248K, backup work car still looking for another something |
Posted By: Paul W
Date Posted: 11-December-2011 at 11:16PM
|
So my question for the day for everyone is....As i and removing things i am bagging and tagging everything. Should i be cleaning the original nuts and bolts? Or should i toss them and get new ones? Also, the carburetor. Would something like http://www.jegs.com/i/Holley/510/0-4412CK/10002/-1?parentProductId" rel="nofollow - http://www.jegs.com/i/Holley/510/0-4412CK/10002/-1?parentProductId = be an ok replacement? or should i be trying to rebuild this one?
|
Posted By: TV 2M8O
Date Posted: 12-December-2011 at 12:24AM
|
Paul,
If you are trying to maintain originality, I would clean up the old hardware, unless it is really corroded and beyond reuse. At that point look for new pieces. Same goes for the carb.
Bagging and tagging is a good idea as well as taking pictures as you disassemble. Sometimes, the memory isn't always the best assembly manual!
If originality is not an issue, the skys the limit!
Just my 2 cents.... ------------- TV 2M8O OUT JOE 1976 Gran Torino S&H season 2-4 Clone Project Blog: http://tv2m8o.blogspot.com/ |
Posted By: Paul W
Date Posted: 12-December-2011 at 12:31AM
| The owner did say he want to do things original. If i endup cleaning things up, what should i use to do it? |
Posted By: Psquare75
Date Posted: 12-December-2011 at 2:40AM
|
My method... I read this ideas somewhere and they seem to work. (edit: I didn't think this would be so long!)
Bolts. Take a wooden wire brush, http://www.chinatraderonline.com/Files/Household/Bathroom-Toilet-Accessories/Toilet-Brushes/European-Style-Wire-Brushes-20542228752.jpg" rel="nofollow - [ img]http://www.chinatraderonline.com/Files/Household/Bathroom-Toilet-Accessories/Toilet-Brushes/European-Style-Wire-Brushes-20542228752.jpg[/img] and mount it in a bench vice, teeth up. Take a bolt, mount it it in a drill as if it were a drill bit, and run it against the wire brush. To clean up the threads, flip the bolt around in the drill by chucking the head and running the threads against the brush, *warning*.. makes a mess of the bench over time.. and your face. wear glasses. Nuts.. Take a matching bolt mounted in the drill, thread side out, and spin the nut on it about 1/3 of the way down (make sure the threads are engaged fully on the nut.) Run this against the wire brush *slowly*. Run it clockwise, so the nut will tighten, and not loosen, taking off like a rocketship if it spins off, lol. Paint prep. Take this cleaned hardware and a clear, empty, clean, 3l bottle of soda. (They still make 3 liters, look for store brand soda). Get something like this  You really can only do a few at a time, but when I did my bolts, I painted them 'baggie at a time' to keep them in order and they went from paint to installation.. But anyway. Put the bolts and nuts in the bottle.. fill the bottle a bit, up past the level of the hardware. cap it, and shake for 30 seconds or so. Get another empty 3l bottle of soda and a small funnel (NOT FROM THE KITCHEN!  ). Mount the funnel in the empty bottle, pour the 'hardware' into the funnel. You should end up with a funnel full of bolts and nuts, a bottle of dirty cleaner, and an empty bottle. ). Mount the funnel in the empty bottle, pour the 'hardware' into the funnel. You should end up with a funnel full of bolts and nuts, a bottle of dirty cleaner, and an empty bottle. Wipe off the hardware with a clean rag (old tshirts work fine in this case.), then on to paint.. if you wish. Repeat as needed with new hardware. The cleaner can be reused many times, Until it's no longer transparent. Notes #1. The whole funnel/bottle step is designed to keep the cleaner off your hands, and make it a little neater.. Also makes the cleaner reuseable. #2. This method will ruin the cad coating on bolts if you aren't careful.. Depending how bad it is, sometimes I just go right to the bottle and not the drill, if the color of the hardware is a concern. #3. If you ruin the cad coating, there is a paint process that simulates it fairly well, but that's another story. ------------- Paul 77 XR7 460/C6/3.00:1 *SOLD* 78 XR7 523/C6/3.5:1 79 F100 460/TKO500/3.25:1 'I also have some left over potatoes-I understand you can generate electricity from them'- Foote500 |
Posted By: unlovedford
Date Posted: 12-December-2011 at 3:04AM
|
Great hints, Paul! ------------- Joe 1972 Mom's Squire Wagon 1972 Torino Wagon 1976 Torino 1968 Cougar XR7-First batch 1972 Torino 460 1989 BroncoII/Jeeps/Titanimous Popeye and Brutus (Rams) |
Posted By: Paul W
Date Posted: 14-December-2011 at 8:02AM
|
update: we have finally removed all the spark plugs and placed marvels mystery oil down their holes. our next step is to try to hand crank it. my question is do i need to remove the fan to get to the bolt? and also do you have any clue what the size socket i would need would be? cant wait to see all that oil come shooting out. after that are plans for and oil change with new filter and change the plugs and wires. it also looks like i need to replace all the wires that go to the celanoid. would that be easy to purchase or should i make them? sorry for allthe question. the snow has been holding off. and the longer it does, the more i will work on it. |
Posted By: Psquare75
Date Posted: 14-December-2011 at 8:13AM
|
No, you should be able to do it with the fan in place. Not sure what the size of it is. Which wires are you referring to, the starter solenoid? Pics would be helpful. ------------- Paul 77 XR7 460/C6/3.00:1 *SOLD* 78 XR7 523/C6/3.5:1 79 F100 460/TKO500/3.25:1 'I also have some left over potatoes-I understand you can generate electricity from them'- Foote500 |
Posted By: mcford
Date Posted: 14-December-2011 at 1:51PM
|
15/16" and yes you should be able to get on it with the fan still on although it would be easier with it off. ------------- Mike |
Posted By: Starsky74Torino
Date Posted: 28-January-2012 at 4:28AM
|
Hi, congats on finding the limeted edition Starsky & Hutch... will look forward to seing your finnished project..
if you need info on your car contact John Q at starskytorino.com he has lots of them listed on his website and is very helpfull..
im sure you are a long way from thinking about rear suspension but if you have air shocks back there they are a pain so I replaced my rear springs for station wagon springs and got a real nice rake and she rides and handles better.. autozone house brand part # RCS 803V $88.99 pair and I put Moog isolators top and bottom.
best of luck
Justin
|
Posted By: Paul W
Date Posted: 28-January-2012 at 9:26PM
|
I cant wait for it to be driveable. its going to be fun. right now we aren't going to be do any major changing because of it being the limited edition and because of money. We did apply power to the solenoid and all that happened was it "clicked" alot. Yesturday we removed the fan and guard to get to the balancer. I am planning on trying to acctually turning it on thursday. It sucks on how slow we are going, but the weather and time is our big issue.
|
Posted By: antlerfiend
Date Posted: 28-January-2012 at 11:25PM
|
Congrats on your S&H find. The more I look at these cars the more I want one. Looking forward to watching the build. ------------- Alex 72 GTS (Morgan's Baby) 68 CJ Drag Car Clone 65 Mustang (first car) 77 LTD II (Drag Car) 78 Mustang II V6 4 speed |
Posted By: Paul W
Date Posted: 01-February-2012 at 4:44PM
| We were finally able to manually crack the motor today. Didnt do anything for a few minutes, then it just went pop and moved freely. Since it is still on the cold side, we are going to keep adding the mystery oil and hand cranking it for the next few weeks just to make sure it is well lubed inside. After that we are going to do the oil change, remove the starter and try to have it fixed, and bring the altinator to autozone for the free testing. |
Posted By: Starsky74Torino
Date Posted: 02-February-2012 at 3:33AM
|
Hi Paul, I hope im not repeating previous advice but before you ever try to fire her up make sure you have rotated the crank not just back and forth bot forward at least 50 (or more if you are patient enough).. what happens is moisture will form rust on the cylinder walls and although it turns round it needs to be gently worn off by slow rotating or it will cause a lot of damage when fired up... I have seen a lot of people end up having to rebuild because of it.
all the best
Justin
|
Posted By: unlovedford
Date Posted: 02-February-2012 at 3:36AM
|
Agreed! ------------- Joe 1972 Mom's Squire Wagon 1972 Torino Wagon 1976 Torino 1968 Cougar XR7-First batch 1972 Torino 460 1989 BroncoII/Jeeps/Titanimous Popeye and Brutus (Rams) |
Posted By: Paul W
Date Posted: 02-February-2012 at 5:46AM
| thats is what i am doing today. My buddy was able to rotate it yesturday, but today i will be doing it again with more oil. |
Posted By: Paul W
Date Posted: 02-February-2012 at 8:39AM
| Well, i added more mystery oil and was able to crank the motor from one side of the engine bay to the other 3 times in one direction. I also took off the altenater and took it to autozone. They tested it as being a working one!! |
Posted By: unlovedford
Date Posted: 02-February-2012 at 8:47AM
|
When you get ready to hit it with the starter, make sure all the plugs are out so that it will spin easier and blow out all the gunk. That will also bring your oil pressure up if you crank long enough. I hope whatever went POP was not a ring or associated part! ------------- Joe 1972 Mom's Squire Wagon 1972 Torino Wagon 1976 Torino 1968 Cougar XR7-First batch 1972 Torino 460 1989 BroncoII/Jeeps/Titanimous Popeye and Brutus (Rams) |
Posted By: Paul W
Date Posted: 02-February-2012 at 8:54AM
| My buddy said that it wasnt moving and then when pop. Since it hasnt been started in something like 25+ years i figured it was stuck a little bit. We ended up unloading almost 1 gallon of the mystery oil in it over a few weeks. When i cranked it today, all the fluid did come shooting out. |
Posted By: Paul W
Date Posted: 01-August-2012 at 5:08AM
Well...we are finally starting in the correct direction. Over the past 6+months we have been is a battle with the cars owner about what needs to be done. He has finally agreed to let me move it again and this time its going to a shop near my house. Within the next week the engine should be wired enough to acctually start.
 |
Posted By: 75GranMan
Date Posted: 01-August-2012 at 2:24PM
|
Paul,hopefully you'll get it fired up soon,whats the story with the ownership of this car,are they a relative?most guys would only resto a project like this on their own car.keep us updated with pix and progress. ------------- John 75Gran Torino 4spd  |
Posted By: Paul W
Date Posted: 01-August-2012 at 3:30PM
|
The plan is now that it is up at my buddies shop we will have the ability and tools to get the motor acctually wired and able to start. The father of my friend is the one who owns the car. He has given us the go ahead to make the decisions on it now. I had been pushing for it to move to the shop because it wasnt getting anything done. One reason i am helping with this resto is that i have always wanted to do something to a car for a long time. when this opportunity came up i jumped on it and kept pushing about it. The other reason is i wanted to help a friend remember his child hood when his dad would drive him in it. The hope was to get it running for his wedding so he could leave it in it like his parents did theirs. but that doesnt look like it will happen at this point. since we have it at the shop we are doing the wiring and body work with the few materials we have at the moment. Right now our budget is very low, so we are going to have to take our time anyways. Next couple weeks i should hopefully have pics and maybe video of it starting up. First time since 1992.
|
Posted By: Paul W
Date Posted: 02-August-2012 at 11:40AM
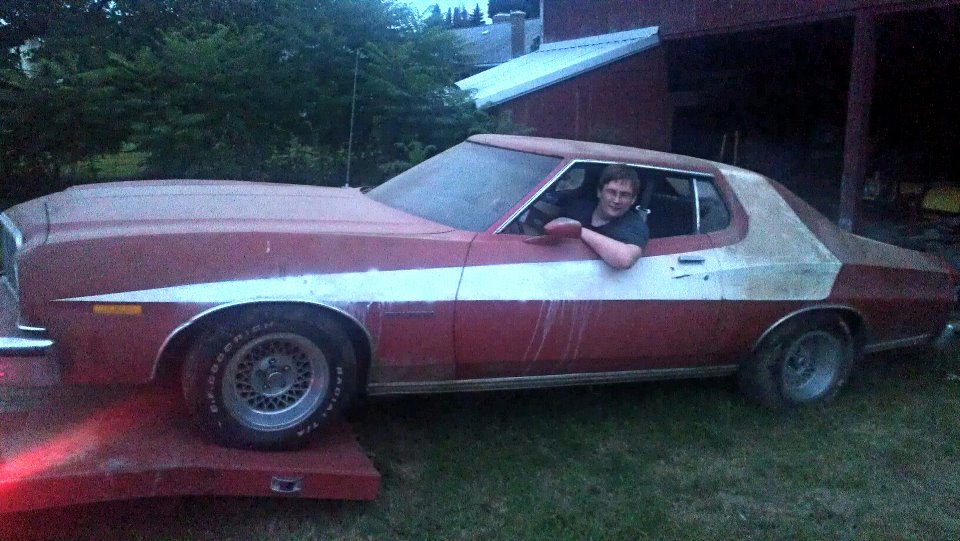
We got a temp wiring setup for the solenoid to try to get any juice through the system. There was nothing. We are replacing the solenoid and replacing the starter while we are at it. I have a picture of that and the back tire which i think is great. Looks like it is the widest it can take. What do you guys think?  |
Posted By: Srandaz2
Date Posted: 02-August-2012 at 4:01PM
|
Looks good ......for a 25 yr sleeper....how's the frame? ------------- Steve |
Posted By: Paul W
Date Posted: 02-August-2012 at 11:40PM
| I was told that the frame looks decent for having been in a sand field for the last 15 years. And even some of it still has the factory coating still on it. Body on the other hand needs work. The battery was left in it, leaked, and took out the battery box, inner fender and radiator support. So right now we are looking for donor pieces for it. |
Posted By: Srandaz2
Date Posted: 03-August-2012 at 4:49AM
|
I think i know where to find an inner Fender not sure how much they want - I do have a Rad Support from a 76 I think i can part with for $125 - not sure how much it costs to ship it though ------------- Steve |
Posted By: Paul W
Date Posted: 03-August-2012 at 5:26AM
| Let me know, we might not be able to afford it until late september. |
Posted By: Paul W
Date Posted: 16-April-2013 at 12:39PM
| update: After a long amount of time we finally have some sort of money to do things with. At the local salvage yard we found a 1976 ranchero. We are planning on purchasing it to use as a parts car for our torino. Once we get what we need, is there anything anyone might need? |